background image

Solenoid Operated, Relief and Logic Control Cartridge Valves (continued)

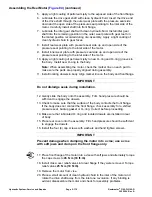
6. Reinstall the cartridge valve into the manifold:

A. Lubricate new O-rings and backup rings of seal kit with clean hydraulic

fluid and install on cartridge. The O-rings and backup rings must be
arranged properly on the cartridge valve for proper operation and sealing.

IMPORTANT

Use care when installing cartridge valves. Slight bending or
distortion of the stem tube can cause binding and malfunction.
Make sure that the deep well socket fully engages the valve base.

B. Lubricate threads on cartridge valve with clean hydraulic oil. Thread

cartridge valve carefully into correct manifold port. The valve should
go in easily without binding.

C. Torque cartridge valve using a deep well socket to specification shown in

manifold illustration.

7. For solenoid valve, install solenoid coil and O-rings (if equipped) to the

cartridge valve. Torque nut to specification shown in manifold illustration.

8. If problems still exist, remove valve and clean again or replace valve.

Rotary Cartridge Valves

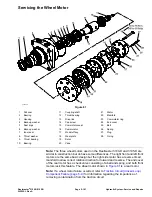
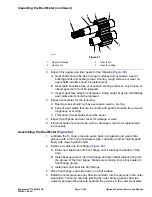
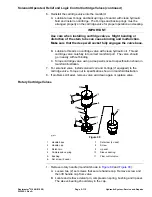
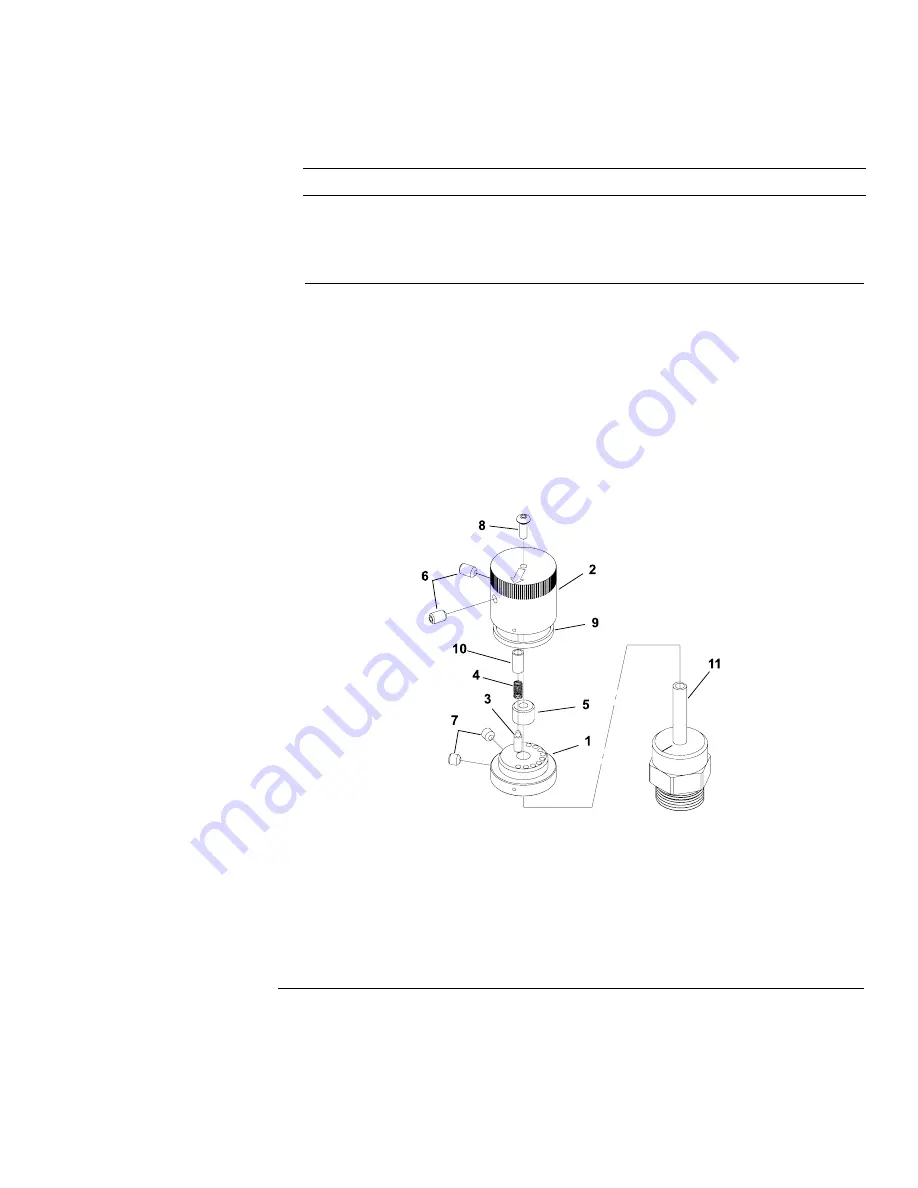
g345658

Figure 90

1.

Handle base

7.

Set screw (2 used)

2.

Handle cap

8.

Screw

3.

Detent pin

9.

Lip seal

4.

Compression spring

10.

Sleeve bearing

5.

Bushing

11.

Flow control valve

6.

Set screw (2 used)

1. Remove rotary handle (manifold shown in

Figure 89

and

Figure 90

):

A. Loosen two (2) set screws that secure handle cap. Remove screw and

then lift handle cap from valve.

B. Locate and retrieve detent pin, compression spring, bushing and lip seal.

The sleeve bearing should stay in the cap.

Reelmaster

®

3100-D/3105-D

Page 5–115

Hydraulic System: Service and Repairs

20252SL Rev A

Summary of Contents for 03200 Reelmaster 3100-D

Page 1: ...03170 Serial No 403430001 and Up Model No 03171 Serial No 403430001 and Up Model No 03174 Serial No 400000000 and Up 2021 The Toro Company 8111 Lyndale Avenue South Bloomington MN 55420 Original Instructions EN Contact us at www Toro com All Rights Reserved ...

Page 2: ...Revision History Revision Date Description A 05 2021 Initial issue Revision History Page 2 Reelmaster 3100 D 3105 D 20252SL Rev A ...

Page 3: ...ly we encourage user feedback Please comment on the completeness accuracy organization usability and readability of this manual by an e mail to servicemanuals toro com or Mail to Technical Publication Manager Commercial The Toro Company 8111 Lyndale Avenue South Bloomington MN 55420 1196 Phone 1 952 887 8495 Reelmaster 3100 D 3105 D Page 3 Reader Comments 20252SL Rev A ...

Page 4: ...NOTES NOTES Page 4 Reelmaster 3100 D 3105 D 20252SL Rev A ...

Page 5: ...his publication without notice DANGER This safety symbol means danger When you see this symbol carefully read the instructions that follow Failure to obey the instructions could kill or cause serious permanent injury or disability WARNING This safety symbol means warning When you see this symbol carefully read the instructions that follow Failure to obey the instructions can result in serious inju...

Page 6: ...g341979 Figure 1 Preface Page 6 Reelmaster 3100 D 3105 D 20252SL Rev A ...

Page 7: ...uence component orientation that may not be obvious Critical Torque This icon is used to highlight an assembly torque requirement that is different than what is recommended in the Standard Torque Tables refer to Torque Specifications page 2 5 Fluid Specifications This icon is used to highlight fluid specifications and capacities that are less common and may not appear on the machine service decal ...

Page 8: ...rams 5 14 Testing 5 27 Service and Repairs 5 62 Chapter 6 Electrical System 6 1 General Information 6 2 Adjustments 6 5 Component Testing 6 9 Service and Repairs 6 47 Chapter 7 Wheels Brakes and Chassis 7 1 General Information 7 2 Adjustments 7 3 Service and Repairs 7 5 Chapter 8 DPA Cutting Units 8 1 General Information 8 2 Adjustments 8 3 Service and Repairs 8 6 Chapter 9 Universal Groomer Optio...

Page 9: ...EATON MEDIUM DUTY PISTON PUMP REPAIR INFORMATION MODEL 70160 VARIABLE DISPLACEMENT PISTON PUMP DANFOSS STEERING UNIT TYPE OSPM SERVICE MANUAL Reelmaster 3100 D 3105 D Page 9 Preface 20252SL Rev A ...

Page 10: ...Preface Page 10 Reelmaster 3100 D 3105 D 20252SL Rev A ...

Page 11: ...ions 1 2 Supervisor s Responsibilities 1 2 Before Operating the Machine 1 3 While Operating the Machine 1 4 Maintenance and Service 1 6 Jacking Instructions 1 7 Safety and Instructional Decals 1 9 Reelmaster 3100 D 3105 D Page 1 1 Safety 20252SL Rev A ...

Page 12: ...f injury or death comply with the following safety instructions as well as information found in the Operator s Manuals and the Operator and Safety Training Videos found on www toro com Supervisor s Responsibilities Ensure that the operators are fully trained and familiar with the Operator s Manual Operator s Training DVD and all of the operating and safety decals on the machine Establish your own ...

Page 13: ... in moving parts and cause personal injury Wearing safety glasses safety shoes long pants and a helmet is advisable and required by some local safety and insurance regulations Make sure work area is clear of objects which might be picked up and thrown by the attachments Keep everyone especially children and pets away from the areas of operation Diesel fuel is highly flammable handle it carefully S...

Page 14: ... into consideration the turf condition and the rollover risk To perform a site survey follow the procedure outlined in the Operator s Manual Stay alert for holes in terrain and other hidden hazards which can cause a sudden change in side hill angle Use extreme caution when operating close to sand traps ditches creeks steep hillsides or other hazards Reduce speed when making sharp turns Do not turn...

Page 15: ...all motion to stop and inspect for damage A damaged reel or bedknife must be repaired or replaced before operation is continued 16 Before getting off the seat A Move traction pedal to neutral B Set the parking brake C Disengage the cutting units and wait for the reels to stop spinning D Stop the engine and remove key from the key switch 17 Whenever machine is left unattended make sure key is remov...

Page 16: ...nging governor settings To assure safety and accuracy have an Authorized Toro Distributor check maximum engine speed with a tachometer 11 Engine must be shut off before checking oil or adding oil to the crankcase 12 To insure optimum performance and safety use genuine TORO replacement parts and accessories Replacement parts and accessories made by other manufacturers could be dangerous and such us...

Page 17: ...he machine may move or fall which may result in personal injury Use the following positions when jacking up the machine Jacking the Front End g341980 Figure 2 1 Square tube 2 Side plate 1 If the front wheel motor is to be removed position jack securely under the square tube of the lower frame as closely to the side plate as possible Figure 2 2 If the front tire is to be removed position the jack s...

Page 18: ...f the ground C Use jack stands or hardwood blocks under the frame to support the machine Figure 4 2 If the rear of the machine can not be lifted from above Figure 4 IMPORTANT Make sure jack is as close to the rear fork as possible when jacking the rear wheel A Place jack securely under the rear wheel motor B Chock both front tires Jack rear tire off the ground C Use jack stands or blocks under the...

Page 19: ...unit and cutting units of your Reelmaster If any decal becomes illegible or damaged install a new decal Decal part numbers are listed in your Parts Catalog Order replacement decals from Authorized Toro Distributor Reelmaster 3100 D 3105 D Page 1 9 Safety Safety and Instructional Decals 20252SL Rev A ...

Page 20: ...Safety Safety and Instructional Decals Page 1 10 Reelmaster 3100 D 3105 D 20252SL Rev A ...

Page 21: ...ting the Torque Values When Using a Drive Adapter Wrench 2 6 Identifying the Fastener 2 7 Standard Torque for Dry Zinc Plated and Steel Fasteners Inch Series 2 8 Standard Torque for Dry Zinc Plated and Steel Fasteners Metric Fasteners 2 9 Other Torque Specifications 2 10 Conversion Factors 2 10 Shop Supplies 2 11 Special Tools 2 13 Reelmaster 3100 D 3105 D Page 2 1 Specifications and Maintenance 2...

Page 22: ...2 3 Combustion Chamber Spherical Type Fuel No 2 Diesel Fuel ASTM D975 Fuel Capacity liters gallons 28 4 L 7 5 gallons Fuel Injection Pump Bosch MD Type Mini Pump Governor Centrifugal Mechanical Low Idle no load 1400 50 RPM High Idle no load 2650 50 RPM Direction of Rotation Counterclockwise Viewed from Flywheel Compression Ratio 24 1 Injection Nozzles Mini Nozzle DNOPD Engine Oil 10W30 Detergent A...

Page 23: ...rev 5 34 cc rev 0 33 cu in rev Wheel Motors Front Front Wheel Motor Displacement Orbital rotor motor 195 cc rev 12 cu in rev Wheel Motors Rear Rear Wheel Motor Displacement Orbital rotor motor 405 cc rev 24 7 cu in rev Hydraulic Manifold Relief Pressure 207 bar 3000 PSI Reel Motor Cross over Relief Pressure Displacement Gear motor 100 bar 1450 PSI 27 cc rev 1 62 cu in rev Steering Control Valve Im...

Page 24: ...tions type of bedknife roller type and installed attachments Bedknife Replaceable tool steel EdgeMax bedknife is fastened to a machined cast iron bedbar with 8 screws Optional bedknives are available Bedknife adjustment Dual screw adjustment to the reel detents corresponding to 0 023 mm 0 0009 inch bedknife movement for each indexed position Rollers Greaseable through shaft front and rear rollers ...

Page 25: ...que feature e g Nylocknut hardness of the surface underneath the head of the fastener or similar condition which affects the installation As noted in the following tables the torque values should be reduced by 25 for the lubricated fasteners to achieve the similar stress as a dry fastener The torque values must be reduced when the fastener is threaded into the aluminum or brass The specific torque...

Page 26: ...rque When using a torque wrench with a drive adapter wrench the calculated torque will be lower than the listed torque recommendation Example The measured effective length of the torque wrench distance from the center of the handle to the center of the square drive is 457 mm 18 inches The measured effective length of the torque wrench with the drive adapter wrench installed distance from the cente...

Page 27: ...ed into the fastener and pre applied dry thread locking compound Keep in mind a fastener with a locking feature usually means there will be friction during initial installation and during removal Toro recommends replacing fasteners with a locking feature once they have been removed because the effectiveness of the locking feature diminishes with each reuse If it is necessary to reuse a fastener wi...

Page 28: ... 50 5 68 7 70 7 95 9 7 16 20 UNF 29 3 29 3 39 4 55 6 75 8 77 8 104 11 1 2 13 UNC 30 3 48 7 65 9 75 8 102 11 105 11 142 15 1 2 20 UNF 32 4 53 7 72 9 85 9 115 12 120 12 163 16 5 8 11 UNC 65 10 88 12 119 16 150 15 203 20 210 21 285 28 5 8 18 UNF 75 10 95 15 129 20 170 18 230 24 240 24 325 33 3 4 10 UNC 93 12 140 20 190 27 265 27 359 37 375 38 508 52 3 4 16 UNF 115 15 165 25 224 34 300 30 407 41 420 4...

Page 29: ... M20 X 2 5 325 33 ft lb 440 45 N m 450 46 ft lb 610 62 N m Note Reduce the torque values listed in the table above by 25 for lubricated fasteners Lubricated fasteners are defined as threads coated with a lubricant such as engine oil or a thread sealant such as Loctite Note The torque values must be reduced when installing the fasteners into threaded aluminum or brass The specified torque value sho...

Page 30: ...lb 88 14 N m 1 2 20 UNF Grade 5 80 10 ft lb 108 14 N m M12 X 1 25 Class 8 8 80 10 ft lb 108 14 N m M12 X 1 5 Class 8 8 80 10 ft lb 108 14 N m For steel wheels and non lubricated fasteners Thread Cutting Screws Zinc Plated Steel Threads per Inch Thread Size Type A Type B Baseline Torque No 6 18 20 20 5 in lb No 8 15 18 30 5 in lb No 10 12 16 38 7 in lb No 12 11 14 85 15 in lb The hole size material...

Page 31: ...tener installation Most thread locking compounds allow the fastener to be removed with standard tools once cured High strength thread locking compounds may require applying heat to the fastener and the surrounding area to allow fastener removal Note Some fasteners have a dry thread locking compound pre applied Patch Loc so no additional thread locking compound is necessary when installing a new fa...

Page 32: ... and previously used gaskets or gasket compounds SILICONE SEALANT Designed for a broad variety of sealing and bonding requirements silicone sealants are usually room temperature vulcanizing RTV which form a flexible silicone rubber that bonds to a wide variety of smooth or porous materials when cured Standard silicone sealants are designed to perform in temperatures from 51ºC to 232ºC 60ºF to 400º...

Page 33: ...omponents for flow and pressure capacities The tester flow measurement maximum is 57 LPM 15 GPM This tester includes the following Inlet Hose This hose connects the system circuit to the inlet side of the hydraulic tester Load Valve Turn the valve to restrict the flow to create a simulated working load in the circuit Pressure Gauge A glycerine filled pressure gauge 0 to 34 500 kPa 0 to 5 000 psi t...

Page 34: ...a gauge rated at 20 to 150 LPM 4 to 40 GPM Note This tester does not include any hydraulic hoses or fittings refer to Hydraulic Hose Kit Toro Part No TOR6007 and Hydraulic Test Fitting Kit Tor Part No TOR4079 Hydraulic O Ring Kit Toro Part No 117 2727 This kit includes O rings in a variety of sizes for the face seal and port seal hydraulic connections To help prevent a hydraulic leak replace the O...

Page 35: ...6 ORFS 11 16 16 TOR4079 18 8 ORFS 13 16 16 TOR4079 19 CAP 2 each 10 ORFS 1 14 TOR4079 20 6 ORFS 11 16 16 to 8 SAE ORB 3 4 16 TOR4079 8 8 ORFS 13 16 16 to 8 SAE ORB 3 4 16 TOR4079 9 UNION 1 each 10 ORFS 1 14 to 8 SAE ORB 3 4 16 TOR4079 2 10 ORFS 1 14 to 8 SAE ORB 3 4 16 TOR4079 7 REDUCER 1 each 12 ORFS 1 3 16 12 to 8 SAE ORB 3 4 16 TOR4079 6 4 ORFS 9 16 18 TOR4079 10 6 ORFS 11 16 16 TOR4079 11 8 OR...

Page 36: ...ose Kit page 2 14 Note The replacement filter element is Toro Part No TOR6012 The filter element canister tightening torque is 34 N m 25 ft lb Remote Starter Switch After flushing the hydraulic system or replacing a hydraulic component e g gear pump piston pump drive motor it is necessary to prime the hydraulic pumps A remote starter switch can be used for this purpose A remote starter switch can ...

Page 37: ...tery cable ring terminal or fork terminal Battery Hydrometer Use the battery hydrometer when measuring the specific gravity of the battery electrolyte You can get this tool locally Dielectric Gel Toro Part No 107 0342 Use the dielectric gel to prevent corrosion of unsealed connection terminals To ensure complete coating of the terminals liberally apply the gel to the component and wire harness con...

Page 38: ... to verify height of cut adjustment Also used for adjustment of optional groomer 1 Used for groomer adjustment 2 Used for height of cut adjustment Bedknife Screw Tool K Line Part No TOR510880 This screwdriver type bit is made to fit Toro bedknife attaching screws Use this bit with a torque wrench to secure the bedknife to the bedbar IMPORTANT Important To prevent damage to the bedbar do not use an...

Page 39: ...t flow from the motor and measure the leakage from the case drain line to measure the efficiency of a hydraulic motor while the hydraulic system pressurizes the motor The table gives the gallons per minute gpm conversion for the measured milliliter or ounce motor case drain leakage GPM mL 15 seconds oz 15 seconds 0 1 95 3 2 0 2 189 6 4 0 3 284 9 6 0 4 378 12 8 0 5 473 16 0 0 6 568 19 2 0 7 662 22 ...

Page 40: ...rt and unwanted material from entering the cutting reel bearing area Cutting Unit Kickstand Toro Part No 119 8010 03 The cutting unit kickstand is used to prop up the rear of the cutting unit during service Use of this tool stabilizes the cutting unit and prevents the bedbar adjusting screws from resting on the work surface Spline Insert Tool K Line Part No TOR4112 8 tooth for 5 inch reels K Line ...

Page 41: ...ses for poor reel mower performance and in comparing the effective height of cut of one mowed surface to another This tool should be used with the Toro Guide to Evaluation Reel Mower Performance and Using the Turf Evaluator Toro Part No 97931SL Diameter Circumference Measuring Tape K Line Part No TOR6023 Spring steel measuring tape for accurately measuring the circumference and outside diameter of...

Page 42: ... bedknife clearance 10 packs 30 strips per pack of cutting performance paper are included in this part number Pulley Alignment Tool Toro Part No 114 5446 Use the pulley alignment tool to verify alignment of groomer and or rear roller brush drive and driven pulleys Specifications and Maintenance Special Tools Page 2 22 Reelmaster 3100 D 3105 D 20252SL Rev A ...

Page 43: ... bottom side of the bedknife with the digital display facing you as shown 2 Press the Alt Zero button on the angle indicator g223327 Figure 9 1 Bedknife 3 Bedbar 2 Angle Indicator 3 Remove the angle indicator and place the magnetic mount on the edge of the bedknife so that the face of the magnet is flat against the top angle of the bedknife 4 Place the angle indicator on the mount with the digital...

Page 44: ...Specifications and Maintenance Special Tools Page 2 24 Reelmaster 3100 D 3105 D 20252SL Rev A ...

Page 45: ...ems 3 3 General Hydraulic System Problems 3 3 Traction Circuit Problems 3 4 Mow Circuit Problems 3 4 Steering Circuit Problems 3 5 Lift Circuit Problems 3 5 Electrical System Problems 3 6 Starting Problems 3 6 General Run and Transport Problems 3 7 Cutting Unit Operating Problems 3 8 Factors That Can Affect Cutting Performance 3 9 Factors Affecting Grooming 3 11 Grooming Reel Mechanical Problems 3...

Page 46: ...lop a hypothesis Narrow down the focus of the problem Assess Performance Ensure you have all the necessary tools for testing Test all potential causes of the failure Reevaluate and create a new hypothesis if necessary Repair Return the unit to service by repairing rebuilding or replacing Solution Confirmation Did the issue go away Was the root cause of the issue correctly repaired Are there any ot...

Page 47: ...achine Fitting s hose s or tube s is are loose or damaged O ring s or seal s is are missing or damaged Hydraulic system operates hot Transmission pressure is high due to load or brakes applied Oil level in reservoir is low or inlet filter is loose or clogged Oil is contaminated or too light Heat exchanger if equipped is damaged or plugged By pass relief is stuck open or air flow is obstructed Char...

Page 48: ...or are damaged Brakes are binding Key on wheel motor shaft is sheared or missing Wheel motor will not hold load in neutral Make up fluid from charge pump is not available Hydrostat ball check valves are damaged Mow Circuit Problems Problem Possible Causes Reel motor drive pump is noisy cavitation Reservoir oil level is low Suction line is restricted Suction line has an air leak Reels will not turn...

Page 49: ...uses Cutting units will not lift or lift slowly Engine speed is too low Charge gear pump is damaged Lift cylinder linkage is binding or broken Lift cylinder bushings are binding Reservoir oil level is low Charge pump pressure or flow is insufficient Implement relief valve 1000 PSI is stuck open Lift cylinders leak internally Steering control valve is defective Cutting units raise but will not stay...

Page 50: ... the starter Faulty starter solenoid Nothing happens when start attempt is made The traction pedal is not in neutral position or the neutral switch is faulty Reel on off switch is in the ON position or faulty The engine is too hot or the over temperature shut down relay is faulty The battery is dead Fuse F1 or F3 is faulty or blown Loose or corroded battery or ground cables Loose or corroded groun...

Page 51: ...itch No 1 failed The seat relay or seat switch failed The high temperature shutdown relay failed Fuse F1 or F3 failed The run solenoid or fuel pump failed Wiring in the run circuit see B Electrical Schematic page A 6 broke or disconnected Engine kills when the backlap switch is in the BACKLAP position and the parking brake is ON The parking brake was released or the backlap switch was moved to MOW...

Page 52: ...solenoid valve SV on the hydraulic manifold is faulty or the valve is stuck The reels on off is faulty The reels up limit or transport mow switch is faulty or misadjusted There is insufficient hydraulic oil pressure to turn the reels see Mow Circuit Problems page 3 4 The cutting units run but should not run when raised The coil to solenoid valve S1 on the hydraulic manifold is faulty or the valve ...

Page 53: ...o reel adjustment Check bedknife to reel contact daily The bedknife must have light contact across the entire reel No contact will dull the cutting edges Excessive contact accelerates wear of both edges Quality of cut is adversely affected by both conditions see Bedknife to Reel Adjustment in the Cutting Unit Operator s Manual Reel and bedknife sharpness Note After grinding the reel and or bedknif...

Page 54: ...e Bedbar Assembly page 8 10 Number of reel blades Use correct number of reel blades for clip frequency and optimum height of cut range Refer to Clip Chart in Traction Unit Operator s Manual Cutting unit alignment and carrier frame ground following Check carrier frames and lift arms for damage binding conditions or bushing wear Repair if necessary Roller condition and roller type Make sure rollers ...

Page 55: ...quality of cut also affect grooming performance Variables that Affect the Use and Performance of Grooming Reels 1 The growing season and weather conditions 2 General turf conditions 3 The frequency of grooming cutting number of cuttings per week and how many passes per cutting 4 The blade spacing on the grooming reel 5 The height of cut 6 The grooming depth 7 The type of grass on the green 8 The a...

Page 56: ...ively Refer to groomer Installation Instructions for groomer set up information The grooming reel blades are bent damaged or missing Repair or replace blades if necessary The grooming reel shaft is bent or damaged Replace grooming reel shaft The turf is damaged or has uneven grooming Grooming depth is not equal on both ends of grooming reel Adjust depth if necessary Check and adjust cutting unit s...

Page 57: ...Kubota Workshop Manual 4 2 Service and Repairs 4 3 Air Cleaner Assembly 4 3 Exhaust System 4 6 Fuel System 4 8 Radiator and Oil Cooler Assembly 4 11 Engine 4 14 Additional Reference Materials KUBOTA 05 E4B SERIES WORKSHOP MANUAL Reelmaster 3100 D 3105 D Page 4 1 Engine 20252SL Rev A ...

Page 58: ...If a parts list is not available be sure to provide your distributor with the Toro model and serial number Operator s Manual The Traction Unit Operator s Manual provides information regarding the operation general maintenance and maintenance intervals for the Kubota diesel engine that powers your Reelmaster machine The Kubota Operator s Manual includes information specific to the engine used in yo...

Page 59: ...racket 9 Compression spring 2 Hose clamp 4 each 6 Air cleaner assembly 10 Mounting band assembly 3 Flange head bolt 3 each 7 Air inlet hose lower 11 Lock nut 4 Flange head bolt 2 each 8 Bolt 12 Flange nut 2 each Reelmaster 3100 D 3105 D Page 4 3 Engine Service and Repairs 20252SL Rev A ...

Page 60: ...ood g342252 Figure 12 1 Latch 4 Filter element 2 Dust cap 5 Body 3 Burp valve 2 Release latches securing the air cleaner cover to the air cleaner body Separate the cover from body Clean inside of the air cleaner cover refer to Figure 12 3 Gently slide the filter out of air cleaner body to reduce the amount of dust dislodged Avoid knocking filter against air cleaner body 4 Inspect filter and discar...

Page 61: ... sealing end of the filter Do not install the damaged filter 3 Insert the filter properly into the air cleaner body Make sure that the filter is sealed properly by applying pressure to outer rim of filter when installing Do not press a flexible center of the filter refer to Figure 12 4 Install the cover and secure with latches Make sure that the cover is positioned with TOP side up 5 After air cle...

Page 62: ... washer 3 Flange head bolt 2 each 10 Flange head bolt 4 each 17 Lock nut 4 Nut 4 each 11 Exhaust guard 18 Bolt 4 each 5 Lock washer 4 each 12 Bolt 19 Washer 4 each 6 Gasket 13 Flange head bolt 2 each 20 Engine mount 7 Flange nut 4 each 14 Engine mount Engine Service and Repairs Page 4 6 Reelmaster 3100 D 3105 D 20252SL Rev A ...

Page 63: ...m the engine 5 Remove the gasket 6 from the exhaust manifold Discard the gasket Installing the Exhaust System Note Make sure that the muffler flange and exhaust manifold sealing surfaces are free of debris or damage that may prevent a tight seal 1 Place the new gasket 6 on the exhaust manifold 2 Install the muffler 2 onto the engine and secure with four lock washers 5 and nuts 4 IMPORTANT Finger t...

Page 64: ...Hose clamp 2 each 6 Breather tube 19 Fuel filter 32 Hose clamp 2 each 7 Bolt 5 each 20 Fuel pump mount plate 33 T fitting 8 Closed clip 2 each 21 Fitting 34 Fitting 9 Hose clamp 22 Fuel hose 35 Fitting 10 Hose clamp 7 each 23 Fuel hose 36 R clamp 11 Fuel hose 24 Pipe 37 Fuel tank support 12 Fuel pump 25 Bushing 2 each 38 Fuel tank cap 13 Fuel pump bracket 26 Fuel hose Engine Service and Repairs Pa...

Page 65: ...ing or disposing waste fuel To clean fuel tank flush tank out with clean solvent Ensure that the tank is free of all contaminates and debris Priming the Fuel System The fuel system needs to be primed before starting the engine for the first time after running out of fuel or after fuel system maintenance e g draining the fuel water separator replacing the fuel filter or a fuel hose To prime the fue...

Page 66: ...he frame with hex flange head screws refer to Installing the Seat page 7 8 4 Connect the negative battery cable to the negative battery post 5 Fill the fuel tank with clean fuel refer to Operator s Manual 6 Prime the fuel system refer to Priming the Fuel System page 4 9 7 Check the fuel hoses and fittings for leaks Note Repair all fuel leaks before returning the machine to service 8 Lower the hood...

Page 67: ...6 R clamp 2 each 28 Overflow bottle 5 Bolt 2 each 17 O ring 2 each 29 Hose clamp 2 each 6 Lower radiator shield 18 Elbow fitting 30 Hose 7 Magnet 19 Hydraulic tube 31 Nut 8 Carriage bolt 4 each 20 Hose clamp 2 each 32 Relay 9 Radiator seal 2 each 21 Protective sleeve 33 Bolt 10 Flange head bolt 4 each 22 Hose 34 Drain plug 11 Bottom fan shroud 23 Hose clamp 4 each 12 Flange nut 4 each 24 Upper rad...

Page 68: ...ion relay away from the radiator 5 Disconnect following hoses from the radiator A Upper radiator hose 24 to the water pump B Lower radiator hose 27 to the engine block C Coolant hose to the reservoir 30 D Air hose to the air cleaner 6 To prevent contamination of hydraulic system during radiator oil cooler removal thoroughly clean junction of hydraulic hoses and fittings on oil cooler Note Allow hy...

Page 69: ...mp B Lower radiator hose 24 to the engine block C Coolant hose 30 to the reservoir D Air hose to the air cleaner 7 Remove all plugs from hydraulic tubes hoses and openings used during the removal procedures 8 Install the new O rings to the hydraulic fittings 15 and 18 Connect the hydraulic hose 25 to the radiator 13 9 Connect the hydraulic tube 19 to the radiator 13 10 Secure the glow plug relay 3...

Page 70: ... washer 29 Bolt 3 each 6 Throttle swivel 18 Bolt 30 Engine mount 7 Lock nut 19 Cable clamp 31 Front engine mount 8 Cap screw 3 each 20 Throttle cable bracket 32 Cap screw 4 each 9 LH engine mount 21 Lock nut 33 Engine mount 10 Washer 11 each 22 Bolt 34 Lower radiator hose 11 Bolt 4 each 23 Bolt 35 Hose clamp 2 each 12 Flange head bolt 7 each 24 Flat washer 36 Upper radiator hose Engine Service and...

Page 71: ...tor or engine is hot pressurized hot coolant can escape and cause burns Do not open the radiator cap or drain the radiator when the coolant is hot WARNING Ethylene glycol antifreeze is poisonous Keep the coolant away from children and pets Keep the coolant in a labelled container Discard the coolant in accordance with local hazardous waste ordinances 6 Drain radiator from the drain cock valve into...

Page 72: ...gure 17 1 Throttle cable g342501 Figure 18 1 Glow plug wire 3 Fuel hose 2 Fuel stop solenoid 4 Front lift tab g342502 Figure 19 1 Temp warning switch 2 Rear lift tab Engine Service and Repairs Page 4 16 Reelmaster 3100 D 3105 D 20252SL Rev A ...

Page 73: ...le 11 Remove traction control cable from the neutral arm assembly on the piston pump Remove all hydraulic hoses from the piston an gear pumps see Removing the Piston Pump Hydrostat page 5 80 12 Remove cable ties securing the wire harness to the front lift tab and other engine parts Connect hoist or lift to the front and rear lift tabs refer to Figure 18 and Figure 19 CAUTION Make sure lift or hois...

Page 74: ...e engine refer to Figure 21 C Remove four cap screws item 32 in Figure 16 and hardened washers 10 securing the right engine mounting bracket 33 and hydrostat to the engine Installing the Engine 1 Install hydrostat and pump mount plate to the engine as follows A Secure right engine mounting bracket 33 and hydrostat to the engine four hardened washers 10 and cap screws 32 Note Do not install flat wa...

Page 75: ...o Figure 18 C High temperature warning switch refer to Figure 19 D High temperature shutdown switch alternator and low oil pressure switch refer to Figure 20 10 Connect coolant hoses to the water pump and engine block Make sure drain cock valve is closed Fill radiator with coolant 11 Install muffler to the exhaust manifold and muffler bracket refer to Installing the Exhaust System page 4 7 12 Conn...

Page 76: ...d 20 Install engine hood to the machine Close and latch hood 21 Adjust traction drive for neutral see Adjust traction Drive for Neutral in Operator s Manual Engine Service and Repairs Page 4 20 Reelmaster 3100 D 3105 D 20252SL Rev A ...

Page 77: ...ficiency Case Drain Test 5 43 Reel Motor Cross over Relief Pressures Test Using Pressure Gauge 5 46 Reel Circuit Testing Manifold Relief Valve SV Pressure Test 5 49 Reel Circuit Testing Gear Pump P1 Flow Test 5 52 Steering Lift Sidewinder Circuit Testing Gear Pump P2 Flow Test 5 55 Steering Lift Sidewinder Circuit Testing Relief Valve Pressure Test 5 58 Steering Lift Sidewinder Circuit Testing Ste...

Page 78: ... Control Valve 5 133 Servicing the Steering Control Valve 5 135 Steering Cylinder 5 136 Servicing the Steering Cylinder 5 138 Front Lift Cylinder 5 141 Rear Lift Cylinder 5 143 Servicing the Lift Cylinder 5 146 Additional Reference Materials PARKER TORQMOTOR SERVICE PROCEDURE TC TB TE TJ TF TG TH AND TL SERIES EATON MEDIUM DUTY PISTON PUMP REPAIR INFORMATION MODEL 70160 VARIABLE DISPLACEMENT PISTO...

Page 79: ...mination from the failed component will circulate throughout the traction circuit This contamination can damage other components in the circuit so it must be removed to prevent additional component failure If a component failure occurs in the traction circuit it is critical that the entire traction circuit be disassembled drained and thoroughly cleaned to ensure that all contamination is removed f...

Page 80: ... is reversed debris from the filter will re enter the traction circuit The alternative to using the Toro high flow hydraulic filter kit after a traction circuit component failure would be to disassemble drain and thoroughly clean all components hydraulic tubes and hydraulic hoses in the traction circuit If any debris remains in the traction circuit and the machine is operated the debris can cause ...

Page 81: ...n the hydraulic system Keep your body and hands away from pin hole leaks or nozzles that eject hydraulic fluid under high pressure Do not use your hands to search for leaks use a piece of paper or cardboard Hydraulic fluid escaping under pressure can have sufficient force to penetrate the skin and cause serious injury If hydraulic fluid is injected into your skin the fluid damage to your body must...

Page 82: ...n the specified range of torque values refer to the Hose Tube Installation Torque Table page 5 7 This procedure to tighten the swivel nut requires a drive adapter wrench e g crowfoot wrench Note It may be necessary to use a drive adapter wrench e g crowfoot wrench to install a hydraulic fitting refer to Calculating the Torque Values When Using a Drive Adapter Wrench page 2 6 g221222 Figure 23 1 Ma...

Page 83: ...o 29 N m 18 to 22 ft lb 6 11 16 16 37 to 44 N m 27 to 33 ft lb 8 13 16 16 51 to 63 N m 37 to 47 ft lb 10 1 14 82 to 100 N m 60 to 74 ft lb 12 1 3 16 12 116 to 142 N m 85 to 105 ft lb 16 1 7 16 12 150 to 184 N m 110 to 136 ft lb 20 1 11 16 12 190 to 233 N m 140 to 172 ft lb Flats From Wrench Resistance Table Size FFWR 4 1 4 inch nominal hose or tubing 1 2 to 3 4 6 3 8 inch 1 2 to 3 4 8 1 2 inch 1 2...

Page 84: ...Fitting Installation Torque Table page 5 10 Note It may be necessary to use a drive adapter wrench e g crowfoot wrench to install a hydraulic fitting refer to Calculating the Torque Values When Using a Drive Adapter Wrench page 2 6 5 If a torque wrench is not available or if space at the port prevents the use of a torque wrench use the Flats From Finger Tight FFFT procedure given below A Install t...

Page 85: ... pushed up as far as possible Step 1 in Figure 26 IMPORTANT Before installing the fitting into the port determine the material of which the port is made Installing a fitting into an aluminum port requires a reduced installation torque 5 Install the adjustable fitting into the port by hand until the washer contacts the face of the port Step 2 in Figure 26 6 If the adjustable fitting needs to align ...

Page 86: ...ge 5 10 D If the port material is aluminum tighten the fitting to 60 of the listed FFFT value refer to the Flats From Finger Tight FFFT Table page 5 10 Fitting Installation Torque Table Fitting Dash Size Fitting Port Side Thread Size inch threads per inch Installation Torque Into Steel Port Installation Torque Into Aluminum Port 4 7 16 20 21 to 25 N m 15 to 19 ft lb 13 to 15 N m 9 to 11 ft lb 5 1 ...

Page 87: ...Hydraulic Schematic g344527 Figure 27 Reelmaster 3100 D 3105 D Page 5 11 Hydraulic System Hydraulic Schematic 20252SL Rev A ...

Page 88: ...g344528 Figure 28 Hydraulic System Hydraulic Schematic Page 5 12 Reelmaster 3100 D 3105 D 20252SL Rev A ...

Page 89: ...g344526 Figure 29 Reelmaster 3100 D 3105 D Page 5 13 Hydraulic System Hydraulic Schematic 20252SL Rev A ...

Page 90: ...Hydraulic Flow Diagrams g344707 Figure 30 Model 03171 shown Hydraulic System Hydraulic Flow Diagrams Page 5 14 Reelmaster 3100 D 3105 D 20252SL Rev A ...

Page 91: ...ds the relief setting Reverse The traction circuit operates essentially the same in reverse as it does in forward However there are a few differences in operation When the reverse traction pedal is depressed the cable from the pedal positions the swash plate in the traction pump so fluid flows out of the upper port Fluid flow out of the upper port goes to the wheel motors and turns them in the rev...

Page 92: ...arge circuit replenishes fluid that is bled from the traction circuit by the bleed valve When operating the traction circuit in the reverse direction the bleed valve closes once reverse pressure reaches 13 8 to 20 6 bar 200 to 300 PSI to allow normal reverse operation Note The bleed valve threads into the piston pump back plate Access to the bleed valve requires removal of the back plate from the ...

Page 93: ...Reel Circuit g344710 Figure 31 Model 03171 shown Reelmaster 3100 D 3105 D Page 5 17 Hydraulic System Hydraulic Flow Diagrams 20252SL Rev A ...

Page 94: ...0 PSI across the speed control valve Any excess flow above what the speed control valve is set for is by passed to the reservoir through the logic cartridge valve With the backlapping valve in the mow position fluid flows through the valve out port M1 and to reel motors that are connected in series Fluid flows through the rear right front and then left front reel motors as it turns the motors in t...

Page 95: ...Lift Circuit Up g344709 Figure 32 Model 03171 shown Reelmaster 3100 D 3105 D Page 5 19 Hydraulic System Hydraulic Flow Diagrams 20252SL Rev A ...

Page 96: ...he hydraulic tank When the cutting units are to be raised the 2 spool valve is positioned by moving the cutting unit shift lever to RAISE Flow is directed to cap ends of the lift cylinders Hydraulic pressure against the cylinder pistons moves their shafts causing the cutting units to raise At the same time the pistons push the hydraulic fluid out of the lift cylinders and back through the hydrauli...

Page 97: ...Lift Circuit Down g344708 Figure 33 Model 03171 shown Reelmaster 3100 D 3105 D Page 5 21 Hydraulic System Hydraulic Flow Diagrams 20252SL Rev A ...

Page 98: ...nits are to be lowered the 2 spool valve is positioned by moving the cutting unit shift lever to LOWER Pressure from gear pump P2 is used to shift the pilot valve in the 2 spool valve This shifting of the pilot valve allows hydraulic pressure to relieve from the cap end of the lift cylinders Flow from the cap end of the lift cylinders causes the cutting units to lower At the same time the fluid re...

Page 99: ...Sidewinder Circuit g344711 Figure 34 Model 03171 shown Reelmaster 3100 D 3105 D Page 5 23 Hydraulic System Hydraulic Flow Diagrams 20252SL Rev A ...

Page 100: ...aulic manifold and to the hydrostat When the cutting unit shift lever is released spring action returns the valve to its original position and by passes flow back to the hydrostat and stopping cylinder movement The cylinder position is locked in place since there is no complete circuit of flow to or from the sidewinder cylinder when the lever is released Shift Sidewinder Left When the sidewinder i...

Page 101: ...Steering Circuit g344712 Figure 35 Model 03171 shown Reelmaster 3100 D 3105 D Page 5 25 Hydraulic System Hydraulic Flow Diagrams 20252SL Rev A ...

Page 102: ...nsures that the fluid flow to the cylinder is proportional to the amount of steering wheel rotation Fluid leaving the cylinder flows back through the steering control spool valve and through the T port Return flow passes through the hydraulic manifold hydrostat and charge relief valve and continues on to the gear pump inlet and hydraulic tank The steering control valve returns to the neutral posit...

Page 103: ...kages loose fasteners or improper adjustments must be checked before assuming that a hydraulic component is the source of the problem Precautions for Hydraulic Testing WARNING Keep body and hands away from pin hole leaks or nozzles that eject hydraulic fluid under high pressure Do not use hands to search for leaks use paper or cardboard Hydraulic fluid escaping under pressure can have sufficient f...

Page 104: ...ter connecting test equipment check fluid level in the hydraulic tank to make sure that fluid level is correct 9 When using hydraulic tester pressure and flow open tester load valve completely before starting engine to minimize the possibility of damaging components 10 The engine must be in good operating condition Use a phototac when performing a hydraulic test Engine speed can affect the accurac...

Page 105: ...aulic system and affect overall machine performance Special Equipment Required Pressure Gauge Flow Meter with Pressure Gauge that has at least an 68 LPM 18 GPM capacity Phototach non contact tachometer 1 Park the machine on a level surface with the cutting units lowered and the reel engage disengage switch is in the disengage position Make sure that the engine is off and the parking brake is engag...

Page 106: ...e side of the hydrostat Figure 38 7 Install tester in series with the pump and the disconnected hose Make sure that the tester flow control valve is fully open 8 Attach a heavy chain to the rear of the machine frame and an immovable object to prevent the machine from moving during testing 9 Chock the wheels to prevent wheel rotation during testing 10 Start engine Move throttle to full speed 2650 5...

Page 107: ...ston pump charge relief valve see Piston Pump Hydrostat Service page 5 84 14 Sit in the operator s seat release the parking brake and slowly depress the forward traction pedal until 68 9 to 103 4 Bar 1000 to 1500 PSI is reached on the flow meter pressure gauge 15 Record reading on pressure gauge from mower manifold CHD port under load Charge pressure under load should not drop more than 20 when co...

Page 108: ...otor is less restricted If a wheel motor is tested in this position the test results will be higher should not be used to determine wheel motor efficiency Test wheel motors in three 3 different wheel positions to obtain accurate test results Record test readings for all three 3 wheel positions Hydraulic fluid flows through both front wheel motors in parallel before passing through the rear wheel m...

Page 109: ...the bottom of the hydrostat Figure 40 Note An alternate testing location would be at the hydraulic tube supplying the front wheel motors under the left floor plate 2 Install the flow tester between the hydrostat and the disconnected hydraulic line Make sure that the tester flow control valve is fully open 3 Disconnect both hydraulic lines from the rear wheel motor then reconnect the lines to each ...

Page 110: ...tor If test results are within specification If specifications are not met test front wheel motors individually as follows g344970 Figure 41 Model 03171 shown 12 Disconnect the hydraulic lines from front wheel motor that is not being tested Cap disconnected hydraulic lines and plug ports in wheel motor to prevent contamination 13 Chock the front wheel being tested to prevent the wheel rotation 14 ...

Page 111: ... been tested in three 3 different positions 19 Reconnect hydraulic lines to front wheel motor and repeat procedure for remaining front wheel motor 20 If specifications are not met repair or replace worn wheel motor Rear Wheel Motor Test g344971 Figure 42 Model 03171 shown Hydraulic fluid flows through both front wheel motors in parallel before passing through the rear wheel motor in series To accu...

Page 112: ...speed CAUTION Use extreme caution when performing wheel motor tests The wheel motors will be trying to move the machine forward 6 Sit in the operators seat release the parking brake and set the Mow Transport slide to the transport position 7 Slowly depress forward traction pedal until 68 9 to 103 4 Bar 1000 to 1500 PSI is displayed on the pressure gauge Flow meter should read less than 5 7 LPM 1 5...

Page 113: ... Eventually enough fluid by pass will cause the unit to stall under heavy load conditions Continued operation can generate excessive heat cause damage to seals and other components in the hydraulic system and affect overall machine performance Special Equipment Required Pressure Gauge Flow Meter with Pressure Gauge that has at least an 68 LPM 18 GPM capacity Phototach non contact tachometer 1 Park...

Page 114: ...perating temperature by operating the machine for approximately 10 minutes Make sure the hydraulic tank is full 9 Verify with a phototach that the pump speed is approximately 3100 RPM 10 Sit in the operator s seat release the parking brake and set the Mow Transport slide to the transport position CAUTION Use extreme caution when performing hydrostat flow tests The traction unit wheels will be rota...

Page 115: ...g is 241 Bar 3500 PSI An additional 6 9 to 10 3 Bar 100 to 200 PSI is necessary to overcome system charge pressure before the relief valve opens D Record tester pressure reading E Release traction pedal open flow control valve fully move throttle to low speed and turn the engine off 14 If relief pressure can not be met or is greater than specified the traction relief valve is faulty and should be ...

Page 116: ...omponent s are the cause of cutting unit performance issues Special Equipment Required Pressure Gauge Phototach non contact tachometer 1 Park machine on a level surface with the cutting units lowered the reel engage disengage switch in the DISENGAGE position and the mow transport switch in the MOW position Make sure engine is off and the parking brake is disengaged Hydraulic System Testing Page 5 ...

Page 117: ... the cutting unit speed control to 9 maximum and engage the cutting units When engaged the cutting circuit pressure may exceed manifold relief valve pressure setting of 207 Bar 3000 PSI momentarily opening the relief valve Circuit pressure should then stabilize at approximately 83 Bar 1200 PSI 9 Safely secure the test pressure gauge and operate the machine under your specific mowing conditions Mon...

Page 118: ...ure Test continued B Gear pump P1 is faulty see Reel Circuit Testing Gear Pump P1 Flow Test page 5 52 13 Disconnect test equipment from hydraulic manifold Hydraulic System Testing Page 5 42 Reelmaster 3100 D 3105 D 20252SL Rev A ...

Page 119: ...he reel motor to stall under heavy cutting conditions Continued operation with a worn inefficient motor can generate excessive heat cause damage to seals and other components in the hydraulic system and affect quality of cut Note One method to find a failing or malfunctioning cutting unit motor is to have another person observe the machine while mowing in dense turf A bad motor will run slower pro...

Page 120: ...flow control valve is fully open 7 Make sure backlap knob on the hydraulic manifold is in the MOW position g345042 Figure 49 1 Inlet hose 3 Outlet hose 2 Case drain hose 8 Disconnect hose from reel motor case drain at the hydraulic tube 1 cutting unit or from the bulkhead fitting 2 and 3 Cap the hydraulic tube or bulkhead fitting to prevent system contamination 9 Place open end of disconnected cas...

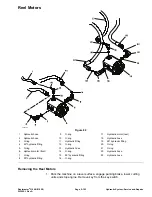
Page 121: ...ainer 15 Record the amount of fluid collected in the container 16 Disengage the cutting units set the throttle to low speed and stop engine 17 If volume is more than 1265 milliliters 43 oz repair or replace the tested reel motor 18 Remove tester and reconnect hydraulic hoses 19 Check hydraulic fluid level see Traction Unit Operator s Manual 20 Repeat test for remaining reel motors as needed Reelma...

Page 122: ...eel Motor Efficiency Test see Reel Circuit Testing Reel Motor Efficiency Case Drain Test page 5 43 1 Determine which cutting reel motor needs to be tested by observing the machine during mowing 2 Park machine on a level surface with the cutting units lowered and reel engage switch OFF Make sure engine is off and mow transport lever is in mow Apply the parking brake 3 Read Precautions for Hydraulic...

Page 123: ...for any hydraulic leakage from test connections and correct before proceeding with test 8 Make sure that the hydraulic fluid is at normal operating temperature by operating the machine under load for approximately ten 10 minutes DO NOT engage cutting units CAUTION Adjacent cutting unit reels will rotate when performing the cross over relief pressure test Keep away from cutting units during test to...

Page 124: ...r and replace if necessary see Servicing the Reel Motor page 5 106 13 After testing is completed relieve cutting unit hydraulic system pressure see Relieving Hydraulic System Pressure page 5 3 Remove pressure gauges and tee fittings from machine Connect hydraulic hoses to reel motor fittings 14 If necessary test cross over relief pressure on other cutting reel motors 15 Operate machine and check f...

Page 125: ...luid is available to the cutting unit motors up to the set relief pressure This test also ensures that pump P1 is capable of generating enough pressure to open a properly functioning relief valve Special Equipment Required Flow Meter with Pressure Gauge that has at least a 45 LPM 12 GPM capacity Phototach non contact tachometer Reelmaster 3100 D 3105 D Page 5 49 Hydraulic System Testing 20252SL Re...

Page 126: ... the system must be relieved See Relieving Hydraulic System Pressure page 5 3 4 Disconnect the hose connection from hydraulic fitting on manifold port M1 5 Install the tester in series with the hose and hydraulic fitting Make sure that the flow control valve on tester is fully open 6 Make sure that the backlap knob on the hydraulic manifold is in the mow position CAUTION Keep away from reels durin...

Page 127: ...throttle to low speed and shut off engine 14 If specification is met test pump P1 flow see Reel Circuit Testing Gear Pump P1 Flow Test page 5 52 If specification is not met test relief valve EV solenoid clean or replace valve see Servicing the Hydraulic Manifold page 5 113 and retest 15 Disconnect tester from manifold and hose Reconnect hydraulic hose to manifold fitting for port M1 Reelmaster 310...

Page 128: ...loss will occur to cause the cutting unit motors to stall under heavy cutting conditions Continued operation with a worn inefficient pump can generate excessive heat and cause damage to the seals and other components in the hydraulic system Special Equipment Required Flow Meter with Pressure Gauge that has at least a 45 LPM 12 GPM capacity Phototach non contact tachometer 1 Park the machine on a l...

Page 129: ...ng the machine for approximately 10 minutes 9 Verify with a phototach that the pump speed is approximately 3100 RPM 10 Verify pump flow at No Load as follows Record tester pressure and flow reading at no load Unrestricted pump output should be approximately 23 8 LPM 6 3 GPM 11 Verify pump flow Under Load as follows CAUTION Do not close tester valve fully when performing this test In this test the ...

Page 130: ...ng step 10 A difference in flow of more than 15 or the inability to achieve specified pressure may indicate A A restriction in the pump intake line B A worn and or slipping hydrostat belt C The gear pump P1 is worn and should be repaired or replaced 14 Disconnect tester and reconnect hose to pump Hydraulic System Testing Page 5 54 Reelmaster 3100 D 3105 D 20252SL Rev A ...

Page 131: ...e and Steering Cylinder Test page 5 60 If cutting unit lift operation is unsatisfactory check lift control manifold solenoid valves and or lift cylinders Additional information on these components is available in this chapter If both steering and lift operations perform poorly perform the gear pump P2 flow test and circuit relief valve pressure test see Steering Lift Sidewinder Circuit Testing Rel...

Page 132: ... 6 Sit in the operator s seat and start the engine Move the throttle to full speed 2650 50 RPM 7 Make sure that the hydraulic fluid is at normal operating temperature by operating the machine for approximately 10 minutes 8 Verify with a phototach that the pump speed is approximately 3100 RPM 9 Verify pump flow at No Load as follows Record tester pressure and flow readings at no load Unrestricted p...

Page 133: ...w speed and shut off engine 12 The under load test flow reading step 10 B should not drop more than 15 when compared to the no load test flow reading step 9 A difference in flow of more than 15 or the inability to achieve specified pressure may indicate A A restriction in the pump intake line B A worn and or slipping drive belt C The gear pump P2 is worn and should be repaired or replaced 13 Disco...

Page 134: ...orm the relief valve pressure test and gear pump P2 flow test see Steering Lift Sidewinder Circuit Testing Gear Pump P2 Flow Test page 5 55 1 Park the machine on a level surface with the cutting units lowered and reel engage disengage switch in the disengage position Make sure the engine is off and the parking brake is engaged 2 Read Precautions for Hydraulic Testing page 5 27 Hydraulic System Tes...

Page 135: ...7 Watch the pressure gauge carefully while turning the steering wheel completely in one direction and holding CAUTION Do not allow pressure to exceed 1500 PSI Hold steering wheel at full lock only long enough to get a system pressure reading Holding the steering wheel against the stop for an extended period may damage the steering control valve 8 System pressure should reach 65 to 70 Bar 940 to 10...

Page 136: ... normal operating temperature by operating the machine for approximately 10 minutes 2 Drive the machine slowly in a figure eight on a flat level surface A There should be no shaking or vibration in the steering wheel or rear wheel B Steering wheel movements should be followed immediately by a corresponding rear wheel movement without the steering wheel continuing to turn 3 Stop unit with the engin...

Page 137: ...E With the engine off continue turning the steering wheel to the left counterclockwise with the steering cylinder fully extended Observe the open fitting on the steering cylinder as the wheel is turned If hydraulic fluid comes out of the fitting while turning the steering wheel to the left the steering cylinder has internal leakage and must be repaired or replaced F Remove plug from the hydraulic ...

Page 138: ...cord the position of hydraulic fittings especially elbow fittings on hydraulic components before removal Mark parts if necessary to make sure they will be aligned properly when installing hydraulic hoses and tubes After Repair or Replacement of Hydraulic Components 1 Check fluid level in the hydraulic tank and add correct fluid if necessary Drain and refill hydraulic tank and change fluid filter i...

Page 139: ...zzles that eject high pressure hydraulic fluid Use a piece of cardboard or paper to find hydraulic leaks Release all pressure in the hydraulic system before performing any work on the system Seek immediate medical attention if hydraulic fluid is injected into your skin IMPORTANT Check hydraulic lines and hoses daily for leaks kinked lines loose mounting supports wear loose fittings or deterioratio...

Page 140: ...eck hydraulic reservoir fluid level and adjust if necessary Note It may not be necessary to remove the wire from the starter solenoid B terminal when connecting a remote starter switch g345087 Figure 61 1 Starter motor 2 B terminal 3 Connect remote starter switch electrical leads to the starter motor solenoid B terminal Figure 61 and the positive terminal at the starter or battery 4 Engage remote ...

Page 141: ... traction circuit 1 Park machine on a level surface Lower cutting units disengage PTO switch stop engine and engage parking brake Remove key from the key switch WARNING Before disconnecting or performing any work on the hydraulic system all pressure in the system must be relieved See Relieving Hydraulic System Pressure page 5 3 IMPORTANT Make sure to clean around any hydraulic connections that wil...

Page 142: ...ly left and right several times 11 Move PTO switch to ENABLE to engage cutting units and let them run for several minutes Move PTO switch to DISABLE 12 Shut off engine and check for hydraulic fluid leaks Check fluid level in hydraulic tank and add correct amount of hydraulic fluid if necessary 13 Operate the machine for 2 hours under normal operating conditions 14 Check condition of hydraulic flui...

Page 143: ...Note If a wheel motor was replaced install high flow filter to the inlet when traveling forward of new wheel motor instead of to the inlet when traveling forward of the traction pump This will prevent system contamination from entering and damaging the new motor g345088 Figure 62 1 Rear wheel motor 2 Lower fitting 3 Thoroughly clean junction of hydraulic hose and lower fitting on rear wheel motor ...

Page 144: ...rward direction periodically apply brakes to increase pressure in traction circuit While monitoring filter indicator continue this process for an additional five 5 minutes IMPORTANT If using a filter that is not the bi directional Toro high flow filter do not press the traction pedal in the reverse direction If flow is reversed when using a filter that is not bi directional debris from the filter ...

Page 145: ...peration check hydraulic reservoir fluid level frequently and add fluid as necessary 7 Make sure traction pedal is in neutral Sit in the operator s seat and start engine and let it idle at low speed The hydraulic pumps should pick up hydraulic fluid and fill the hydraulic system If there is no indication of fill in 30 seconds stop the engine and determine the cause 8 After the hydraulic system sta...

Page 146: ... wheel motor was replaced or rebuilt run the traction unit so all wheels turn slowly for 10 minutes 14 Operate traction unit by gradually increasing its work load to full over a 10 minute period 15 Stop the machine Check hydraulic tank and fill if necessary Check hydraulic components for leaks and tighten any loose connections Hydraulic System Service and Repairs Page 5 70 Reelmaster 3100 D 3105 D...

Page 147: ...23 Dipstick 4 Flange head bolt 2 each 14 Hydraulic tube 24 Hydraulic tank 5 Hose 15 Barb fitting 25 O ring 6 Hose clamp 16 O ring 26 Barb fitting 7 Barb fitting 17 Hose clamp 2 each 27 Clamp 8 O ring 18 Suction hose 28 O ring 9 Filter head 19 Suction strainer 29 Hydraulic fitting 10 Oil filter element 20 O ring 30 Hose Reelmaster 3100 D 3105 D Page 5 71 Hydraulic System Service and Repairs 20252SL...

Page 148: ...ect the hydraulic tank for leaks cracks or other damage Installing the Hydraulic Tank Figure 63 1 If the fittings were removed from hydraulic tank lubricate and place new O rings onto fittings Install fittings into tank openings using marks made during the removal process to properly orientate fittings Tighten fittings see Installing the Hydraulic Fittings SAE Straight Thread O Ring Fittings page ...

Page 149: ...eld 18 Elbow fitting 30 Hose 7 Magnet 19 Hydraulic tube 31 Nut 8 Carriage bolt 4 each 20 Hose clamp 2 each 32 Relay 9 Radiator seal 2 each 21 Protective sleeve 33 Bolt 10 Flange head bolt 4 each 22 Hose 34 Drain plug 11 Bottom fan shroud 23 Hose clamp 4 each 12 Flange nut 4 each 24 Upper radiator hose Note The hydraulic oil cooler on your Reelmaster is combined with the radiator See Radiator and O...

Page 150: ...ing 9 90º hydraulic fitting 28 Pump support 47 O ring 10 Washer 29 Spacer 48 Hydraulic hose 11 Hydraulic hose 30 Cap screw 49 Hydraulic hose 12 Suction hose 31 Flat washer 50 Hydraulic hose 13 Flange nut 32 Spacer 51 Hydraulic hose 14 Idler pivot pin 33 Pump mount plate 52 Bushing 15 Grease fitting 34 Pump mount spacer 53 Gear pump 16 Flange nut 35 Pulley 54 O ring 17 Retaining ring 36 Cap screw 5...

Page 151: ...ing end to unhook the spring from the tab on the pump mount plate 4 Rotate idler pulley away from pump drive belt and remove drive belt from pulleys Make sure that drive belt is in good condition if it is to be re installed Replace drive belt if worn or damaged 5 Remove drive belt idler components as needed Installing the Drive Belt Figure 65 1 Install all removed drive belt idler components Make ...

Page 152: ...ply pump drive belt tension with torsion spring on idler arm Figure 66 A Insert nut driver or small piece of pipe onto the end of the torsion spring B Push down on the spring end and then hook the spring under the tab on the pump mount plate 5 Lubricate the grease fitting on end of idler pivot shaft 6 Lower and secure hood Hydraulic System Service and Repairs Page 5 76 Reelmaster 3100 D 3105 D 202...

Page 153: ... fitting 4 Extension spring 15 Mount 26 Thrust washer 5 Hose 16 Flat washer 27 Traction stud 6 Flat washer 17 Screw 28 Lock nut 7 Lock nut 18 Cap screw 29 Spacer 8 Flat washer 19 Nut 30 Ball bearing 9 Flat washer 20 Flange head bolt 31 Screw 10 Ball joint 21 Flange nut 11 Pump lever 22 Neutral bracket Reelmaster 3100 D 3105 D Page 5 77 Hydraulic System Service and Repairs 20252SL Rev A ...

Page 154: ...assembly from pump trunnion and neutral bracket from mount plate Locate and retrieve key from trunnion Installing the Neutral Arm 1 Install key into trunnion slot Position neutral bracket to the mount plate and the pump lever and hub assembly to the pump trunnion 2 Secure pump lever and hub assembly to the piston pump trunnion with flat washer and cap screw 3 Secure neutral bracket to the pump mou...

Page 155: ...O ring 9 90º hydraulic fitting 28 Pump support 47 O ring 10 Washer 29 Spacer 48 Hydraulic hose 11 Hydraulic hose 30 Cap screw 49 Hydraulic hose 12 Suction hose 31 Flat washer 50 Hydraulic hose 13 Flange nut 32 Spacer 51 Hydraulic hose 14 Idler pivot pin 33 Pump mount plate 52 Bushing 15 Grease fitting 34 Pump mount spacer 53 Gear pump 16 Flange nut 35 Pulley 54 O ring 17 Retaining ring 36 Cap scre...

Page 156: ...ic hoses connected to the hydraulic fittings on the piston pump hydrostat and gear pump Allow hoses to drain into a suitable container Plug hose and fitting openings to prevent contamination CAUTION Support pump assembly during removal to prevent them from falling and causing personal injury or component damage 9 Support hydraulic pump assembly to prevent it from shifting 10 Remove both flange hea...

Page 157: ...pump shaft Remove bushing from the pump shaft Locate and retrieve key from pump shaft 16 Remove both cap screws and washers that secure piston pump to pump support Locate and retrieve spacers 17 Remove lock nuts flat washers and cap screws that secure the piston pump to the pump mount plate Remove pump from plate 18 If hydraulic fittings are to be removed from piston pump mark fitting orientation ...

Page 158: ... falling and causing personal injury or component damage 7 Position pump assembly to the machine Install fasteners and spacers securing the pump mount plate to the engine and pump support Figure 68 Tighten fasteners securely 8 Position and secure pump support to pump mount plate piston pump and engine mount with removed fasteners and spacers 9 Install pump drive belt see Installing the Drive Belt ...

Page 159: ...d Tubes O Ring Face Seal Fittings page 5 6 14 Install neutral arm assembly to the piston pump see Installing the Neutral Arm page 5 78 15 Fill hydraulic tank with new hydraulic fluid 16 Properly charge hydraulic system see Charge Hydraulic System page 5 69 17 Adjust the traction drive for neutral refer to Operator s Manual 18 Lower and secure hood Reelmaster 3100 D 3105 D Page 5 83 Hydraulic Syste...

Page 160: ...Piston Pump Hydrostat Service g345931 Figure 70 Hydraulic System Service and Repairs Page 5 84 Reelmaster 3100 D 3105 D 20252SL Rev A ...

Page 161: ...ey 25 Cover plate 41 O ring 10 Swashplate 26 Washer 3 per plate 42 Cartridge 11 Rotating kit 27 Coupler 43 O ring 12 Gasket 28 Housing 44 Bleed off spring 13 Valve plate 29 Retaining ring 45 Bleed off valve poppet 14 Bearing 30 Thrust washer 46 Bearing cup 15 Dowel pin 31 Thrust bearing 16 Back plate 32 Washer IMPORTANT If a piston pump failure occurred refer to Traction Circuit Closed Loop Compon...

Page 162: ...from the piston pump hydrostat to service either the relief valve or the bleed off valve IMPORTANT The shim kit is used to replace the original crush ring not shown in the cover plate If the swash plate cover plate or housing is replaced during servicing the old crush ring must be replaced See Piston Pump Hydrostat Crush Ring Replacement page 5 87 in conjunction with the Eaton service manual for a...

Page 163: ...le housing sub assembly consisting of the housing camplate bearing cone bearing cup and cover plate see Eaton service manual for Repair Information Model 70160 Variable Displacement Piston Pump 5 Install the washers and cap screws to the cover plate and housing Torque cap screws to 39 N m 29 ft lbs 6 Check torque required to rotate control shaft Torque should be from 1 7 to 2 8 N m 15 to 25 in lbs...

Page 164: ...wer cutting units stop engine and engage parking brake Remove key from the key switch Raise and support hood 2 Remove muffler from the engine to gain access to the gear pump see Removing the Exhaust System page 4 7 WARNING Before disconnecting or performing any work on the hydraulic system all pressure in the system must be relieved See Relieving Hydraulic System Pressure page 5 3 3 Thoroughly cle...

Page 165: ...oth cap screws and flat washers securing gear pump to the piston pump Separate gear pump from the piston pump Locate and retrieve O ring Plug openings of gear pump to prevent contamination 8 If hydraulic fittings are to be removed from gear pump mark fitting orientation to allow correct assembly Remove the hydraulic fittings and O rings from the gear pump as needed Discard removed O rings Installi...

Page 166: ...n hydraulic fluid through case drain hole IMPORTANT The gear pump suction fitting must be on the same side as the trunnion of the piston pump 5 Align gear teeth and slide gear pump input shaft into piston pump coupler Secure gear pump to piston pump with two 2 cap screws and flat washers 6 Remove the caps and plugs from gear pump fittings and hoses Using labels placed during gear pump removal prop...

Page 167: ...he Gear Pump Figure 75 Note The gear pump must be replaced as a complete assembly Individual gears housings and thrust plates are not available separately Disassemble gear pump for cleaning inspection and seal replacement only 1 Plug the pump ports and clean the outside of the pump thoroughly After cleaning remove plugs and drain any fluid out of the pump 2 Make sure that the key is removed from t...

Page 168: ...e back plate 8 Loosen the rear body from the adapter plate by tapping with a soft face hammer Lift body straight up to remove 9 Remove the idler gear from the wear and adapter plates Remove drive gear from the drive gear shaft IMPORTANT Note position of the open and closed side of the wear plate before removing from the adapter plate 10 Remove the wear plate and O ring from the adapter plate 11 Re...

Page 169: ... free of twisted or broken teeth B Gear shafts should be free of rough surfaces and excessive wear at bushing points and sealing areas C Gear shaft diameter in the bushing area should not be less than 19 0 mm 0 748 inch D Gears should be free of excessive scoring and wear E Make sure that the drive and idler gears have their snap rings in the grooves on each side F Break sharp edges of gear teeth ...

Page 170: ...ck plate should be about 37º to the pressure port Figure 77 and Figure 78 Assembling the Gear Pump Figure 75 Note When reassembling the pump check the marker line on each part to make sure the parts are properly aligned during reassembly 1 Lubricate new O rings pressure seals back up gaskets and wear plates with a thin coat of petroleum jelly Lubricate all other internal parts freely with clean hy...

Page 171: ...o hold it in place Install key into the slot in the drive gear shaft 11 Align marker line on back body and adapter plate Install body onto adapter plate and drive gear shaft IMPORTANT Do not dislodge seals during installation 12 Install the wear plate into the gear pocket of back body with the pressure seal and back up gasket against the adapter plate Make sure mid section cut away of the wear pla...

Page 172: ...heel assembly 24 Cotter pin 7 Pulley deck spacer 16 Lock nut 25 Lock nut 8 Wheel shield 17 Lug nut 26 Retaining ring 9 Brake bracket 18 Drive stud Removing the Front Wheel Figure 79 1 Park the machine on a level surface Lower cutting units stop engine and engage parking brake Remove key from the key switch WARNING Before jacking up the machine review and follow Jacking Instructions page 1 7 Hydrau...

Page 173: ...l motor from machine 7 If necessary remove the hydraulic adapters and O rings from the wheel motor Discard removed the O rings Installing the Front Wheel Figure 79 1 If adapters were removed from wheel motor lubricate and place new O rings onto fittings Install adapters into motor openings and tighten fittings see Installing the Hydraulic Fittings SAE Straight Thread O Ring Fittings page 5 8 2 Ins...

Page 174: ...4 Woodruff key 5 Hydraulic hose 10 Socket head screw Removing the Rear Wheel Motor Figure 80 1 Park the machine on a level surface Lower cutting units stop engine and engage parking brake Remove key from the key switch WARNING Before jacking up the machine review and follow Jacking Instructions page 1 7 Hydraulic System Service and Repairs Page 5 98 Reelmaster 3100 D 3105 D 20252SL Rev A ...

Page 175: ...8 Using hub puller see Special Tools page 2 13 loosen wheel hub from wheel motor 9 Remove the wheel hub and motor from vise Remove the lock nut and wheel hub from motor shaft Locate and retrieve the woodruff key 10 If hydraulic fittings are to be removed from the wheel motor mark fitting orientation to allow correct assembly Discard the O rings from removed fittings Installing the Rear Wheel Motor...

Page 176: ...ce Seal Fittings page 5 6 6 Install the wheel assembly to machine and secure with four 4 lug nuts 7 Lower the machine to the ground 8 Make sure that the lock nut is torqued from 345 to 372 N m 255 to 275 ft lb Also make sure that the wheel lug nuts are torqued from 61 to 88 N m 45 to 65 ft lb 9 Make sure hydraulic tank is full Add correct fluid if necessary Hydraulic System Service and Repairs Pag...

Page 177: ...similar in construction but do have some differences The right front and left front motors are the same basic design but the right side motor has a reverse timed manifold to allow correct rotation direction for forward and reverse The end cover of the rear motor has a check valve consisting of a ball and spring and both front motors lack this feature The wheel motor shown in Figure 81 is a rear mo...

Page 178: ...el Motor continued Note For repair of the wheel motors see the Parker Torqmotor Service Procedure TC TB TE TJ TF TG TH and TL Series Hydraulic System Service and Repairs Page 5 102 Reelmaster 3100 D 3105 D 20252SL Rev A ...

Page 179: ...O ring 5 O ring 13 Hydraulic hose 21 O ring 6 Hydraulic motor front 14 O ring 22 Hydraulic hose 7 O ring 15 90º hydraulic fitting 23 Hydraulic hose 8 90º hydraulic fitting 16 O ring Removing the Reel Motors 1 Park the machine on a level surface engage parking brake lower cutting units and stop engine Remove key from the key switch Reelmaster 3100 D 3105 D Page 5 103 Hydraulic System Service and Re...

Page 180: ...ve motor from cutting unit 7 Inspect the O ring on the reel motor flange and replace O ring if damaged 8 If hydraulic fittings are to be removed from motor mark fitting orientation to allow correct assembly Remove fittings from motor and discard O rings Installing the Reel Motors 1 If hydraulic fittings were removed from motor lubricate new O rings position O rings to fittings and install fittings...

Page 181: ... installing the hydraulic hoses make sure that the hydraulic hoses are straight not twisted before tightening the hoses to the motor fittings 7 Lubricate and install new O rings on motor fittings Correctly connect hydraulic hoses to the motor using labels placed during removal procedure Figure 82 8 Check the fluid level in hydraulic reservoir and add correct fluid if necessary Reelmaster 3100 D 31...

Page 182: ... gear 16 Washer 4 each 5 Front flange 11 Drive shaft 17 Lock washer 4 each 6 Pressure seal 12 Rear wear plate 18 Cap screw 4 each Disassembling the Reel Motor Figure 84 1 Plug the motor ports and clean the outside of the motor thoroughly After cleaning remove the plugs and drain any fluid out of the motor Hydraulic System Service and Repairs Page 5 106 Reelmaster 3100 D 3105 D 20252SL Rev A ...

Page 183: ...ring from the body Locate and retrieve dowel pins 7 Carefully remove body Lift body straight up to remove Make sure that the rear wear plate remains on the drive and idler gear shafts Remove and discard O ring from the body Locate and retrieve dowel pins IMPORTANT Record position of the open and closed side of the wear plates before removing Identify wear plates inner and outer drive gear and idle...

Page 184: ... Shaft seal 11 Carefully remove the dust seal retaining ring backup washer and shaft seal from the front flange Figure 86 Discard removed seals 12 Remove the cross over relief valves from rear cover if necessary Inspecting the Reel Motor 1 Remove any nicks and burrs from all parts with emery cloth CAUTION Use goggles or other appropriate eye protection when using compressed air for drying parts 2 ...

Page 185: ... cover for damage or wear 6 If internal parts are found to be worn or damaged reel motor replacement is necessary Assembling the Reel Motor Figure 84 1 Lubricate the O rings pressure seals back up gaskets and wear plate grooves with a thin coat of petroleum jelly Lubricate all other internal parts freely with clean hydraulic fluid 2 Install new seals into front flange Figure 86 A Press new shaft s...

Page 186: ...tall locating dowels in body Align marker line on the body and front flange IMPORTANT Do not dislodge seals during installation 12 Gently slide the body onto the assembly Firm hand pressure should be sufficient to engage the dowels 13 Check to make sure that the surface of the body contacts the front flange If the body does not contact the front flange check assembly for a shifted pressure seal ba...

Page 187: ...ulic manifold assembly 24 O ring 7 Hydraulic hose 16 O ring 25 Test nipple 8 O ring 17 Hydraulic fitting 26 Dust cap 9 Hydraulic fitting 18 O ring Removing the Hydraulic Manifold Assembly Note The ports on the manifold are marked for easy identification of components Example P1 is the gear pump connection port See Hydraulic Schematic page 5 11 to identify the function of the hydraulic lines and ca...

Page 188: ...nifold mark fitting orientation to allow correct assembly Remove fittings from manifold and discard O rings Installing the Hydraulic Manifold Assembly 1 If fittings were removed from mow control manifold lubricate and place new O rings onto fittings Install fittings into manifold openings using marks made during the removal process to properly orientate fittings Tighten fittings see Installing the...

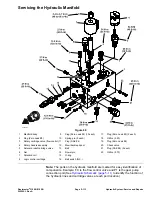
Page 189: ...cartridge valve 13 Ball 21 Plug SAE 6 2 each 6 Nut 14 Dowel pin 22 Orifice 073 7 Solenoid coil 15 O ring 8 Logic control cartridge 16 Ball switch N C Note The ports on the hydraulic manifold are marked for easy identification of components Example FC is the flow control valve and P1 is the gear pump connection port See Hydraulic Schematic page 5 11 to identify the function of the hydraulic lines a...

Page 190: ...l kit from valve 4 Visually inspect the manifold port and cartridge valve for damage to sealing surfaces damaged threads and contamination A Contamination may cause valves to stick or hang up Contamination can become lodged in small valve orifices or seal areas causing valve malfunction B If valve sealing surfaces appear pitted or damaged the hydraulic system may be overheating or there may be wat...

Page 191: ...nding C Torque cartridge valve using a deep well socket to specification shown in manifold illustration 7 For solenoid valve install solenoid coil and O rings if equipped to the cartridge valve Torque nut to specification shown in manifold illustration 8 If problems still exist remove valve and clean again or replace valve Rotary Cartridge Valves g345658 Figure 90 1 Handle base 7 Set screw 2 used ...

Page 192: ...n and sealing IMPORTANT Use care when installing cartridge valves Slight bending or distortion of the stem tube can cause binding and malfunction Make sure that the deep well socket fully engages the valve base B Lubricate threads on cartridge valve with clean hydraulic oil Thread rotary cartridge valve carefully into the manifold port The valve should go in easily without binding Torque valve wit...

Page 193: ...tary spool 1 Remove spool from mow manifold A Remove backlap switch from mow manifold before removing mow backlap spool Remove dowel pin and ball from manifold port after switch is removed Remove and discard O ring from switch B Remove lower retaining ring from mow backlap spool Raise mow backlap spool to allow access to retaining ring on upper end of spool Remove upper retaining ring C Push spool...

Page 194: ... top of manifold Install upper retaining ring D Push mow backlap spool down and install lower retaining ring to spool E If handle was removed from spool position spool so handle location of spool is between stop pins Apply Loctite 603 Retaining Compound or equivalent to threads on handle and install handle into spool F Place ball and dowel pin in backlap switch manifold port Install new O ring ont...

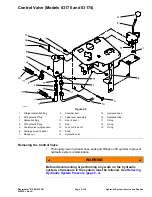
Page 195: ...e spool 12 Lock nut 2 each 19 O ring 6 Carriage screw 2 each 13 Knob 7 Flange nut 14 Hydraulic hose Removing the Control Valve 1 Thoroughly clean hydraulic hose ends and fittings on lift cylinder to prevent hydraulic system contamination WARNING Before disconnecting or performing any work on the hydraulic system all pressure in the system must be relieved See Relieving Hydraulic System Pressure pa...

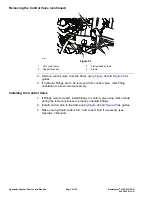
Page 196: ...rk fitting orientation to allow correct assembly Installing the Control Valve 1 If fittings were removed install fittings to control valve using marks made during the removal process to properly orientate fittings 2 Install control valve to the frame using Figure 92 and Figure 93 as guides 3 Make sure hydraulic tank is full Add correct fluid if necessary see Operator s Manual Hydraulic System Serv...

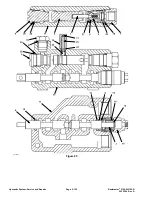
Page 197: ...g 3 Spacer 12 O ring 21 O ring 4 Spool 13 Retaining ring 22 Detent plunger 5 Seat 14 Washer 23 Spring 6 Plug solid 15 Back up washer 24 O ring 7 Seat retaining plug 16 Spool spring 25 O ring 8 Bushing 17 Disc 26 Back up washer 9 Check spring 18 Plug 27 O ring Reelmaster 3100 D 3105 D Page 5 121 Hydraulic System Service and Repairs 20252SL Rev A ...

Page 198: ...g345756 Figure 95 Hydraulic System Service and Repairs Page 5 122 Reelmaster 3100 D 3105 D 20252SL Rev A ...

Page 199: ...e solid plug back up washer and O ring from the opposite end of the plunger 8 Remove plug and O ring from the top of the valve body next to the detent plug 9 Remove detent plug and O ring from the valve body Remove disc spring and detent plunger from the body Inspecting the Control Valve 1 Inspect spool and spool bore for wear If wear is excessive replace valve with new one 2 Inspect springs and r...

Page 200: ... from 41 to 48 N m 30 to 35 ft lb 9 Lubricate plunger liberally with clean hydraulic fluid and install into its valve body bore 10 Install new O ring seat check poppet and check spring into the plunger bore 11 Install O ring back up washer and seat retaining plug into the plunger bore Torque plug from 41 to 48 N m 30 to 35 ft lb 12 Install O ring and plug into the top of the valve body next to the...

Page 201: ...ydraulic tube 5 Flange nut 14 Link 4 each 23 Hydraulic tube 6 Knob 15 Bolt 24 Hydraulic hose 7 90º hydraulic fitting 16 Lock nut 25 O ring 8 Valve actuator bracket 17 Push nut 26 Hydraulic hose 9 Shoulder bolt 18 Hydraulic fitting 27 Hydraulic tube Removing the Control Valve 1 Thoroughly clean hydraulic hose ends and fittings on lift cylinder to prevent hydraulic system contamination Reelmaster 31...

Page 202: ...d Figure 97 as guides 3 If hydraulic fittings are to be removed from control valve mark fitting orientation to allow correct assembly Installing the Control Valve 1 If fittings were removed install fittings to control valve using marks made during the removal process to properly orientate fittings 2 Install the control valve to the frame using Figure 96 and Figure 97 as guides 3 Make sure hydrauli...

Page 203: ...etent spring 4 Spool 14 Washer 24 O ring 5 Seat 15 Seat retaining plug 25 O ring 6 Solid plug 16 Spool spring 26 Back up washer 7 Seat retaining plug with port 17 Disc 27 O ring 8 Bushing 18 Plug 28 O ring 9 Check spring 19 Detent plug 29 O ring 10 Spool cap 20 Wiper seal 30 Back up washer Reelmaster 3100 D 3105 D Page 5 127 Hydraulic System Service and Repairs 20252SL Rev A ...

Page 204: ...g345782 Figure 99 Hydraulic System Service and Repairs Page 5 128 Reelmaster 3100 D 3105 D 20252SL Rev A ...

Page 205: ...ote Disassemble spool assemblies only if the retaining ring spacer spring or washer need replacing 5 Remove seat retaining plugs back up washers O rings and check springs from the valve body 6 Remove check poppets seats O rings and plungers from the valve body 7 Remove solid plug back up washer and O ring from the opposite end of the plunger 8 Remove plug and O ring from the top of the valve body ...

Page 206: ...proper bore 9 Install new O rings seats check poppets and check springs into the plunger bores 10 Install O rings back up washers and seat retaining plugs into their plunger bores Torque both plugs from 41 to 48 N m 30 to 35 ft lb 11 Install new O ring back up washer and solid plug into the bore with the grooved plunger Torque plug from 41 to 48 N m 30 to 35 ft lb 12 Install new O ring seat check ...

Page 207: ... Lock nut 26 O ring 5 Flat washer 16 Spacer 27 O ring 6 Lock nut 17 Hydraulic tube 28 O ring 7 Scissor frame 18 Hydraulic tube 29 Retaining ring 8 Hydraulic cylinder 19 90º hydraulic fitting 30 Lower frame LH 9 Spacer 20 Bulkhead lock nut 31 Frame 10 Flat washer 21 Straight hydraulic fitting 32 Bolt 11 Cap screw 22 Hydraulic hose Reelmaster 3100 D 3105 D Page 5 131 Hydraulic System Service and Rep...

Page 208: ...rrect assembly Installing the Sidewinder 1 If hydraulic fittings were removed from cylinder install fittings to cylinder using marks made during the removal process to properly orientate fittings 2 Install hydraulic cylinder to the frame using Figure 100 as guide 3 Adjust scissors mount as follows A Shift sidewinder fully to the left fully retract cylinder B Loosen four cap screws securing mount t...

Page 209: ...t hub 21 Decal 36 O ring 7 Steering cover 22 Hose assembly 37 O ring 8 Bolt 23 Hose assembly 38 O ring 9 Decal 24 Hose assembly 39 Phillips pan head screw 10 Ball knob 25 Hose assembly 40 Steering wheel cap 11 Lever 26 Hose assembly 41 Steering shield 12 Steering control valve 27 Tilt steering boss 42 Slope indicator assembly 13 Tilt bracket 28 Friction disc 43 Nut 14 Bolt 29 Friction disc 15 Flat...

Page 210: ...at washer 3 Label all hydraulic hoses and fittings for assembly purposes Note port identification on steering control valve 4 Remove the steering control valve from the steering column using the Figure 101 and Figure 102 Installing the Steering Control Valve 1 Install the steering control valve to the steering column using the Figure 101 and Figure 102 2 Use labels placed during the removal proces...

Page 211: ...ol 12 Spacer 20 Screw fitting ports P T and E 5 Bearing assembly 13 O ring 21 P port check ball 6 Shaft seal 14 Distribution plate 22 Spring set 7 Ball stop 15 Inner gearwheel 8 Ball 16 Outer gearwheel Note For service of the steering control valve see the Sauer Danfoss Steering Unit Type OSPM Service Manual Reelmaster 3100 D 3105 D Page 5 135 Hydraulic System Service and Repairs 20252SL Rev A ...

Page 212: ...etaining ring 12 Rear casting Removing the Steering Cylinder 1 Park the machine on a level surface Lower cutting units stop engine and engage parking brake Remove key from the key switch Note The rear tire must be removed to allow sufficient clearance to remove the steering cylinder from the machine Hydraulic System Service and Repairs Page 5 136 Reelmaster 3100 D 3105 D 20252SL Rev A ...

Page 213: ...ng Cylinder 1 If removed install ball joints into steering cylinder 2 Lubricate and place new O rings onto removed steering cylinder fittings Install fittings into cylinder openings using marks made during the removal process to properly orientate fittings Tighten fittings see Installing the Hydraulic Fittings SAE Straight Thread O Ring Fittings page 5 8 3 Install the steering cylinder to machine ...

Page 214: ...and 13 Square O ring 4 Seal 9 O ring 14 Wear ring 5 O ring 10 Back up ring Disassembling the Steering Cylinder 1 Remove the hydraulic fluid from the steering cylinder into a drain pan by slowly pumping the cylinder shaft Plug both ports and clean the outside of the cylinder Hydraulic System Service and Repairs Page 5 138 Reelmaster 3100 D 3105 D 20252SL Rev A ...

Page 215: ...piston rod for straightness excessive scoring and pitting or wear Inspect piston and head for evidence of excessive scoring and pitting or wear Replace entire cylinder assembly if necessary 1 Make sure all parts are clean before reassembly 2 Coat new O rings wear ring seal rod seal and back up ring with clean hydraulic fluid A Install seal wearing and O ring to the piston B Install dust seal rod s...

Page 216: ...light coat of clean hydraulic fluid Slide piston shaft and cylinder gland assembly into the barrel being careful not to damage the seals 6 Secure head into the barrel with the retaining ring Hydraulic System Service and Repairs Page 5 140 Reelmaster 3100 D 3105 D 20252SL Rev A ...

Page 217: ...crew 18 Flange head screw 31 Bulkhead nut 6 Hydraulic hose 19 Cap screw 32 Hose rod 7 Centering wire 20 Bearing cap 33 Flange head screw 8 Hydraulic hose 21 Jam nut 34 Flange nut 9 Hydraulic hose 22 Cap screw 35 O ring 10 90º hydraulic fitting 23 Lock nut 36 O ring 11 Flange nut 24 Hardened washer 37 Flange head screw 12 Flat washer 25 Slide support bar 38 Link clip 13 Straight link chain 26 Pin R...

Page 218: ...rom lift cylinder mark fitting orientation to allow correct assembly Remove fittings from the cylinder and discard O rings Installing the Front Lift Cylinder 1 If fittings were removed from lift cylinder lubricate and place new O rings onto fittings Install fittings into cylinder port openings using marks made during the removal process to properly orientate fittings Tighten fittings see Installin...

Page 219: ...Rear Lift Cylinder g346266 Figure 107 Model 03171 shown Reelmaster 3100 D 3105 D Page 5 143 Hydraulic System Service and Repairs 20252SL Rev A ...

Page 220: ...ic tube 39 Nut 59 Flange head bolt 20 Tube clamp 40 Flange nut Removing the Rear Lift Cylinder 1 Park machine on a level surface Lower cutting units stop engine and engage parking brake Remove key from the key switch 2 Read the General Precautions for Removing and Installing Hydraulic System Components page 5 62 3 To prevent contamination of hydraulic system during lift cylinder removal thoroughly...

Page 221: ... Fittings page 5 8 2 Install the rear lift cylinder to the frame and lift arm using Figure 107 as guide 3 Attach hydraulic hoses to lift cylinder see Installing Hydraulic Hoses and Tubes O Ring Face Seal Fittings page 5 6 4 Fill the reservoir with hydraulic fluid as required 5 Adjust the rear lift arm refer to Operator s Manual 6 After installation is completed operate lift cylinder to verify cyli...

Page 222: ...Internal collar 6 O ring 12 Dust seal Disassembling the Lift Cylinder 1 Remove fluid from lift cylinder into a drain pan by slowly pumping the cylinder shaft Plug both ports and clean the outside of the cylinder IMPORTANT Prevent damage when clamping the hydraulic cylinder into a vise clamp on the clevis only Hydraulic System Service and Repairs Page 5 146 Reelmaster 3100 D 3105 D 20252SL Rev A ...

Page 223: ...l the dust seal O ring back up ring and dust seal to the head IMPORTANT Do not clamp vise jaws against the shaft surface Protect shaft surface before mounting in a vice 3 Mount shaft securely in a vise by clamping on the clevis of the shaft A Coat shaft with clean hydraulic oil B Slide head onto the shaft Install rod seal onto shaft and into head C Install piston and nut onto the shaft Torque nut ...

Page 224: ...Hydraulic System Service and Repairs Page 5 148 Reelmaster 3100 D 3105 D 20252SL Rev A ...

Page 225: ...or Lights 6 14 Hour Meter 6 16 PTO Switch 6 18 Seat Switch 6 20 Parking Brake Switch 6 22 Neutral Switch 6 24 Mow Transport Switch 6 26 Backlap Switch 6 27 High Temperature Warning Switch 6 29 High Temperature Shutdown Switch 6 31 Oil Pressure Switch 6 33 Glow Relay 6 35 Diode Assembly 6 37 Fuel Stop Solenoid 6 38 Reel Drive Solenoid 6 40 Glow Controller 6 41 Fuel Pump 6 43 Standard Control Module...

Page 226: ... SCM to monitor and control electrical components required for safe operation The SCM can be used to check operation of machine switches by monitoring the SCM LED s Detailed information on the Standard Control Module can be found later in this chapter Diesel Engine Electrical Components The engine used in the Reelmaster incorporates the following electrical components to start and run properly Glo...

Page 227: ...t leads connected to the battery posts and record the battery voltage Note Upon starting the engine the battery voltage will drop and then should increase once the engine is running Note Depending upon the condition of the battery charge and battery temperature the battery voltage will increase at different rates as the battery charges Start the engine and run at high idle 2650 RPM Allow the batte...

Page 228: ...h properly adjusted 3 An operator must be in the seat or the parking brake must be engaged When the engine is running the engine should stop in 1 3 seconds if 1 The operator leaves the seat without engaging the parking brake 2 The traction pedal is depressed with the parking brake engaged Use the Standard Control Module SCM to check operation of the interlocks 1 Remove the cover over the control p...

Page 229: ...ing 1 Before adjusting the traction neutral switch check and adjust traction system neutral position refer to Traction Unit Operator s Manual IMPORTANT To prevent traction neutral switch damage make sure that no components contact switch through entire traction pedal movement 2 Park the machine on a level surface engage the parking brake lower the cutting units and stop the engine Remove the key f...

Page 230: ...ust the switch loosen the nut securing the switch to the switch bracket or the nuts securing the switch bracket to the floor plate and adjust the switch position as needed 5 After adjusting the switch use the Standard Control Module see Standard Control Module SCM page 6 45 to verify that the switch and circuit wiring are functioning correctly The switch should open when the traction pedal is move...

Page 231: ...justing 1 Park the machine on a level surface engage the parking brake lower the cutting units and stop the engine Remove the key from the key switch g346740 Figure 112 1 Mow Transport switch 2 Rocker arm 2 When the mow transport lever is on the transport position the clearance between the rocker arm and the switch should be 0 6 to 1 1 mm 0 025 to 0 045 in at the closest point Figure 112 Reelmaste...

Page 232: ...rs that secure switch to bracket and position switch to allow correct clearance between switch and rocker arm Tighten switch fasteners and recheck switch to rocker arm clearance Electrical System Adjustments Page 6 8 Reelmaster 3100 D 3105 D 20252SL Rev A ...

Page 233: ...oing a continuity check Note For engine component testing information starter solenoid and motor alternator glow plugs see the Kubota Workshop Manual CAUTION When testing electrical components for continuity with a multimeter ohms setting make sure that power to the circuit has been disconnected Reelmaster 3100 D 3105 D Page 6 9 Electrical System Component Testing 20252SL Rev A ...

Page 234: ...er to Servicing the Battery page 6 49 2 Locate and unplug the fusible link connector P1 from the machine wire harness 3 Use a multimeter to ensure that the continuity exists between each terminal pin in the connector P1 and connector J1 at the starter Figure 114 4 If any of the fusible links are open replace the fusible link harness Note Do not replace individual fusible link conductors of the fus...

Page 235: ...ith the fuse installed in the fuse block use a multimeter to check that 12 VDC exists at both of the terminal test points on the fuse If 12 VDC exists at 1 of the fuse test points but not at the other the fuse is damaged 2 If necessary remove the fuse from the fuse block for testing The fuse should have continuity between the fuse terminals A Ensure that the key switch is in the OFF position and t...

Page 236: ...anel and has three 3 positions OFF RUN and START Figure 117 The Standard Control Module SCM monitors the operation of the key switch and reacts to the various key switch positions g346371 Figure 118 1 Switch 3 Hex nut 2 Key 4 Lock washer Electrical System Component Testing Page 6 12 Reelmaster 3100 D 3105 D 20252SL Rev A ...

Page 237: ... ohms setting the switch functions can be tested to determine whether continuity exists between the various terminals for each switch position Verify continuity between switch terminals SWITCH POSITION NORMAL CIRCUITS OTHER CIRCUITS OFF NONE NONE RUN B A I X Y START B S I NONE 5 Replace key switch if testing determines that it is faulty 6 If the key switch tests correctly and a circuit problem sti...

Page 238: ...o oil pressure switch located on the engine near the oil filter Turn key switch to the ON position the engine oil pressure light should come on indicating correct operation of the indicator light and circuit wiring High Temperature Warning Light If the engine coolant temperature reaches 105ºC 221ºF approximate the high temperature warning light should come on To test the high temperature warning l...

Page 239: ...546 Figure 120 1 Apply 12 VDC to terminals 1A and 2A Figure 120 2 Ground terminals 1B and 2B Figure 120 3 Both indicator lights should illuminate Reelmaster 3100 D 3105 D Page 6 15 Electrical System Component Testing 20252SL Rev A ...

Page 240: ...move key from the key switch 2 Locate the wire harness connector at the rear of the hour meter Unplug the harness connector from the hour meter g238110 Figure 122 1 Hourglass icon 3 Positive terminal PK 2 Negative terminal BK 3 Connect the positive terminal of a 12 VDC source to the positive terminal of the hour meter 4 Connect the negative terminal of the voltage source to the other terminal of t...

Page 241: ...of an hour in 6 minutes 6 Disconnect the voltage source from the hour meter 7 Replace the hour meter if necessary 8 Connect the wire harness connector to the hour meter Reelmaster 3100 D 3105 D Page 6 17 Electrical System Component Testing 20252SL Rev A ...

Page 242: ...ated because of excessive engine coolant temperature avoid shutting off the engine Under this condition push the PTO knob down slowly drive to a safe flat area move the throttle lever to the SLOW position press the traction pedal and set the parking brake Allow the engine to be idle for several minutes while it cools to a safe level and check the cooling system before returning the machine to serv...

Page 243: ...ting test the switch functions to determine if the continuity exists between the various terminals for each switch position Check the continuity between the switch terminals Circuit Logic Table Switch Position Closed Circuits Open Circuits OFF DOWN COM B NC B COM C NC C COM B NO B COM C NO C ON UP COM B NO B COM C NO C COM B NC B COM C NC C D Replace the PTO switch if testing determines that the s...

Page 244: ...the seat switch If the key switch is in the ON position and the seat is occupied the SCM in seat input LED should be illuminated Testing 1 Park the machine on a level surface lower the cutting deck set the parking brake and shut off the engine 2 Before you disconnect the seat switch for testing ensure that you test the switch and its circuit wiring as a SCM input refer to Standard Control Module S...

Page 245: ...hion Ensure that there is continuity between the harness terminals of the seat switch as the seat cushion approaches the bottom of its travel indicating that the seat switch is functioning 8 Replace the seat switch if testing determines that the switch is damaged 9 If the seat switch testing is correct and the circuit problem still exists check the machine wire harness refer to the Electrical Sche...

Page 246: ...Magnet catch 13 Parking brake link 21 Slotted hex head screw 6 Rivet 14 Clevis pin 22 Bolt 7 Cover bracket 15 Cotter pin 8 Control panel cover 16 Clevis pin The switch used for the parking brake is a normally open switch The switch closes when the parking brake is not set The parking brake switch is located under the steering tower cover Figure 126 Electrical System Component Testing Page 6 22 Ree...

Page 247: ... access to parking brake switch 6 Locate the parking brake switch 7 Make sure key switch is OFF and disconnect the parking brake switch connector from machine wire harness 8 Connect a multimeter ohms setting across the switch connector terminals to check the continuity of the switch as follows A When the switch plunger is extended there should not be continuity between the switch terminals B When ...

Page 248: ...move key from key switch 2 Make sure the neutral switch is properly adjusted see Neutral Switch page 6 5 3 Before disconnecting the switch for testing the switch and its circuit wiring should be tested as a SCM input see Standard Control Module SCM page 6 45 If input testing verifies that the switch and circuit wiring are functioning correctly no further switch testing is necessary If however inpu...

Page 249: ...leads 7 Slowly depress the traction pedal The continuity tester should show no continuity as the pedal is moved to the full forward or full reverse direction 8 Replace and readjust the switch if necessary 9 Reconnect switch after testing Reelmaster 3100 D 3105 D Page 6 25 Electrical System Component Testing 20252SL Rev A ...

Page 250: ...ly parking brake and remove key from key switch 2 Make sure the mow transport switch is properly adjusted see Mow Transport Switch page 6 7 3 Locate the switch and disconnect electrical connector from the switch 4 Check the continuity of the switch by connecting a multimeter ohms setting across the connector terminals 5 When the switch plunger is extended mow transport slide in MOW position there ...

Page 251: ...lief cartridge valve 13 Ball 21 Plug SAE 6 2 each 6 Nut 14 Dowel pin 22 Orifice 073 7 coil 15 O ring 8 Logic control cartridge 16 Backlap switch The backlap switch is a normally open ball switch that is in the normal open state when the backlap lever is in the mow position When the backlap lever is in the backlap position the switch closes The backlap switch is attached to the hydraulic mow contro...

Page 252: ...ctrical connector from the backlap switch 6 Check the continuity of the switch by connecting a multimeter ohms setting across the switch connector terminals 7 With the key switch in the OFF position turn the backlap lever to the backlap position while watching the multimeter Continuity should be made as the switch closes 8 Turn the backlap lever to the mow position while watching the multimeter Co...

Page 253: ...ure warning switch and circuit wiring should be tested as a SCM input before performing the following testing procedure Testing 1 Park the machine on a level surface lower the cutting deck shut off the engine set the parking brake and remove the key from the key switch 2 Unlatch the hood and raise it DANGER If the radiator or engine is hot pressurized hot coolant can escape and cause burns Do not ...

Page 254: ...luid temperature increases 7 The high temperature warning switch is normally open and should close between 102 to 108ºC 216 to 226ºF 8 Allow fluid to cool while observing temperature 9 The high temperature warning switch should open at about 98ºC 208ºF 10 If the switch does not meet the specifications replace the switch 11 After you complete the testing install the temperature switch to the engine...

Page 255: ...it wiring should be tested as a SCM input before performing the following testing procedure Testing 1 Park the machine on a level surface lower the cutting deck shut off the engine set the parking brake and remove the key from the key switch 2 Unlatch the hood and raise it DANGER If the radiator or engine is hot pressurized hot coolant can escape and cause burns Do not open the radiator cap or dra...

Page 256: ...rving temperature 9 The high temperature shutdown switch should open at approximately 104 C 219 F 10 If the switch does not meet the specifications replace the switch 11 After you complete the testing install the temperature switch to the engine housing do the following steps A Clean the threads of the housing and switch Apply thread sealant to the threads of the switch B Thread the switch into th...

Page 257: ...ting 1 Park the machine on a level surface lower the cutting deck set the parking brake and shut off the engine 2 Turn the key switch to the ON position The oil pressure indicator light on the control panel should be illuminated 3 If the indicator light is not illuminated A Unlatch the hood and raise it B Locate the engine oil pressure switch on the engine and disconnect the wire harness connector...

Page 258: ...the Electrical Schematics and Wire Harness Drawings Diagrams in Appendix A page A 1 6 After you complete the oil pressure switch testing connect the wire harness connector to the oil pressure switch 7 Lower the hood and secure it with the latches Electrical System Component Testing Page 6 34 Reelmaster 3100 D 3105 D 20252SL Rev A ...

Page 259: ... disconnect the negative cable from the battery and then disconnect the positive cable from the battery refer to Servicing the Battery page 6 49 4 Disconnect the wire harness connectors from the relay Note Before taking small resistance readings with a digital multimeter short the multimeter test leads together The meter displays a small resistance value usually 0 5 ohms or less This resistance is...

Page 260: ... leads from the relay terminals 8 Replace the relay if testing determines that the relay is damaged 9 If the relay testing is correct and a circuit problem still exists check the main wire harness refer to the Electrical Schematics and Wire Harness Drawings Diagrams in Appendix A page A 1 10 Connect the wire harness electrical connectors to the relay after you complete the testing 11 Connect the p...

Page 261: ... that is to be tested and remove the cable tie that secures the diode to the wire harness Unplug the diode from the wire harness for testing 3 The diode Figure 137 can be tested by using a digital multimeter diode test or ohms setting and the Diode Test Table page 6 37 4 Replace the diode assembly if testing determines that the diode is damaged 5 After you complete the testing ensure that the diod...

Page 262: ...to the engine causing the engine to stop running The fuel stop solenoid is grounded through the solenoid housing Testing the Fuel Stop Solenoid In Place Note Before taking the small resistance readings with a digital multimeter short the multimeter test leads together The meter will display a small resistance value usually 0 5 ohms or less This resistance is because of the internal resistance of t...

Page 263: ...he hood and raise it 3 Locate the fuel stop solenoid on the engine and disconnect the wire harness connector from the solenoid Note The solenoid can be removed from the engine or tested in place 4 If the solenoid is removed from the engine ensure that the solenoid plunger moves freely and is free of dirt unwanted material and corrosion Note When testing the run solenoid use test leads with at leas...

Page 264: ...ultimeter short the test leads together The meter will display a small resistance value usually 0 5 ohms or less This resistance is due to the internal resistance of the meter and test leads Subtract this value from the measured value of the component you are testing 2 Apply 12 VDC source directly to the solenoid Listen for solenoid to switch on 3 Remove 12 VDC source from the solenoid Listen for ...

Page 265: ...there is power from the battery 2 Disconnect the electrical connector to the fuel stop solenoid to prevent the engine from starting 3 Turn the key switch to the RUN position Check the following while in the RUN position A Glow indicator lamp is on B Glow relay is energized C Glow plugs are energized D Glow indicator lamp goes out and glow plugs de energize after approximately 6 seconds 4 Turn the ...

Page 266: ...elay and glow plugs refer to the Electrical Schematics in Appendix A page A 1 B Check the continuity of the circuitry from the battery to key switch glow controller glow lamp glow relay and ground refer to the Electrical Schematics in Appendix A page A 1 C Replace the parts as necessary 6 Connect the electrical connector to the fuel stop solenoid Electrical System Component Testing Page 6 42 Reelm...

Page 267: ...up any spilled diesel fuel before starting the engine Testing the Fuel Pump Capacity 1 Park the machine on a level surface lower the cutting deck set the parking brake and shut off the engine Ensure that the key switch is in the OFF position 2 Unlatch the hood and raise it 3 Disconnect electrical connector from the fuel stop solenoid to prevent the engine from firing 4 Disconnect fuel hose pump di...

Page 268: ...ot met IMPORTANT If the fuel pump is replaced ensure that replacement pump is the correct pump for your Reelmaster by using your Parts Catalog If incorrect pump is used the fuel system damage can occur 9 Connect the fuel pump discharge hose to the fuel water separator or filter Ensure to secure the hose with the hose clamp 10 Reconnect electrical connector to the fuel stop solenoid 11 Prime the fu...

Page 269: ...onitor the inputs from the neutral parking brake PTO start ignition backlap high temperature warning switch and high temperature shutdown switch Output to the PTO reel drive solenoid fuel pump and engine run solenoid are controlled based on the inputs received by the Module The Standard Control Module does not connect to an external computer or hand held device can not be re programmed and does no...

Page 270: ...run position testing of the switch and circuit wiring would be required Refer to the Traction Unit Operator s Manual for operation and troubleshooting of the Standard Control Module Electrical System Component Testing Page 6 46 Reelmaster 3100 D 3105 D 20252SL Rev A ...

Page 271: ...eratures are cool WARNING The gases are explosive also they can cause nausea Wear safety goggles and rubber gloves when working with electrolyte Charge the battery in a well ventilated place so that the gasses produced while charging can dissipate Keep open flames and electrical sparks away from the battery do not smoke Disconnect the charger from the electrical outlet before connecting or disconn...

Page 272: ... Clean the cable clamps and terminals separately Connect the cables with the positive cable first Apply a layer of terminal protector Toro Part No 107 0392 or a light coat of petroleum jelly to the terminals to reduce corrosion after you make the connections 5 Check the battery electrolyte level every 25 operating hours and every 30 days if machine is in storage 6 Maintain the cell level with the ...

Page 273: ...avoid splashing or spilling of the electrolyte Always wear the safety goggles and a face shield while working with batteries Battery Specifications Battery electrolyte specific gravity Fully Charged 1 250 to 1 280 Discharged less than 1 240 Battery specifications BCI Group Size 26 525 CCA at 18 C 0 F Reserve Capacity of 80 minutes at 27 C 80 F Battery dimensions including terminal posts and caps L...

Page 274: ...e from battery 4 Carefully remove battery from machine 5 Install battery in reverse order making sure to connect and tighten positive cable to battery before connecting the negative cable Route battery cables as noted during removal Note Before connecting the negative ground cable connect a digital multimeter set to amps between the negative battery post and the negative ground cable connector The...

Page 275: ...nimum and maximum fill lines Charge at 15 to 25 A for 15 minutes to allow sufficient mixing of the electrolyte refer to Charging the Battery page 6 53 2 Perform the hydrometer test of the battery electrolyte IMPORTANT Ensure that the area around the cells is clean before opening the battery caps A Use a hydrometer to measure the specific gravity of each cell Pull the electrolyte in and out of the ...

Page 276: ...te temperature of the center battery cell D Connect a battery load tester to the battery terminals following the manufacturer s instructions Connect a digital multimeter to the battery terminals E If you charge the battery apply a 150 A load for 15 seconds to remove the surface charge Wait for 10 minutes before proceeding with load test F Apply a test load of 270 A 1 2 the cranking performance rat...

Page 277: ...ic Gravity Open Circuit Voltage 100 1 265 12 68 75 1 225 12 45 50 1 190 12 24 25 1 155 12 06 0 1 120 11 89 2 Determine the charging time and rate using the manufacturer s battery charger instructions or the following Battery Charge Level Table page 6 53 Battery Charge Level Table Battery Charge Level Percent of Fully Charged Battery Reserve Capacity Minutes 75 50 25 0 80 or less 3 8 hrs 3 A 7 5 hr...

Page 278: ...ry charger manufacturer s instructions connect the charger cables to the battery posts Ensure that you make a good connection 4 Charge the battery following the manufacturer s instructions 5 Occasionally check the temperature of the battery electrolyte If the temperature is more than 52 ºC 125 ºF or the electrolyte is violently gassing or spewing lower and temporarily stop the charging rate 6 Thre...

Page 279: ...rs 7 5 Standard Seat 7 5 Deluxe Seat 7 7 Front Wheel and Brake 7 9 Rear Fork and Wheel with Hydraulic Motor 7 13 Rear Fork and Wheel without Hydraulic Motor 7 15 Brake Linkages 7 18 Steering Column 7 20 Front Lift Arms 7 23 Rear Lift Arm 7 25 Traction Pedal 7 28 Reelmaster 3100 D 3105 D Page 7 1 Wheels Brakes and Chassis 20252SL Rev A ...

Page 280: ...ing the operation general maintenance and maintenance intervals for your Reelmaster machine Refer to the Operator s Manual for additional information when servicing the machine Wheels Brakes and Chassis General Information Page 7 2 Reelmaster 3100 D 3105 D 20252SL Rev A ...

Page 281: ...t parking brake lever until a force of 133 to 178 N 30 to 40 lb is required to actuate lever To adjust A Loosen set screw on adjustment knob Figure 146 B Turn adjustment knob clockwise to increase force and counterclockwise to decrease force C Tighten set screw after adjustment g344070 Figure 147 1 Piston pump 2 By pass valve 3 Check brake adjustment as follows A Rotate by pass valve on the piston...

Page 282: ...just brakes as follows A Remove both front wheel assemblies from the machine see Removing the Front Wheel and Brake page 7 9 B Adjust brakes by turning clevis to increase or decrease shoe pressure on the brake drum Figure 148 Make sure that the brake shoes do not drag against drums with the parking brake lever released C If brakes can not be adjusted properly repair or replace brake components as ...

Page 283: ...ut 2 each 2 Seat belt buckle 7 Flange head bolt 4 each 12 Seat belt bracket 3 Bolt 2 each 8 Seat support strap 2 each 13 Seat belt 4 Spacer 2 each 9 Flange nut 4 each 14 Heat shield 5 Seat slider 10 Seat adjuster Reelmaster 3100 D 3105 D Page 7 5 Wheels Brakes and Chassis Service and Repairs 20252SL Rev A ...

Page 284: ...tch Separate the seat from the frame 4 Remove seat parts as necessary to make repairs using Figure 149 as a guide Installing the Seat 1 Install any new seat parts using Figure 149 as a guide 2 Position the seat and support straps to the fuel tank and frame 3 Connect the electrical connector to the seat switch 4 Secure the seat support straps to the frame with four flange head bolts Wheels Brakes a...

Page 285: ...vel surface lower cutting units stop engine engage parking brake and remove key from the key switch 2 Remove the four flange head bolts securing the seat support straps to the frame refer to Figure 150 3 Disconnect the electrical connector from the seat switch Separate the seat from the frame Reelmaster 3100 D 3105 D Page 7 7 Wheels Brakes and Chassis Service and Repairs 20252SL Rev A ...

Page 286: ...make repairs using Figure 151 and Figure 152 as a guide Installing the Seat 1 Install any new seat parts using Figure 151 and Figure 152 as a guide 2 Position the seat and support straps to the fuel tank and frame 3 Connect the electrical connector to the seat switch 4 Secure the seat support straps to the frame with four flange head bolts refer to Figure 150 Wheels Brakes and Chassis Service and ...

Page 287: ... pivot bracket 2 each 6 Hydraulic motor assembly CCW 16 Lock nut 2 each 26 Flange head bolt 2 each 7 Pulley deck spacer 8 each 17 Lug nut 8 each 27 Lock nut 10 each 8 Wheel shield 2 each 18 Drive stud 8 each 28 Retaining ring 2 each 9 Brake bracket 2 each 19 Bolt 8 each 10 Lock nut 8 each 20 Brake lever 2 each Removing the Front Wheel and Brake 1 Park machine on a level surface lower cutting units...

Page 288: ...b wheel hub puller or wheel motor with a hammer during removal or installation Hammering may cause damage to the hydraulic wheel motor 5 Using the hub puller refer to Special Tools page 2 13 loosen wheel hub 14 from wheel motor 6 Remove lock nut 16 hub and brake drum 13 from motor shaft Locate and retrieve woodruff key 7 Remove cotter pin 21 from the adjustment rod 22 Separate adjustment rod from ...

Page 289: ...spacers 7 wheel shield 8 and brake bracket 9 Secure with lock nuts 10 but do not fully tighten 2 Assemble brake assembly as follows Figure 154 A Secure backing plate to the brake bracket with four cap screws and lock washers B Apply antiseize lubricant to cam shaft splines Insert cam shaft through the backing plate C Attach brake lever to the cam shaft Make sure matchmarks are aligned properly Sec...

Page 290: ...screws 5 and lock nuts 10 that secure the brake bracket and wheel motor to the frame 9 Place wheel onto drive studs 18 and wheel hub Secure wheel with lug nuts 17 on drive studs 10 Lower wheel to ground Torque the lug nuts 17 from 61 to 88 N m 45 to 65 ft lb in a criss cross pattern Torque the lock nut 16 from 345 to 372 N m 255 to 275 ft lb 11 Check and adjust brakes see Adjusting the Brake page ...

Page 291: ...olt 2 each 5 Wheel hub 16 Lock washer 27 Case drain clamp 6 Lock nut 4 each 17 Thrust washer 28 Clamp 7 Hydraulic motor 18 Bolt 29 Spacer 2 each 8 Rear fork 19 Flex top nut 2 each 30 Clamp 9 Socket head screw 4 each 20 Hydraulic cylinder 31 Lock nut 2 each 10 External retaining ring 21 External retaining ring 32 Valve stem 11 Ball joint 22 O ring 2 each Reelmaster 3100 D 3105 D Page 7 13 Wheels Br...

Page 292: ... the fork may result from improper handling 7 Remove the bolt thrust washer and lock washer from the rear fork shaft 8 Lower the rear fork from machine 9 Check the bushings for wear and damage Replace if necessary Installing the Rear Fork and Wheel 1 If removed install the bushings into the rear fork 2 Position the rear fork through the frame 3 Install the lock washer thrust washer and bolt to the...

Page 293: ...nut 2 each 6 Dust cap 18 Rear fork 30 Hydraulic cylinder 7 Lock nut retainer 19 Socket head screw 4 each 31 External retaining ring 8 Jam nut 20 External retaining ring 32 O ring 2 each 9 Tab washer 21 Ball joint 33 Hydraulic fitting 2 each 10 Tapered bearing 2 each 22 Flange head bolt 8 each 34 O ring 2 each 11 Bearing cup 2 each 23 Bushing 2 each 35 Ball joint 12 Wheel hub 24 Rear casting Reelma...

Page 294: ... hub with the bearings from the spindle 9 Disassemble the wheel hub as follows Note Ensure that you do not damage the hub bore A Remove and discard the oil seal from the wheel hub B Remove the bearing cones from both sides of the wheel hub Clean the inner surface of the wheel hub C Clean and inspect the wheel bearing cups and cones Check the bearing cones and cups for wear pitting or other damage ...

Page 295: ...h with the end of the wheel hub The lip of the oil seal must be toward the inner bearing E Lubricate the inside of new oil seal and press it into the wheel hub Note Ensure that you do not damage the oil seal in the wheel hub 6 Install the wheel hub onto the spindle 7 Install greased outer bearing cone tab washer and nut onto the spindle shaft 8 While rotating the wheel hub by hand torque the nut t...

Page 296: ...Brake Linkages g344438 Figure 157 Wheels Brakes and Chassis Service and Repairs Page 7 18 Reelmaster 3100 D 3105 D 20252SL Rev A ...

Page 297: ...ge parking brake and remove key from the key switch 2 Remove the control panel cover from the machine IMPORTANT When removing the adjustable clevis from either the brake pivot shaft or adjustment rod or the brake lever from the cam shaft on the brake assembly make sure to match mark both parts Marking both parts will make reassembly and brake adjustment easier 3 Remove the parts as necessary to re...

Page 298: ...1 Decal 36 O ring 7 Steering cover 22 Hose assembly 37 O ring 8 Bolt 23 Hose assembly 38 O ring 9 Decal 24 Hose assembly 39 Philips pan head screw 10 Ball knob 25 Hose assembly 40 Steering wheel cap 11 Lever 26 Hose assembly 41 Steering shield 12 Steering control valve 27 Tilt steering boss 42 Slope indicator assembly 13 Tilt bracket 28 Friction disc 43 Nut 14 Bolt 29 Friction disc 15 Flat washer ...

Page 299: ...nd pivot hubs securing the steering control valve bracket to the steering arm Slide bracket from the steering control valve and steering arm 7 Remove and replace parts as necessary to repair steering column using Figure 158 and Figure 159 as a guide Assembling the Steering Column 1 Make sure lever and friction discs are properly assembled to the steering control valve bracket using Figure 158 and ...

Page 300: ... Secure steering wheel nut to the steering control valve Torque steering wheel nut from 27 1 to 35 3 N m 20 to 26 ft lb 6 Secure steering wheel cap to the steering wheel with six philips pan head screws Wheels Brakes and Chassis Service and Repairs Page 7 22 Reelmaster 3100 D 3105 D 20252SL Rev A ...

Page 301: ... Flange head screw 6 Hydraulic hose 20 Bearing cap 34 Flange nut 7 Centering wire 21 Jam nut 35 O ring 8 Hydraulic hose 22 Cap screw 36 O ring 9 Hydraulic hose 23 Lock nut 37 Flange head screw 10 90º hydraulic fitting 24 Hardened washer 38 Link clip 11 Flange nut 25 Slide support bar 39 RH lift arm 12 Flat washer 26 Pin 40 LH lift arm 13 Straight link chain 27 Spacer 14 Hex nut 28 External retaini...

Page 302: ...ng Figure 160 as a guide 7 Inspect bushings in lift arm and carrier frame If bushings are worn or damaged replace bushings Installing the Front Lift Arms 1 Assemble the lift arm using Figure 160 as a guide 2 Slide the lift arm onto the lift arm pivot shaft 3 Secure the pivot shaft link with both flange head screws to the lift arm pivot shafts Note Install both spacers to the hydraulic cylinder sha...

Page 303: ...Rear Lift Arm g346266 Figure 161 Model 03171 shown Reelmaster 3100 D 3105 D Page 7 25 Wheels Brakes and Chassis Service and Repairs 20252SL Rev A ...

Page 304: ...t arm see Cutting Unit Operator s Manual 3 Remove the external retaining ring and thrust washer from the hydraulic lift cylinder shaft of the rear lift arm 4 Remove the flange head screw and thrust washer from the rear pivot shaft 5 Slide the rear lift arm from rear pivot shaft and hydraulic lift cylinder 6 Disassemble lift arm as necessary using Figure 161 as a guide 7 Inspect the bushings in lif...

Page 305: ...rator s Manual IMPORTANT Make sure hydraulic hoses are free of twists and sharp bends Raise cutting units and make sure that rear cutting unit hoses do not con tact the traction cable bracket If required reposition fittings and hoses 6 Grease the rear lift arm see Traction Unit Operator s Manual Reelmaster 3100 D 3105 D Page 7 27 Wheels Brakes and Chassis Service and Repairs 20252SL Rev A ...

Page 306: ...Traction Pedal g344483 Figure 162 Wheels Brakes and Chassis Service and Repairs Page 7 28 Reelmaster 3100 D 3105 D 20252SL Rev A ...

Page 307: ...Bolt 12 Nut 2 each 31 Nut 2 each 50 Ball bearing 13 Lock nut 32 Lock washer 2 each 51 Retaining ring 14 Traction pedal 33 Lock nut 52 Reverser pedal 15 Flange bushing 2 each 34 Flat washer 53 Lock nut 3 each 16 Grease fitting 35 Neutral switch bracket 54 Spring 17 Slide 36 Proximity switch 55 Washer 18 Lock nut 37 Switch plate 56 Traction control cable 19 Flat washer 38 Carriage bolt 57 Cable clam...

Page 308: ...Wheels Brakes and Chassis Service and Repairs Page 7 30 Reelmaster 3100 D 3105 D 20252SL Rev A ...

Page 309: ...ulic Reel Motor 8 6 Backlapping 8 8 Bedbar Assembly 8 10 Bedknife Replacement and Grinding 8 13 Servicing the Bedbar Adjuster 8 17 Reel Assembly 8 19 Reel Assembly Service 8 26 Preparing the Reel for Grinding 8 29 Front Roller 8 31 Shop Roller Assembly Model 03192 8 33 Rear Roller 8 34 Servicing the Roller 8 36 Rear Roller Brush Optional 8 40 Reelmaster 3100 D 3105 D Page 8 1 DPA Cutting Units 202...

Page 310: ...hine Additionally if optional kits have been installed on the cutting units e g groomer the Installation Instructions for the kit includes set up operation and maintenance information Refer to the Cutting Unit Operator s Manual and the kit Installation Instructions for additional information when servicing the cutting units DPA Cutting Units General Information Page 8 2 Reelmaster 3100 D 3105 D 20...

Page 311: ...ges assures good quality of cut and greatly reduces the need for routine backlapping In addition the rear roller positioning system allows for various height of cut ranges and aggressiveness of cut selections If a cutting unit is determined to be out of adjustment complete the following procedures in the specified order to adjust the cutting unit properly 1 Adjust the bedknife to reel contact refe...

Page 312: ...ge will consistently pass under the roller at one end but will not pass under the opposite end Check rear roller with the feeler gauge just inside the machined ends of the roller A frame adjustment should be made if there is consistently more than 0 13 mm 0 005 in clearance under the roller on one end but not on the other g214673 Figure 163 1 Bedbar adjuster screw 3 Bedbar 2 Spring tension locknut...

Page 313: ...ring the Reel for Grinding page 8 29 If cutting reel is not tapered and rear roller is not level a 0 010 shim part number 107 4001 is available to allow additional rear roller adjustment The shim would be used on one side of the rear roller and should be installed between the rear roller bracket and roller shim Figure 164 8 After leveling rear roller complete the cutting unit set up and adjustment...

Page 314: ...the cutting unit 3 Inspect the reel insert splines for wear Replace if necessary refer to Reel Assembly page 8 19 4 Place protective plastic cap refer to Special Tools page 2 13 into the hole in the cutting unit side plate to prevent debris entry into reel bearing area Installing the Hydraulic Reel Motor g343373 Figure 165 1 Reel motor location 2 Weight location Note Refer to Figure 165 for correc...

Page 315: ...s in the cutting unit side plates Align reel motor shaft splines with cutting reel insert splines Slide motor shaft into reel insert 4 Rotate the motor counter clockwise until the motor flanges are encircling the cap screws Tighten two 2 cap screws to secure reel motor to cutting unit Reelmaster 3100 D 3105 D Page 8 7 DPA Cutting Units Service and Repairs 20252SL Rev A ...

Page 316: ... initial reel to bedknife adjustments appropriate for backlapping IMPORTANT Do not attempt to rotate the directional valve lever on the hydraulic manifold when the engine or reels are running g343395 Figure 167 1 Reel Speed Selector Knob 2 Backlap Lever 3 Remove the console cover and locate the reel speed selector knob and backlap lever on the hydraulic manifold Figure 167 Rotate the reel speed se...

Page 317: ... position to the F forward position Also rotate the flow control valve knob to correct mowing position 9 Wash all lapping compound from the cutting units g251598 Figure 168 1 Top surface 3 Top angle 2 Remove burr without dulling sharp corner 4 Front angle 10 For a better cutting edge run a file across the front face of the bedknife when the lapping operation is completed Figure 168 This will remov...

Page 318: ...onal injury Use heavy gloves when handling the bedbar 1 Park the machine on a clean and level surface lower the cutting units completely to the ground shut off the engine set the parking brake and remove the key from the key switch 2 Remove the cutting unit from the machine Use the cutting unit kickstand to support the cutting unit refer to Special Tools page 2 13 3 Loosen the lock nuts item 2 in ...

Page 319: ...te install a new bushing The bushing should be installed flush with the inside of the side plate Figure 170 2 If removed install the flange bushings with flange facing outward Apply anti seize lubricant to inside of flange bushing 3 Apply anti seize lubricant to the bedbar threads and the shoulder area of each bedbar pivot bolt 4 Slide one metal washer and one plastic washer onto each bedbar pivot...

Page 320: ...ch bedbar pivot bolt from 37 to 44 N m 27 to 33 ft lbs 8 Tighten both lock nuts item 10 in Figure 169 until outside metal washer just rotates Do not over tighten the lock nuts as this can distort the side plates and affect reel to bedknife contact or in the case of cutting units with painted side plates reel bearing adjustment The plastic washer between the bedbar and side plate should be loose 9 ...

Page 321: ...from the bedbar refer to Figure 171 3 Refer to Grinding the Bedknife page 8 14 Installing the Bedknife 1 Use scraper to remove all rust scale and corrosion from bedbar surface Lightly oil bedbar surface before installing bedknife 2 Make sure that screw threads in bedbar 5 16 18UNC 2A are clean IMPORTANT Do not use an impact wrench to tighten screws into the bedbar 3 Use new screws to secure the be...

Page 322: ...he bedknife toward each end refer to Figure 172 tighten screws from 23 to 28 N m 200 to 250 in lb 7 After installing bedknife to bedbar grind bedknife Grinding the Bedknife g207291 Figure 173 1 Top angle 4 Front surface 2 Top surface 5 Front angle 3 Remove burr without dulling sharp corner DPA Cutting Units Service and Repairs Page 8 14 Reelmaster 3100 D 3105 D 20252SL Rev A ...

Page 323: ...he service limit may result in poor after cut appearance and reduce the structural integrity of the bedknife for impacts When grinding the bedknife be careful to not overheat the bedknife Remove small amounts of material with each pass of the grinder Also clean and dress grinding stone often during the grinding process Note EdgeMax bedknives are extremely hard Using a diamond grinding wheel is rec...

Page 324: ...ing information 2 lead in chamfer is ground into all new bedknives Figure 175 The original chamfer should last for the first 40 of the bedknife service life Check and re grind the lead in chamfer as necessary 3 After bedknife grinding is complete install bedbar to cutting unit refer to Installing the Bedbar Assembly page 8 11 DPA Cutting Units Service and Repairs Page 8 16 Reelmaster 3100 D 3105 D...

Page 325: ...e flange bushings item 5 in cutting unit frame and remove if necessary 6 If detent is damaged remove it from cutting unit side plate by removing the cap screw Installing the Bedbar Adjuster 1 If the detent item 7 Figure 176 was removed apply Loctite 243 or equivalent to threads of cap screw and secure detent to cutting unit side plate with cap screw Tighten cap screw from 19 to 21 N m 14 to 16 ft ...

Page 326: ...seize lubricant to left hand threads threads of bedbar adjuster screw item 4 Thread bedbar adjuster screw into adjuster shaft item 10 5 Install the washer item 11 compression spring and lock nut onto adjuster screw 6 Install the bedbar assembly refer to Installing the Bedbar Assembly page 8 11 7 Adjust the cutting unit refer to Cutting Unit Operator s Manual DPA Cutting Units Service and Repairs P...

Page 327: ... side plate 5 Metal washer 2 each 11 Cap screw 2 each 17 Cap screw 2 each 6 Bedbar pivot bolt 2 each 12 O ring 18 O ring Note This section provides the procedure for removing and installing the cutting reel assembly cutting reel spline inserts grease seals and bearings from the cutting unit Note Refer to Reel Assembly Service page 8 26 for information on replacing cutting reel seals and bearings R...

Page 328: ...houlder bolt 6 each 8 Cap screw 12 Flange head screw 2 each Removing the Reel Assembly 1 Position the machine on a clean and level surface lower cutting units stop engine engage parking brake and remove key from the key switch 2 Remove the cutting unit from the machine and place on a flat work area CAUTION Contact with the reel bedknife or other cutting unit parts can result in personal injury Use...

Page 329: ...Spline insert LH 3 Reel support plate 2 Reel shaft 4 Pry bar 4 Loosen the spline inserts A Tip the cutting unit to access the bottom of the reel B Insert a long handled pry bar 3 8 x 12 inch with screwdriver handle recommended through the bottom of the cutting unit The pry bar should pass between the top of the reel shaft and the backs of the reel blades so that the reel will not move IMPORTANT To...

Page 330: ... to LH side plate Note The reel bearings and grease seals are press fit on the cutting reel shaft and should remain on the reel when removing the LH side plate 9 Remove three 3 shoulder bolts and flange nuts that secure the LH side plate to the cutting unit frame Remove the LH side plate from the reel shaft and cutting unit frame 10 Carefully pull the cutting reel assembly from the RH side plate 1...

Page 331: ...te 7 Slide the LH side plate onto the cutting reel assembly 8 Install shoulder bolts and flange nuts that secure the LH side plate to the cutting unit frame Torque the shoulder bolts from 37 to 44 N m 27 to 33 ft lbs 9 Apply Loctite 243 or equivalent to threads of flange head screw that secures support rod to LH side plate Install screw and torque from 37 to 44 N m 27 to 33 ft lbs 10 Install cap s...

Page 332: ...e 181 1 Spline insert LH 3 Reel support plate 2 Reel shaft 4 Pry bar 15 Tighten the spline inserts A Insert a long handled pry bar 3 8 x 12 inch with a screwdriver handle recommended through the front of the cutting unit The pry bar should pass between the top of the reel shaft and the backs of the reel blades so that the reel will not move IMPORTANT To avoid grinding the reel do not contact the c...

Page 333: ...rect spline insert tool refer to Special Tools page 2 13 D Position the pry bar in the same manner on the opposite end of the reel and tighten the remaining spline insert 16 If counterweight was removed from cutting unit install new O ring on counter weight Secure counter weight to cutting unit side plate with two 2 flange nuts Torque screws from 37 to 44 N m 27 to 33 ft lbs 17 Install the cutting...

Page 334: ...e is detected replace reel A Check the reel shaft for bending and distortion by placing the shaft ends in V blocks B Check the reel blades for bending or cracking C Check the service limit of the reel diameter refer to Preparing the Reel for Grinding page 8 29 3 Check the threaded inserts in the reel shaft for excessive wear or distortion Replace the inserts if damage is evident A One insert has L...

Page 335: ...usly removed use correct spline insert tool to install threaded inserts refer to Special Tools page 2 13 Apply thread locking compound Loctite 243 or equivalent to threaded portion of insert Tighten threaded insert from 115 to 128 N m 85 to 95 ft lb 3 Make sure that the two 2 retaining rings are fully seated into the grooves on the cutting reel shaft 4 Carefully drive special washers onto reel sha...

Page 336: ...sembling the Cutting Reel continued 6 Fill threaded insert splines with high temp Mobil XHP 222 grease or equivalent DPA Cutting Units Service and Repairs Page 8 28 Reelmaster 3100 D 3105 D 20252SL Rev A ...

Page 337: ... The rear of the forward swept reel blades have a tapered relief Before grinding a reel identify the type of reel design to make sure that grinding is correctly done Before grinding a cutting reel make sure that all cutting unit components are in good condition Depending on type of grinder used faulty cutting unit components can affect grinding results When grinding be careful to not overheat the ...

Page 338: ... the reel blades to the minimum blade land width if the reel blade land width exceeds the service limit Spin grind the reel to restore its cylindrical shape Note Spin grind the reel and establish the specified blade land width after relief grinding After grinding the reel and or bedknife adjust the cutting unit refer to Cutting Unit Operator s Manual Check the reel to bedknife contact again after ...

Page 339: ...r brackets A Remove flange lock nut and carriage screw that secure bracket to the cutting unit side plate B Remove the height of cut roller bracket from the cutting unit 5 Slide the front roller assembly from the remaining height of cut roller bracket on the cutting unit 6 If necessary remove the second height of cut roller bracket from the cutting unit Installing the Front Roller 1 Place cutting ...

Page 340: ...f cut roller bracket onto the other end of roller shaft Secure second bracket to cutting unit side plate with carriage screw and flange nut 5 Apply Loctite 243 or equivalent to exposed threads of cap screw item 1 between flange of side plate and position of flange lock nut item 3 on cap screw Tighten flange lock nut on cap screw and then loosen nut 1 4 to 1 2 turn Cap screw should rotate freely wi...

Page 341: ...ve the cotter hairpin from the clevis pin that secures the shop roller bracket to the side plate 3 Remove the shop roller assembly from the cutting unit 4 Disassemble the shop roller assembly by using the Figure 187 as a guide Installing the Shop Roller Assembly 1 Assemble the shop roller assembly by using the Figure 187 as a guide 2 Install the shop roller assembly onto the side plate of the cutt...

Page 342: ... rear roller bracket and roller shims to the cutting unit side plate B Remove the roller bracket and roller shims from the rear roller and cutting unit 5 Slide the rear roller assembly from the remaining rear roller bracket on the cutting unit 6 If necessary remove the second rear roller bracket and roller shims from the cutting unit Installing the Rear Roller Figure 188 1 Place cutting unit on a ...

Page 343: ...cket onto the other end of roller shaft Secure second roller bracket and shims to cutting unit side plate with two 2 carriage screws and flange nuts Do not fully tighten flange nuts 4 Center rear roller to the cutting reel and secure in place by tightening four 4 flange nuts 5 Lubricate the rear roller 6 Adjust the cutting unit refer to Cutting Unit Operator s Manual Reelmaster 3100 D 3105 D Page ...

Page 344: ...oller tube Remove second set of outer seals and bearing from roller tube by tapping on opposite end of shaft Remove the shaft from roller tube 3 Carefully remove the inner seal from both ends of roller tube taking care to not damage tube surfaces 4 Discard the removed seals and bearings 5 Clean the roller shaft and all surfaces on the inside of the roller tube Inspect components for wear or damage...

Page 345: ... rotate freely and do not bind If any binding is detected consider component removal and reinstallation g195711 Figure 191 1 Roller tube 3 Bearing 2 Inner seal 4 Bearing outer seal tool 2 Install new bearing and outer seals into one end of roller tube A Position a new bearing into one end of roller tube Use bearing outer seal tool refer to Special Tools page 2 13 with a soft face hammer to fully s...

Page 346: ...r tube Make sure that seals are not damaged as shaft is installed 4 Install new bearing and outer seals into second end of roller tube A Position a second new bearing to roller shaft and tube Position washer refer to Special Tools page 2 13 on bearing to allow pressing on both inner and outer bearing races simultaneously g252749 Figure 193 1 Roller tube 4 Bearing 2 Roller shaft 5 Washer 3 Inner se...

Page 347: ... grease is removed from shaft threads to prevent bearing lock nut loosening 5 Thoroughly clean threads on both ends of roller shaft Note If original bearing lock nut s are being used apply Loctite 243 or equivalent to threads of lock nut s 6 Install bearing lock nut onto each end of the roller shaft Make sure that outer seals are not damaged during nut installation Torque lock nuts from 68 to 81 N...

Page 348: ...t from the cutting reel motor Figure 55 shows components used when the brush drive is on the left side of the cutting unit Note The Installation Instructions for the rear roller brush kit has detailed information regarding assembly and adjustment Use those Instructions along with this Service Manual when servicing the rear roller brush Disassembling the Rear Roller Brush Figure 195 1 Position mach...

Page 349: ...shaft 3 Roller brush 2 J bolt 4 Locknut g252832 Figure 197 1 Bearing 4 Housing non driven 2 Inner grease seal 5 Housing driven 3 Outer grease seal 1 If seals or bearings were removed from brush bearing housings install new components noting proper orientation as shown in Figure 197 A Pack bearings with high temp Mobil XHP 222 grease or equivalent before installation B Press bearing into bearing ho...

Page 350: ...onto shaft Install and tighten flange nut until pulley is seated onto shaft and then torque flange nut from 37 to 44 N m 27 to 33 ft lb Use a wrench on roller brush shaft flats to prevent shaft from rotating when tightening nut C Position excluder seals on brush shaft so that seals just touch bearing housings D If driven pulley item 12 was removed check and adjust alignment of drive and driven pul...

Page 351: ...cutting unit from the cutting reel motor Figure 199 shows components used when the brush drive is on the left side of the cutting unit Note The Installation Instructions for the rear roller brush kit has detailed information regarding assembly and adjustment Use those Instructions along with this Service Manual when servicing the rear roller brush 1 Position machine on a clean and level surface lo...

Page 352: ...re drive housing to cutting unit side plate and remove housing from the cutting unit IMPORTANT If rear roller brush drive is on left side of cutting unit drive shaft has left hand threads and can be identified by a groove on the flange If the rear roller brush drive is on right side of cutting unit drive shaft has right hand threads and does not have a groove on the flange Figure 201 B Loosen and ...

Page 353: ...n Figure 199 B Apply a light coating of grease to inner diameter of the grommet in drive bearing housing before installing brush plate C Brush plate should be installed so that idler pulley assembly is toward the bottom of the plate Also the shoulder bolt item 15 should not clamp the brush plate to the drive housing during assembly D When installing drive pulley item 17 make sure that tabs on pull...

Page 354: ...shaft and then torque flange nut from 37 to 44 N m 27 to 33 ft lb Use a wrench on roller brush shaft flats to prevent shaft from rotating when tightening nut IMPORTANT The roller brush shaft must nor contact the cutting unit side plate Also heavy brush contact on the rear roller will cause premature brush wear 4 Check that brush is parallel to rear roller with 1 5 mm 0 060 in clearance to light co...

Page 355: ...Installation Instructions 9 2 Service and Repairs 9 3 Gear Box Assembly 9 5 Idler Assembly 9 13 Groomer Reel 9 15 Groomer Reel Service 9 17 Grooming Brush Optional Service 9 19 Height Adjuster Assembly 9 20 Reelmaster 3100 D 3105 D Page 9 1 Universal Groomer Optional 20252SL Rev A ...

Page 356: ...he set up operation general maintenance procedures and maintenance intervals for the groomer assembly on your Reelmaster machine Refer to the Installation Instructions for additional information when servicing the groomer assembly Universal Groomer Optional General Information Page 9 2 Reelmaster 3100 D 3105 D 20252SL Rev A ...

Page 357: ...sembly 5 Plate 3 Groomer reel 6 Weights CAUTION Never work on the groomer with the engine running Always stop the engine remove the key from the key switch and wait for all machine movement to stop before working on the groomer Reelmaster 3100 D 3105 D Page 9 3 Universal Groomer Optional Service and Repairs 20252SL Rev A ...

Page 358: ...nstallation set up operation and maintenance of the universal groomer on your Reelmaster machine Refer to these instructions for additional information when servicing the groomer Universal Groomer Optional Service and Repairs Page 9 4 Reelmaster 3100 D 3105 D 20252SL Rev A ...

Page 359: ...ng brake and remove key from the key switch 2 Remove the groomer reel assembly refer to Groomer Reel page 9 15 Note If cutting unit is equipped with an optional powered rear roller brush remove the rear roller brush cover drive belt and drive housing assembly to service the groomer drive refer to Removing the Rear Roller Figure 188 page 8 34 for additional information CAUTION Contact with the reel...

Page 360: ... head set screw Toro p n 1 803022 in the end of the drive shaft and tighten to 13 N m 120 in lb refer to Figure 206 6 Remove the cotter pin and clevis pin from the height adjustment rod at the front of the groomer gear box Discard cotter pin 7 Tip up the cutting unit to access the bottom of the reel to remove the drive shaft assembly 8 Insert a long handled pry bar 3 8 x 12 inch with screwdriver h...

Page 361: ...nge bushing 11 If the hex head on the end of the drive shaft is damaged during removal A Remove the drain fill plug and drain the oil from the gear box B Remove the 4 socket head screws and remove the gear box cover assembly and driven gear Remove and discard the cover gasket C Slide the thrust washer ring gear and bushing from the gear box housing D Slide the sun gear and planet gears and bushing...

Page 362: ...e the drive shaft removal tool Toro p n 137 0920 on the large flats of the drive shaft assembly refer to Figure 208 K Rest the handle of the pry bar against the front roller and turn the drive shaft in correct direction to loosen it from the reel 12 Tip the cutting unit back onto its rollers 13 Clean the threads in the end of the reel shaft A right hand thread and left hand thread tap is available...

Page 363: ... 38 Seal 7 Retaining ring 23 Cover 39 Output shaft 8 Slider gear 24 Gasket 40 Shield 9 Shifter shaft 25 Thrust washer 41 Dowel pin 2 10 Thrust washer 26 Bearing 42 Thrust washer 2 11 Retaining ring 27 Sun gear 43 Retaining ring 2 12 Dowel pin 28 O ring 44 Bearing 4 13 O ring 29 Bushing 45 Idler gear 2 14 Knob 30 Ring gear 46 Cap screw 2 15 O ring 31 Bearing 16 O ring 32 Planet gear 3 Reelmaster 31...

Page 364: ... Inspect V ring seals bearings gears and bushings in gear box assembly Replace damaged or worn components as necessary Assembling the Gear Box Assembly g343773 Figure 210 1 If sun gear ring gear or gear box housing bearings are replaced press bearings all the way to shoulder in part 2 If flange bushings are replaced ensure bushing flange is fully seated against part 3 Ensure all retaining rings an...

Page 365: ...1 threads only Tighten threaded adapter from 156 196 N m 115 125 ft lb 11 Operate groomer gear box by hand to check for proper operation prior ro installation Installing the Gear Box Assembly 1 Park machine on a clean and level surface lower cutting units completely to the ground stop engine engage parking brake and remove key from the key switch CAUTION Contact with the reel or other cutting unit...

Page 366: ... the gear box to the reel Do not use an impact wrench Groomer gear boxes installed on the left side of the cutting unit use a left hand thread turn the drive shaft in correct direction to install the gear box 6 Tighten the input shaft from 122 to 153 N m 90 to 100 ft lb 7 Remove the square head set screw from the end of the drive shaft 8 Use a new cotter pin and install the cotter pin and clevis p...

Page 367: ...s completely to the ground stop engine engage parking brake and remove key from the key switch 2 Remove hydraulic reel motor from cutting unit refer to Removing the Hydraulic Reel Motor page 8 6 3 Remove the groomer reel assembly refer to Removing the Groomer Reel page 9 15 4 Remove the cotter pin and clevis pin from the height adjustment rod at the front of the idler arm Discard the cotter pin 5 ...

Page 368: ...haft to prevent shaft from rotating tighten flange nut from 37 to 45 N m 27 to 33 ft lb E If collar was removed from idler arm install collar and tighten from 33 to 41 N m 24 to 30 ft lb g343765 Figure 213 1 Pivot hub 2 Apply anti sieze lubricant to the outside diameter of the pivot hub Figure 213 Position idler arm over pivot hub 3 Apply Loctite to two 2 socket head screws and secure pivot hub an...

Page 369: ...tting unit from machine refer to Traction Unit Operator s Manual CAUTION Contact with the reel or other cutting unit parts can result in personal injury Use heavy gloves when handling the groomer reel 2 Carefully remove the four item 4 in Figure 214 jam nuts cap screws and shaft clamps securing the groomer reel to the output and stub shafts 3 Lift the groomer reel from the cutting unit 4 Inspect s...

Page 370: ...tch 2 Position the groomer reel between the groomer output and stub shafts 3 Secure the groomer reel to the cutting unit with four 4 jam nuts cap screws and shaft clamps Tighten the cap screws to 5 to 7 N m 46 to 60 in lb 4 Check groomer reel height and mower height of cut settings Adjust as needed Universal Groomer Optional Service and Repairs Page 9 16 Reelmaster 3100 D 3105 D 20252SL Rev A ...

Page 371: ... remove key from the key switch 2 Remove groomer reel from cutting unit refer to Removing the Groomer Reel page 9 15 3 If groomer reel is equipped with broomer kit remove straps and broomer brushes from reel Figure 216 4 Remove lock nut from either end of the shaft Figure 215 5 Remove spacers and blades from groomer shaft If needed remove second lock nut from shaft Assembling the Groomer Reel 1 In...

Page 372: ...correct direction C Loosely wrap the straps around the groomer reel shaft and brushes as shown Figure 216 Straps should be positioned in the pre cut notches of each brush and at the following locations on the broomer shaft 18 reels between blades 2 3 11 12 21 22 and 30 31 22 reels between blades 2 3 14 15 26 27 and 38 39 Position the broomer brushes properly in the blade slots and tighten the groo...

Page 373: ...s removed and installed from the groomer in the same manner as the groomer reel refer to Groomer Reel page 9 15 The grooming brush element or shaft can be serviced separately Figure 217 Reelmaster 3100 D 3105 D Page 9 19 Universal Groomer Optional Service and Repairs 20252SL Rev A ...

Page 374: ...rake and remove key from the key switch 2 Remove the cotter pins and clevis pins securing the height adjustment rods to the groomer gear box and idler arm Discard cotter pins 3 Loosen the two item 2 in Figure 218 height adjustment bolt lock nuts 4 Loosen the two 2 front roller pinch bolt lock nuts and cap screws 5 Remove the flange nut and carriage bolt securing the height adjuster assembly to the...

Page 375: ... plate 3 Position front roller between height adjuster assemblies and secure height adjuster assembly to cutting unit side plate with carriage bolt and flange nut Do Not tighten the flange nut at this time Ensure the height adjustment bolt and one 1 washer is above slot in side plate and one 1 washer and lock nut is below slot in side plate 4 Use new cotter pins and install the cotter pins and cle...

Page 376: ...Universal Groomer Optional Service and Repairs Page 9 22 Reelmaster 3100 D 3105 D 20252SL Rev A ...

Page 377: ...ons A 2 Hydraulic Schematic 3100 D Model 03170 A 3 Hydraulic Schematic 3100 D Model 03171 A 4 Hydraulic Schematic 3105 D Model 03174 A 5 Electrical Schematic A 6 Wire Harness Drawing A 7 Wire Harness Drawing A 8 Reelmaster 3100 D 3105 D Page A 1 Foldout Drawings 20252SL Rev A ...

Page 378: ... include a line with an alternate color These wires are identified with the wire color and line color with either a or _ separating the color abbreviations listed above e g R BK is a red wire with a black line OR_BK is an orange wire with a black line Wire Size The individual wires of the electrical harness diagrams in this chapter identify both the wire color and the wire size Examples 16 BK 16 A...

Page 379: ...Reelmaster 3100 D Model 03170 Drawing 110 8783 Rev D Sheet 1 of 1 20252SL Rev A Page A 3 Hydraulic Schematic 3100 D Model 03170 g346770 ...

Page 380: ...Page A 4 20252SL Rev A Reelmaster 3100 D Model 03171 Drawing 110 8782 Rev C Sheet 1 of 1 Hydraulic Schematic 3100 D Model 03171 g346771 ...

Page 381: ...Reelmaster 3105 D Model 03174 Drawing 136 3617 Rev B Sheet 1 of 1 20252SL Rev A Page A 5 Hydraulic Schematic 3105 D Model 03174 g346769 ...

Page 382: ...Page A 6 20252SL Rev A Reelmaster 3100 D 3105 D Drawing 122 1522 Rev A Sheet 1 of 1 Electrical Schematic g346835 ...

Page 383: ...Reelmaster 3100 D 3105 D Drawing 122 1523 Rev B Sheet 1 of 2 20252SL Rev A Page A 7 Wire Harness Drawing CV g346834 ...

Page 384: ...Page A 8 20252SL Rev A Reelmaster 3100 D 3105 D Drawing 122 1523 Rev A Sheet 2 of 2 Wire Harness Drawing g346833 ...

Page 385: ......
Reviews: