30
Adjusting the Interlock Switch
To adjust or replace the interlock switch, complete the
following procedure:
1. Ensure that the engine is Off and the traction lever is
disengaged.
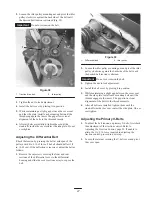
2. Loosen the 2 switch mounting nuts (Fig. 45) and move
the switch until the switch plunger is depressed 0.12 to
0.24 in. (0.3 to 0.6 cm) (switch closed).
1
2
Figure 45
1.
Interlock switch
2.
Mounting nuts
3. Tighten the switch mounting nuts.
4. Engage the traction lever and verify that the switch
plunger is depressed between 0.12 to 0.24 in. (0.3 to
0.65 cm).
5. Adjust the switch as required.
Servicing the Bedbar
Greensmaster 800 & 1600 only
Removing the Bedbar
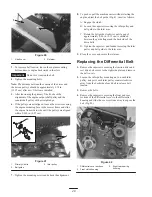
1. Turn the bedbar adjuster screw, counterclockwise, until
the channel bottoms out in the adjuster frame (Fig. 46).
6
5
4
3
2
1
Figure 46
1.
Bedbar adjusting screw
2.
Spring tension screw
3.
Thrust Washer
4.
Bedbar
5.
Channel
6.
Adjuster frame
2. Using a 7/8 in. standard wrench, back out the spring
tension screw until the thrust washer is no longer
tensioned against the bedbar (Fig. 46).
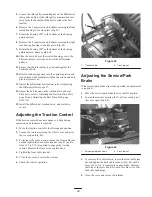
3. On each side of the machine, loosen the jam nut
securing the bedbar bolt (Fig. 46).
2
1
Figure 47
1.
Jam nut
2.
Bedbar bolt
4. Remove each bedbar bolt allowing the bedbar to be
pulled downward and removed from the machine. Save
the 2 nylon and 2 stamped steel washers on each end of
bedbar (Fig. 46).
Installing the Bedbar
1. Install the bedbar, positioning the mounting ears
between the thrust washer and the channel on the
bedbar adjuster.
2. Secure the bedbar to each side plate with the bedbar
bolts (flange nuts on the bolts) and 8 washers. Position a
nylon washer each side of the side plate boss. Place a
steel washer outside each of the nylon washers.
3. Torque bolts to 240 to 320 in.-lb. (27 to 36 N
⋅
m).
4. Tighten the flange nuts until the thrust washers just
rotate freely.
5. Adjust the bedbar; refer to Adjusting the Bedknife to
the Reel, page 15.
Servicing the Bedbar
Greensmaster 1000 only
Removing the Bedbar
1. Turn bedbar adjuster screw, counterclockwise, to back
bedknife away from reel (Fig. 48).

