Servicing the Bedbar
Removing the Bedbar
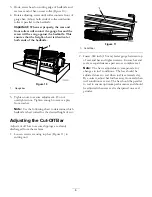
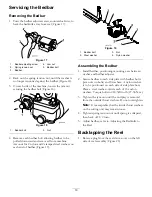
1. Turn the bedbar adjuster screw, counterclockwise, to
back the bedknife away from reel (Figure 17).
Figure 17
1.
Bedbar adjusting screw
4.
Jam nut
2.
Spring tension nut
5.
Bedbar bolt
3.
Bedbar
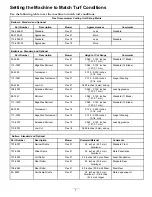
2. Back out the spring tension nut, until the washer is
no longer tensioned against the bedbar (Figure 18).
3. On each side of the machine, loosen the jam nut
securing the bedbar bolt (Figure 18).
Figure 18
1.
Bedbar bolt
2.
Nut
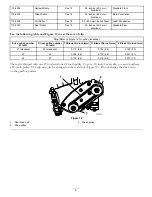
4. Remove each bedbar bolt allowing bedbar to be
pulled downward and removed from machine.
Account for 2 nylon and 2 stamped steel washers on
each end of bedbar (Figure 19).
Figure 19
1.
Bedbar bolt
3.
Nut
2.
Steel washer
4.
Nylon washer
Assembling the Bedbar
1. Install bedbar, positioning mounting ears between
washer and bedbar adjuster.
2. Secure bedbar to each side plate with bedbar bolts
(jam nuts on bolts) and 8 washers. A nylon washer
is to be positioned on each side of side plate boss.
Place a steel washer outside each of the nylon
washers. Torque bolts to 240-320 in.-lb (27-36 N-m).
3. Tighten the jam nut until the end play is removed
from the outside thrust washers. Do not overtighten.
Note:
It is acceptable that the inside thrust washers
on the cutting unit may remain loose.
4. Tighten spring tension nut until spring is collapsed,
then back off 1/2 turn.
5. Adjust bedbar; refer to Adjusting the Bedknife to
the Reel.
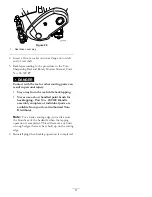
Backlapping the Reel
1. Remove plug from the reel drive cover on the left
side of reel assembly (Figure 20)
10


