36
Replacing the Seat Switch
1.
Pivot the seat forward and secure it with the support
rod.
2.
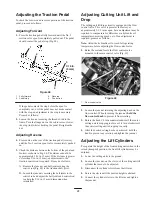
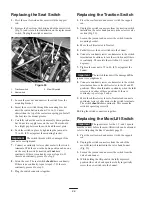
Remove the boot from the button end of the seat switch
(Fig. 50) and retain it for installation on the replacement
switch. Unplug the switch connectors.
1
2
3
Figure 50
1. Traction switch
2. Seat switch
3. Mow/lift switch
3.
Loosen the jam nut and unscrew the switch from the
mounting bracket.
4.
Screw the new switch through the mounting bracket
until the switch button is about 1/16 in. (1.6 mm)
shorter
than the top of the seat return spring pin. Install
the boot into the mount grooves.
5.
Carefully release the seat to its normally down position,
but do not sit or apply force on the seat. There should
be a slight gap between the switch and the seat plate.
6.
Lock the switch in place by tightening the jam nut to
75 in.-lb. (8 N
⋅
m) against the mounting bracket.
Important
The switch threads will be damaged if the
jam nut is overtightened.
7.
Connect a continuity tester or ohm meter to the switch
terminals. With the seat in the down position and no one
on the seat, the switch circuit should
not
have
continuity. If there is continuity, repeat steps 4–6. If
there is no continuity, proceed to step 8.
8.
Sit on the seat. The seat switch
should
have continuity.
If there is no continuity, repeat steps 4–7. If there is
continuity, proceed to step 9.
9.
Plug the switch connectors together.
Replacing the Traction Switch
1.
Pivot the seat forward and secure it with the support
rod..
2.
Unplug the switch connectors from the traction switch
installed in the valve bank bonnet on the selector valve
section (Fig. 50).
3.
Loosen the jam nut and unscrew the switch from the
mounting bracket.
4.
Move the shift selector to Neutral.
5.
Partially screw the new switch into the bonnet.
6.
Connect a continuity tester or ohm meter to the switch
terminals and continue to turn the switch in until there
is continuity. Then rotate the switch in 1/2 turn (180
degrees).
7.
Tighten the jam nut to 75 in.-lb. (8 N
⋅
m) against the
bonnet.
Important
The switch threads will be damaged
if
the
jam nut is overtightened.
8.
Connect a continuity tester or ohm meter to the switch
terminals and move the shift selector to the #1 and #2
positions. There should
not
be continuity when the shift
selector is in either of these positions. If there is
continuity, repeat steps 5 and 6.
9.
Move the shift selector lever to Neutral and connect a
continuity tester or ohm meter to the switch terminals.
The switch
should
show continuity. This means the
switch is operating correctly.
10.
Plug the switch connectors together.
Replacing the Mow/Lift Switch
Important
The spool travel for the 1, 2, and 3 spools
must be correct before the mow/lift switch can be adjusted;
refer to Adjusting the Rear Camshaft, page 33.
1.
Pivot the seat forward and secure it with the support
rod.
2.
Unplug the switch connectors from the end of the
mow/lift switch installed in the valve bank bonnet
(Fig. 50).
3.
Loosen the jam nut and unscrew the switch from the
valve bank bonnet.
4.
While holding the lift pedal in the fully depressed
position (the valve bank spools are fully in) partially
screw the new switch into the bonnet.
Summary of Contents for 04351 Greensmaster 3050
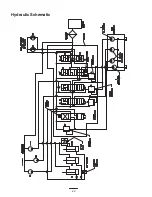
Page 40: ...40 Hydraulic Schematic ...
Page 46: ...46 ...

