background image

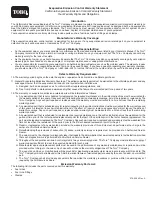
Evaporative Emission Control Warranty Statement

California Evaporative Emission Control Warranty Statement

Your Warranty Rights and Obligations

Introduction

The California Air Resources Board and The Toro

®

 Company are pleased to explain the evaporative emission control system’s warranty on

your 2006 model year equipment. In California, new equipment that use small off–road engines must be designed, built, and equipped to

meet the State’s stringent anti–smog standards. The Toro) Company must warrant the evaporative emission control system on your

equipment for two years provided there has been no abuse, neglect or improper maintenance of your equipment.

Your evaporative emission control system may include parts such as: fuel lines, fuel line fittings, and clamps.

Manufacturer’s Warranty Coverage:

This evaporative emission control system is warranted for two years. If any evaporative emission–related part on your equipment is

defective, the part will be repaired or replaced by The Toro

®

 Company.

Owner’s Warranty Responsibilities:

As the equipment owner, you are responsible for performance of the required maintenance listed in your Operator’s Manual. The Toro

®

Company recommends that you retain all receipts covering maintenance on your equipment, but The Toro

®

 Company cannot deny

warranty solely for the lack of receipts.

As the equipment owner, you should however be aware that The Toro

®

 Company may deny you warranty coverage if your emission

warranty parts have failed due to abuse, neglect, or improper maintenance or unapproved modifications.

You are responsible for presenting your equipment to an Authorized Service Dealer as soon as the problem exists. The warranty repairs

should be completed in a reasonable amount of time, not to exceed 30 days. If you have a question regarding your warranty coverage,

you should contact The Toro

®

 Company at 1–952–948–4027 or call us toll free at the number listed in your Toro Warranty statement.

Defects Warranty Requirements:

10

.

The warranty period begins on the date the engine or equipment is delivered to an ultimate purchaser.

11

.

General Evaporative Emissions Warranty Coverage. The emission warranty parts must be warranted to the ultimate purchaser and any

subsequent owner that the evaporative emission control system when installed was

A. Designed, built, and equipped so as to conform with all applicable regulations; and
B. Free from defects in materials and workmanship that causes the failure of a warranted part for a period of two years.

12

.

The warranty on evaporative emissions–related parts will be interpreted as follows:

A. Any warranted part that is not scheduled for replacement as required maintenance in the written instructions must be warranted for

the warranty period of two years. If any such part fails during the period of warranty coverage, it must be repaired or replaced by The

Toro

®

 Company. Any such part repaired or replaced under the warranty must be warranted for a time not less than the remaining

warranty period.

B. Any warranted part that is scheduled only for regular inspection in the written instructions must be warranted for the warranty period

of two years. A statement in such written instructions to the effect of ”repair or replace as necessary” will not reduce the period of

warranty coverage. Any such part repaired or replaced under warranty must be warranted for a time not less than the remaining

warranty period.

C. Any warranted part that is scheduled for replacement as required maintenance in the written instructions must be warranted for the

period of time prior to the first scheduled replacement point for that part. If the part fails prior to the first scheduled replacement, the

part must be repaired or replaced by The Toro

®

 Company. Any such part repaired or replaced under warranty must be warranted for a

time not less than the remainder of the period prior to the first scheduled replacement point for the part.

D. Repair or replacement of any warranted part under the warranty provisions of this article must be performed at no charge to the

owner at an Authorized Service Dealer.

E. Notwithstanding the provisions of subsection (D) above, warranty services or repairs must be provided at an Authorized Service

Dealer.

F. The owner must not be charged for diagnostic labor that leads to the determination that a warranted part is in fact defective, provided

that such diagnostic work is performed at an Authorized Service Dealer.

G. Throughout the evaporative emission control system’s two year warranty period, The Toro

®

 Company must maintain a supply of

warranted parts sufficient to meet the expected demand for such parts.

H. Manufacturer approved replacement parts must be used in the performance of any warranty maintenance or repairs and must be

provided without charge to the owner. Such use will not reduce the warranty obligations of The Toro

®

 Company.

I. The use of any add–on or modified parts will be grounds for disallowing a warranty claim made in accordance with this article. The

Toro

®

 Company will not be liable under this Article to warrant failures of warranted parts caused by the use of an add–on or modified

part.

J. The Toro

®

 Company shall provide any documents that describe the warranty procedures or policies within five working days of

request by the Air Resources Board.

Emission Warranty Parts List:

The following list includes the parts covered under this warranty:

Fuel Lines

Fuel Line Fittings

Clamps

374–0094 Rev. A

Summary of Contents for 04351 Greensmaster 3050

Page 1: ...Operator s Manual Original Instructions EN GB Form No 3354 728 Rev C Greensmaster 3050 Greensmaster Traction Unit Model No 04351 Serial No 260000001 and Up ...

Page 2: ...arging the Battery 12 Installing the Rear Wheel Assembly 13 Mounting the Seat 13 Securing the Steering Arm 13 Mounting the Cover 14 Installing the Battery 14 Installing the Cutting Units 15 Rear Ballast 16 Before Operating 17 Checking the Engine Oil 17 Filling the Gas Tank 17 Servicing the Hydraulic System 18 Tire Pressure 19 Checking the Torque of the Wheel Nuts 19 Operation 20 Think Safety First...

Page 3: ...recommended precautions This manual uses two other words to highlight information Important calls attention to special mechanical information and Note emphasizes general information worthy of special attention Safety This machine meets or exceeds CEN standard EN 836 1997 ISO standard 5395 1990 and ANSI B71 4 1999 specifications in effect at the time of production when 40 lb of ballast is added to ...

Page 4: ...Check that operator s presence controls safety switches and shields are attached and functioning properly Do not operate unless they are functioning properly Operation Do not operate the engine in a confined space where dangerous carbon monoxide fumes can collect Mow only in daylight or in good artificial light Before attempting to start the engine disengage all blade attachment clutches shift int...

Page 5: ...linder multi reel machines take care as rotating one cylinder reel can cause other cylinders reels to rotate Disengage drives lower the cutting units set parking brake stop engine and remove key and disconnect spark plug wire Wait for all movement to stop before adjusting cleaning or repairing Clean grass and debris from cutting units drives silencers mufflers and engine to help prevent fires Clea...

Page 6: ... good condition before applying pressure to the system Keep your body and hands away from pin hole leaks or nozzles that eject hydraulic fluid under high pressure Use paper or cardboard not your hands to search for leaks Hydraulic fluid escaping under pressure can have sufficient force to penetrate the skin and cause serious injury Seek immediate medical attention if fluid is injected into skin Be...

Page 7: ...lock the parking brake press the brake pedal and the parking brake lock 2 To unlock the parking brake press the brake pedal 3 Parking brake lock 93 8064 for CE 1 Warning read the instructions before servicing or performing maintenance 2 Cutting hazard of foot or hand stop the engine and wait for moving parts to stop 62 5070 93 6686 1 Hydraulic oil 2 Read the Operator s Manual 93 9898 1 Lock and un...

Page 8: ...erator s Manual 93 8063 for CE 1 Warning read the Operator s Manual 2 Tipping hazard do not use the machine on a slope greater than 15 degrees 3 Thrown object hazard stay a safe distance from the machine 4 Cutting hazard of hand or foot stay away from moving parts 5 Warning lock the parking brake stop the engine and remove the ignition key before leaving the machine 93 8065 1 Transmission 2 Forwar...

Page 9: ... are on your battery 1 Explosion hazard 2 No fire open flames or smoking 3 Caustic liquid chemical burn hazard 4 Wear eye protection 5 Read the Operator s Manual 6 Keep bystanders a safe distance from the battery 7 Wear eye protection explosive gases can cause blindness and other injuries 8 Battery acid can cause blindness or severe burns 9 Flush eyes immediately with water and get medical help fa...

Page 10: ...peed 8 1 MPH approx 13 0 km h Reverse Speed 1 9 MPH approx 3 1 km h Reel Speed 1975 RPM approx Clip Speed 11 Blade Cutting Unit 0 18 in approx 4 6 mm Clip Speed 8 Blade Cutting Unit 0 25 in approx 6 4 mm Accessories 8 Blade DPA Cutting Unit Model No 04610 11 Blade DPA Cutting Unit Model No 04611 Spiker Model No 04494 Tri Roller Model No 04495 Thatching Reels Model No 04493 Variable Traction Speed ...

Page 11: ...1 2 Mounting the cover Capscrew 1 4 x 5 8 in Nut 1 4 in 2 2 Securing the battery cables to the battery Gauge bar Machine screw 10 x 7 8 in Jam nut 10 in 1 1 1 Setting the height of cut Grass basket 3 Mounts to the pull frame Ignition keys 2 Service decal 11 Affix the appropriate language decal over English decal 106 9071 Parts Catalog Noise certificate Pre delivery sheet Certificate of compliance ...

Page 12: ... the battery posts Charge the battery at a rate of 3 to 4 amps until the specific gravity is 1 250 or higher and the temperature is at least 60_ F 16_ C with all sells gasing freely 6 When the battery is charged disconnect the charger from the electrical outlet and battery posts Note After the battery has been activated add only distilled water to replace normal loss although maintenance free batt...

Page 13: ...nt the seat slides in the front set of mounting holes to gain an additional 3 in 7 6 cm in the forward adjustment or in the rear mounting holes for an additional 3 in 7 6 cm in the rearward adjustment 1 Support the seat base in the up position with the seat support rod 2 Remove the locknuts securing the seat slides to the plywood shipping base Discard the locknuts 3 Secure the seat seat panel and ...

Page 14: ...ponents causing sparks Sparks can cause the battery gasses to explode resulting in personal injury When removing or installing the battery do not allow the battery terminals to touch any metal parts of the tractor Do not allow metal tools to short between the battery terminals and metal parts of the tractor Warning 2 Connect the positive battery cable red from the starter solenoid to the positive ...

Page 15: ...the assemblies together Fig 12 5 Mount the baskets on the pull frames loosen the jam nuts on the pull arms and adjust the ball sockets until there is 1 4 to 1 2 in 6 to 13 mm clearance between the lip of the basket and the reel blades or the front shield Note This prevents the basket from tipping the cutting unit forward causing the lift roller to come off of the lift arm while in the mowing opera...

Page 16: ... the motor clockwise so that the motor flanges clear the studs Rotate the motor counterclockwise until the flanges are encircling the studs Tighten the mounting capscrews Fig 13 Rear Ballast This unit complies with CEN standard EN 836 1997 ISO standard 5395 1990 and ANSI B71 4 1999 specifications when 40 lb of calcium chloride ballast is added to the rear wheel Important If a puncture occurs in a ...

Page 17: ... containing methanol or gasohol containing more than 10 ethanol because the fuel system could be damaged Do not mix oil with gasoline Danger In certain conditions gasoline is extremely flammable and highly explosive A fire or explosion from gasoline can burn you and others and can damage property Fill the fuel tank outdoors in an open area when the engine is cold Wipe up any gasoline that spills D...

Page 18: ...fluid to the biodegradable type be certain to follow the approved flushing procedure published by Mobil Contact your Toro Distributor for details The oil is available in 5 gallon 19 l containers from your Toro Distributor order part no 100 7674 Premium Biodegradable Hydraulic Fluid Mobil EAL EnviroSyn 46H Important Mobil EAL EnviroSyn 46H is the only synthetic biodegradable fluid approved by Toro ...

Page 19: ...ires are over inflated at the factory for shipping purposes Reduce the pressure to the proper levels before starting the unit Vary the tire pressure for the front wheels depending upon your turf conditions from a minimum of 8 psi to a maximum of 12 psi 55 to 83 kPa Vary the tire pressure for the rear wheel from a minimum of 8 psi to a maximum of 15 psi 55 to 103 kPa Checking the Torque of the Whee...

Page 20: ...utomotive drum type mechanical brake located at each traction wheel Lift Pedal Depressing the lift pedal Fig 18 during operation stops the reels from turning and lifts the cutting units The lift pedal must be fully depressed until the cutting units are fully raised and have stopped rotating Parking Brake Button Depressing the brake pedal to actuate the brake assembly then depressing the small butt...

Page 21: ...t of the electrical circuit It contains a 10 amp fuse 15 amp maximum Hour Meter The hour meter Fig 20 indicates the total hours of machine operation It starts to function whenever the key switch is rotated to On Seat Adjusting Handle This lever on the left side of the seat Fig 20 allows a 4 in fore and aft adjustment 7 3 2 1 4 5 6 Figure 20 1 Choke control 2 Throttle control 3 Ignition switch 4 Vo...

Page 22: ...e your foot from the traction pedal and make sure the pedal is in the Neutral position 4 Move the choke lever to the On position only when starting a cold engine and the throttle lever to the half throttle position 5 Insert and rotate the ignition key clockwise until the engine starts After the engine starts regulate the choke to keep the engine running smoothly As soon as possible open the choke ...

Page 23: ...lease it Move the traction shift selector to neutral and try to start the engine The engine should start and continue to run which means the traction switch and mow lift switch on the valve bank are operating correctly proceed to step 4 If the engine cranked but did not start the problem is not in the interlock system If engine did not crank contact your local Toro Distributor for assistance 4 Sit...

Page 24: ...at the ribbon procedure of cutting may be used This holds compaction to a minimum and leaves a neat attractive pattern on the greens Important Shift to the No 1 position when approaching a green because the machine speed will automatically be reduced when the cutting units are engaged Higher speed will resume when the cutting units are disengaged 2 Actuate the mow pedal as the front edge of the gr...

Page 25: ...ings before transporting to the next green Heavy wet clippings place an undue strain on the baskets and will add unnecessary weight to the machine thereby increasing the load on the engine hydraulic system brakes etc Transport Operation Make sure that the cutting units are in the full up position Set the shift selector in No 2 if conditions will permit faster ground speed Shift to No 1 and operate...

Page 26: ...ings1 Change the engine oil Every 100 Hours Replace the engine oil filter Replace the air filter element Every 200 Hours Check the reel bearing preload adjustment Torque the wheel lug nuts Every 800 Hours Replace the spark plugs Replace the fuel filter Check the engine RPM idle and full throttle Check the valve clearance Every 2000 Hours or 2 Years whichever occurs first Replace moving hoses Repla...

Page 27: ...ooling fins Inspect the air filter pre cleaner Check any unusual engine noises Check the hydraulic hoses for damage Check for fluid leaks Check the tire pressure Check the reel to bedknife adjustment Check the height of cut adjustment Lubricate all grease fittings 1 Lubricate the mow lift and brake linkage Touch up damaged paint 1immediately after every washing regardless of the interval listed No...

Page 28: ...ion unit has grease fittings that must be lubricated regularly with No 2 General Purpose Lithium Base Grease If the machine is operated under normal conditions lubricate all bearings and bushings after every 50 hours of operation The following traction unit bearings and bushings must be lubricated Rear wheel bearings 1 Fig 27 Steering fork shaft 1 Fig 28 Lift arm pivot 3 and pivot hinge 3 Fig 29 P...

Page 29: ...nd let oil flow into a drain pan When the oil stops install the drain plug 1 2 Figure 34 1 Drain plug 2 Oil filter 2 Remove the oil filter Fig 34 Apply a light coat of clean oil to the new filter gasket 3 Screw the filter on by hand until the gasket contacts the filter adapter then tighten 1 2 to 3 4 turn further Do not overtighten 4 Add oil to the crankcase refer to Checking the Engine Oil page 1...

Page 30: ...he foam element check the condition of the paper element Clean it by gently tapping it on a flat surface or replace it if needed 5 Reinstall the foam element paper element and air cleaner cover Important Do not operate the engine without the air cleaner element because extreme engine wear and damage will likely result Adjusting the Throttle Control Proper throttle operation is dependent upon prope...

Page 31: ... speed of 1625 50 rpm Check the speed with a tachometer 1 2 Figure 38 Shown with Air Cleaner Removed 1 Governed idle spring anchor tang 2 High speed spring anchor tang 4 Adjust the idle stop screw clockwise until the idle speed is 25 to 50 rpm over the rpm set in step 3 5 Move the throttle control to the Fast position Bend the high speed spring anchor tang Fig 38 to attain a high speed of 2850 50 ...

Page 32: ...e clamp Fig 40 on the carburetor side of filter and remove the fuel line from the filter 1 2 Figure 40 1 Fuel filter 2 Shut off valve 2 Place a drain pan under the filter loosen the remaining hose clamp and remove the filter Fig 40 3 Install the new filter with the arrow on the filter body pointing away from the fuel tank Changing the Hydraulic Oil and Filter Normally change the hydraulic oil and ...

Page 33: ...d lock equally Testing the brakes in a confined area where others are present could cause injury Always check the brakes in a wide open spaced flat area which is free of other persons and obstructions before and after adjustment Caution 2 If the brakes do not lock equally disconnect the brake rods by removing the cotter pin and clevis pin Fig 43 m 5100 1 2 3 4 Figure 43 1 Clevis pin and cotter pin...

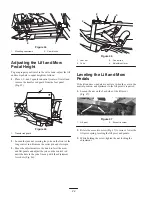
Page 34: ...ustment lever by hand to level the mow and lift pedals and adjust the yoke on the control rod until the hole in the yoke lines up with the adjustment lever hole Fig 46 1 2 3 4 Figure 46 1 Jam nut 2 Yoke 3 Control rod 4 Adjustment lever Leveling the Lift and Mow Pedals If the lift and mow pedals are not level when they are in the neutral position an adjustment to the lift pivot is required 1 Loosen...

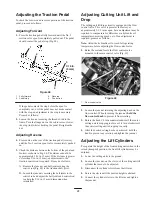
Page 35: ...tain the 3 16 in 5 mm dimension when reinstalled Adjusting Cutting Unit Lift and Drop The cutting unit lift drop circuit is equipped with a flow control valve This valve is preset at the factory at approximately 3 1 2 turns open but an adjustment may be required to compensate for differences in hydraulic oil temperatures mowing speeds etc If an adjustment is required proceed as follows Note Allow ...

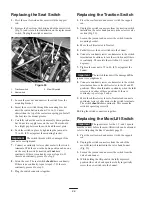
Page 36: ...lug the switch connectors from the traction switch installed in the valve bank bonnet on the selector valve section Fig 50 3 Loosen the jam nut and unscrew the switch from the mounting bracket 4 Move the shift selector to Neutral 5 Partially screw the new switch into the bonnet 6 Connect a continuity tester or ohm meter to the switch terminals and continue to turn the switch in until there is cont...

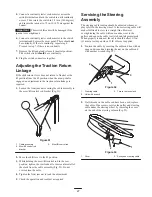
Page 37: ...w lift control rod 2 Move the shift lever to the 1 position 3 While holding the mow lift control rod in the rear position tighten the rear locknut to remove almost all of the slack from the cable assembly Fig 51 Do not over tension the cable 4 Tighten the front jam nut to lock the adjustment 5 Check the operation and readjust as required Servicing the Steering Assembly The steering cable tension s...

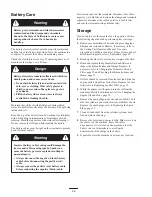
Page 38: ...he negative black cable Warning If corrosion occurs at the terminals disconnect the cables negative cable first and scrape the clamps and terminals separately Reconnect the cables positive cable first and coat the terminals with petroleum jelly Storage If you wish to store the machine for a long period of time the following steps should be performed prior to storage 1 Remove accumulations of dirt ...

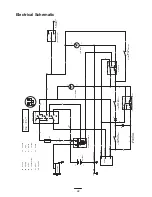
Page 39: ...Y BN D2 VIO BK FL STARTER SOLENOID MAGNETO ENGINE GND FRAME GND SP BATTERY VIO VOLT VOLT METER W BK 30 85 87 86 87a KILL RELAY CLOSED WHEN OFF MOW SW GY 30 85 87 86 87a PARKING BRAKE KILL RELAY BK VIO D1 W GN R OR FL W SP 10A STARTER X STOP NONE RUN B I A X Y START B I S Y A B S I OR A X Y S I B RUN START OFF IGNITION SW BN BU TO THE LIGHTS OPTIONAL LIGHT TEST SW BU BU VIO HR HR METER SEAT SW CLOS...

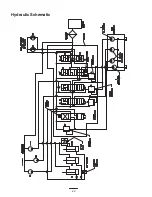
Page 40: ...40 Hydraulic Schematic ...

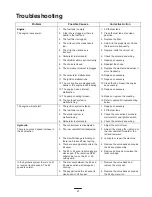
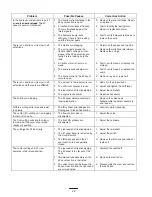
Page 41: ...s malfunctioning 15 Refer to hydraulic troubleshooting below The engine will not start 1 The ignition system is faulty 1 Repair as necessary g 2 The fuel tank is empty 2 Fill the fuel tank 3 The starter system is malfunctioning 3 Check the connections solenoid starter motor and ignition switch 4 Carburetor fuel solenoid 4 Check the solenoid and wiring Hydraulic 1 The control lever is misadjusted 1...

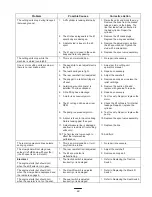
Page 42: ...he reels are affected 2 The shift lever bracket is loose 2 Adjust and tighten the shift lever 3 The rear camshaft is misadjusted 3 Adjust the camshaft 4 The engine lacks power 4 Repair as necessary The shift lever is binding 1 The 4 spool detent assembly is lacking lubrication 1 Remove the valve bank Disassemble the detent assembly and repair it All three cutting units raise and lower too slowly 1...

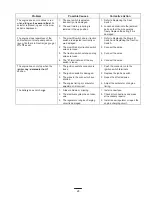
Page 43: ...s a blockage 6 Repair as necessary 7 A motor is excessively worn 7 Test to verify Repair or replace the motor 8 The 1 cutting unit has slow reel RPM 8 Check the lift cylinders for internal leakage Repair or replace the cylinder 9 The pump is excessively worn 9 Text to verify Repair or replace the pump 10 A spool is loose in the valve body Fluid is leaking past the spool 10 Replace the spool valve ...

Page 44: ... 4 The I terminal wire of key switch is loose 4 Connect the wire 5 There is engine trouble or the fuel tank is empty 5 Determine the problem and correct it 6 The parking brake kill relay is damaged 6 Replace the relay The engine does not stop when the mow pedal is depressed the reels are engaged as you get off of the seat 1 The mow lift or seat switch is adjusted incorrectly or is damaged 1 Refer ...

Page 45: ...f the seat 2 The mow lift and or traction switch wires are loose 2 Connect the wires 3 The traction switch extension plug wires are loose 3 Connect the wires 4 The B terminal wire of the key switch is loose 4 Connect the wires The engine does not stop when the ignition key is rotated to the Off 1 The ignition switch connection is loose 1 Push the connector onto the ignition switch terminals g t o ...

Page 46: ...46 ...

Page 47: ...eduled for replacement as required maintenance in the written instructions must be warranted for the warranty period of two years If any such part fails during the period of warranty coverage it must be repaired or replaced by The Toro Company Any such part repaired or replaced under the warranty must be warranted for a time not less than the remaining warranty period B Any warranted part that is ...

Page 48: ...t limited to weather storage practices contamination use of unapproved coolants lubricants additives or chemicals etc Normal wear and tear items Normal wear and tear includes but is not limited to damage to seats due to wear or abrasion worn painted surfaces scratched decals or windows etc Parts Parts scheduled for replacement as required maintenance are warranted for the period of time up to the ...

Reviews: