Cutting Unit Maintenance
Blade Safety
•
Use care when checking the reel cutting-unit.
Wear gloves and use caution when servicing the
reel.
•
A worn or damaged blade or bedknife can break,
and a piece could be thrown toward you or
bystanders, resulting in serious personal injury or
death.
•
Inspect the blades and bedknives periodically for
excessive wear or damage.
•
Use care when checking the blades. Wear gloves
and use caution when servicing them. Only
replace or backlap the blades and bedknives;
never straighten or weld them.
•
When servicing the blades, be aware that you
can still move the blades after you disconnect the
power.
Installing the Cutting Unit
1.
Move the kickstand to the C
UTTING
-U
NIT
-S
ERVICE
position; refer to
.
2.
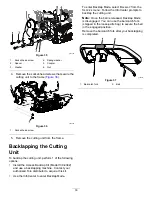
Remove the hardware that secures the reel-drive
assembly to the side plate (
).
g333187
Figure 32
1.
Socket-head screw
4.
Spring washer
2.
Spacer
5.
Nut
3.
Washer
3.
Remove the reel-drive assembly, flat washers,
spring washers, and spacers from the side plate
(
).
4.
Align the cutting unit to the frame.
5.
Use 4 socket-head screws to secure the cutting
unit to the frame (
g343380
Figure 33
1.
Socket-head screw
6.
Use the previously removed socket-head
screws, washers, and spacers to secure the
reel-drive assembly to the cutting-unit side plate
(
).
Ensure that the reel-drive-assembly driveshaft is
installed to the transmission-driveshaft coupler
(
).
g333165
Figure 34
1.
Socket-head screw
4.
Spring washer
2.
Spacer
5.
Coupler
3.
Washer
6.
Nut
Removing the Cutting Unit
1.
Move the kickstand to the C
UTTING
-U
NIT
-S
ERVICE
position; refer to
.
2.
Remove the grass basket (if equipped).
3.
Remove the reel-drive assembly from the cutting
unit (
) and retain the hardware.
32

