background image

Figure 4

3

Cómo instalar el limpiador de
aire

Parts needed for this procedure:

1

Soporte de montaje del motor

1

Conjunto del cartucho

3

Perno con arandela prensada

2

Arandela

2

Arandela de freno

2

Tuerca

1

Tapón

Procedure

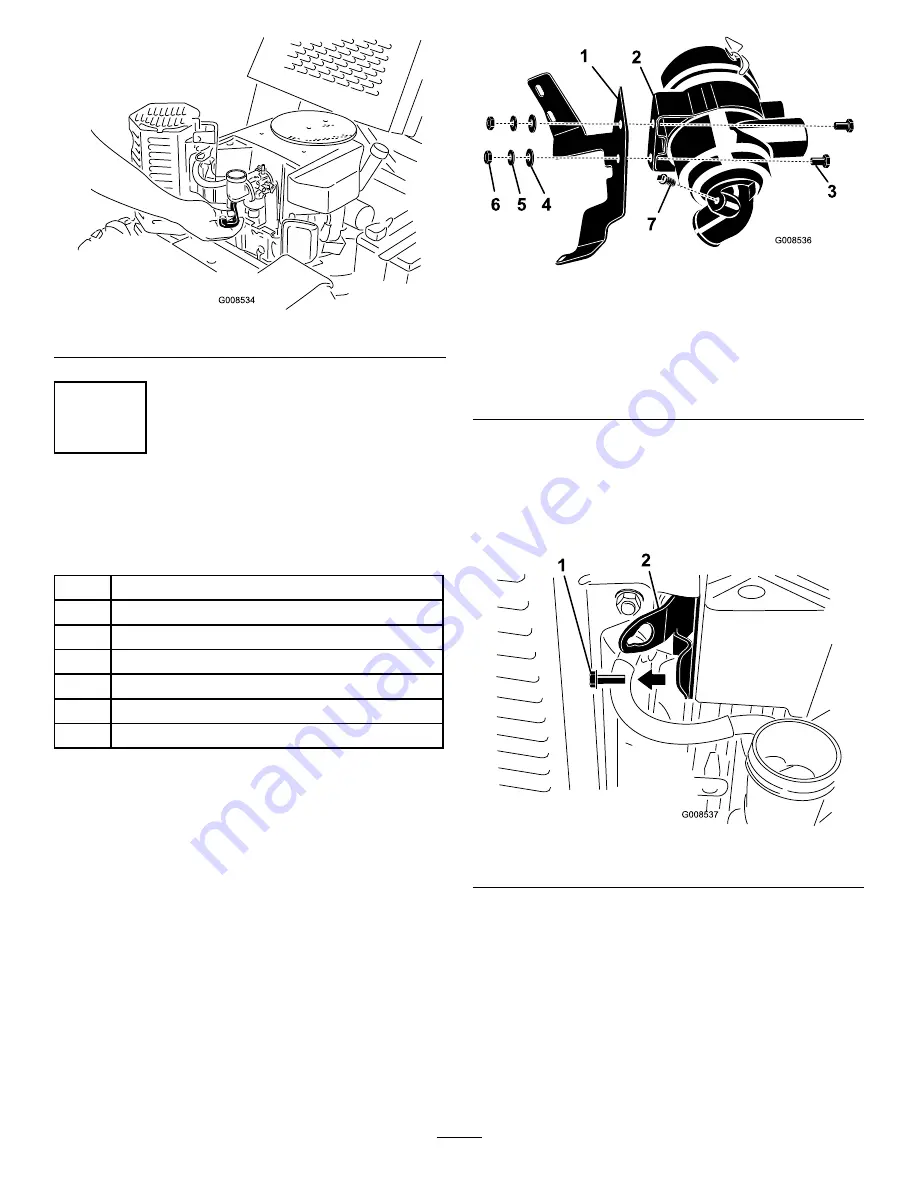
1. Monte el soporte de montaje del cartucho en el

soporte de montaje del motor usando 2 pernos con
arandela prensada, arandelas, arandelas de freno y
tuercas, según se muestra en Figure 5.

Figure 5

1.

Soporte de montaje del
motor

5.

Arandela de freno

2.

Soporte de montaje del
cartucho

6.

Tuerca

3.

Perno con arandela
prensada

7.

Tapón

4.

Arandela

2. Instale el tapón en el conector diagnóstico del

cartucho del limpiador de aire (Figure 5).

3. Retire y guarde el perno del borde superior interior

del protector del silenciador, según se muestra en
Figure 6.

Figure 6

1.

Perno

2.

Protector del silenciador

4. Retire el perno que sujeta la esquina superior de la

tapa de la válvula en el lado izquierdo de la máquina
(Figure 7).

3

Summary of Contents for 115-4029

Page 1: ...o Parts Required Procedure 1 Stop the machine on a level surface stop the engine remove the ignition key and lower the boom 2 Allow the engine to cool completely before continuing If the engine has been running the muffler and muffler guard will be hot and could burn you This procedure requires you to touch the muffler guard Allow the engine and muffler to cool completely before installing this ki...

Page 2: ... Parts needed for this procedure 1 Intake pipe 1 Gasket 1 Breather tube Procedure 1 Install a new gasket and intake pipe onto the carburetor using the flange nuts you removed previously Figure 3 and torque the flange nuts to 52 to 69 in lb 6 to 7 5 N m Figure 3 1 Carburetor stud 3 Intake pipe 2 Gasket 4 Flange nut 2 Install the new breather tube between the intake pipe and the engine Figure 4 Figu...

Page 3: ...acket 6 Nut 3 Flange head bolt 7 Plug 4 Washer 2 Install the plug into the diagnostic port on the air cleaner canister Figure 5 3 Remove and save the bolt on the upper and inner edge of the muffler guard as shown in Figure 6 Figure 6 1 Bolt 2 Muffler guard 4 Remove the bolt securing the upper corner of the valve cover on the left side of the machine Figure 7 Figure 7 1 Mounting bracket assembly 3 ...

Page 4: ...nd nut securing the canister mounting straps rotate the canister so that the port is up and tighten the bolt and nut to secure the canister Figure 8 Figure 8 1 Canister 4 Air intake port 2 Mounting bracket strap 5 Nut 3 Bolt 2 Slide two hose clamps onto the large air hose Figure 9 Figure 9 1 Hose clamp 2 Large air hose 3 Install the air hose onto the intake pipe on the carburetor and the lower por...

Page 5: ...ches on the air cleaner and pull the air cleaner cover off of the air cleaner body Figure 11 1 2 3 3 4 G008661 Figure 11 1 Air filter body 3 Latches 2 Air filter 4 Air cleaner cover 3 Clean the inside of the air cleaner cover with compressed air 4 Gently slide the air filter out of the air cleaner body Figure 11 Avoid knocking the filter into the side of the body Important Never attempt to clean t...

Page 6: ......

Page 7: ... 1 Cómo retirar el limpiador de aire existente No Parts Required Procedure 1 Aparque la máquina en una superficie nivelada pare el motor retire la llave de contacto y baje la espada 2 Deje que el motor se enfríe totalmente antes de continuar Si el motor ha estado en marcha el silenciador y el protector del silenciador estarán muy calientes y pueden causarle quemaduras Este procedimiento requiere q...

Page 8: ...carburador 2 Instalación del tubo de admisión Parts needed for this procedure 1 Tubo de admisión 1 Junta 1 Tubo del respiradero Procedure 1 Instale un junta nueva y el tubo de admisión en el carburador usando las tuercas con arandela prensada que retiró anteriormente Figure 3 y apriete las tuercas con arandela prensada a 6 7 5 Nm 52 69 pulgadas libra Figure 3 1 Espárrago del carburador 3 Tubo de a...

Page 9: ...eno y tuercas según se muestra en Figure 5 Figure 5 1 Soporte de montaje del motor 5 Arandela de freno 2 Soporte de montaje del cartucho 6 Tuerca 3 Perno con arandela prensada 7 Tapón 4 Arandela 2 Instale el tapón en el conector diagnóstico del cartucho del limpiador de aire Figure 5 3 Retire y guarde el perno del borde superior interior del protector del silenciador según se muestra en Figure 6 F...

Page 10: ...ntaje entre el motor y el protector del silenciador según se muestra en Figure 7 4 Conexión del limpiador de aire al motor Parts needed for this procedure 1 Manguera de aire grande 3 Abrazadera 1 Caperuza Procedure 1 Si la entrada de aire no está orientada directamente hacia arriba afloje el perno y la tuerca que sujetan las abrazaderas de montaje del cartucho gire el cartucho hasta que la entrada...

Page 11: ...ure 9 4 Deslice las abrazaderas sobre la manguera y sobre el borde del tubo de entrada y el orificio inferior y apriételas para sujetar la manguera 5 Coloque una abrazadera sobre el orificio inferior de la caperuza Figure 10 Figure 10 1 Caperuza 3 Entrada de aire 2 Abrazadera 6 Instale la caperuza sobre la entrada de aire y apriete la abrazadera Figure 10 5 ...

Page 12: ...ure 11 1 2 3 3 4 G008661 Figure 11 1 Carcasa del filtro de aire 3 Cierres 2 Filtro de aire 4 Tapa del limpiador de aire 3 Limpie el interior de la tapa del limpiador de aire con aire comprimido 4 Extraiga con cuidado el filtro de aire de la carcasa del limpiador de aire Figure 11 Evite golpear el filtro contra el lado de la carcasa Important No intente nunca limpiar el filtro de aire Cámbielo cada...

Reviews: