background image

Form No. 3362-333 Rev A

Electrical Service Kit

2008 and Before Emotion 43 Model 21027 Lawn Mower

Model No. 117-4092

Addendum

Use these instructions to install and replace the fuse on
your mower in addition to the information found in
the

Operator’s Manual

. Keep this addendum with your

Operator’s Manual

for future reference.

Installing the Fuse

No Parts Required

Procedure

Your mower comes with a 40-amp fuse that protects the
electric starter.

Important:

You cannot start the mower with the

electric starter or charge the battery unless you
install the fuse.

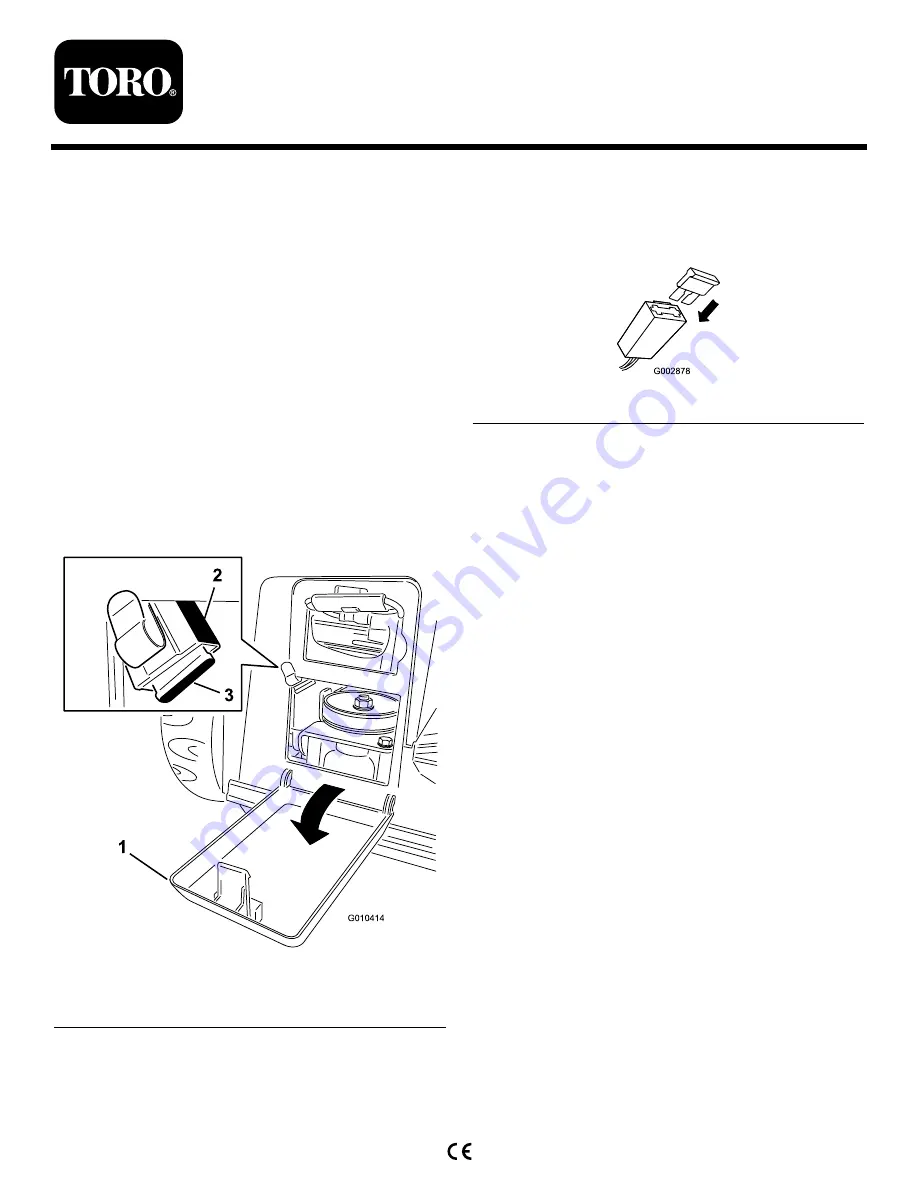
1. Open the battery cover (Figure 1).

Figure 1

1.

Battery cover

3.

Fuse (shown installed)

2.

Fuse holder

2. Locate the fuse holder from the upper left corner of

the opening to the battery compartment (Figure 1).

Note:

The wire to the fuse holder is short; you will

not be able to pull the fuse holder fully out of the
battery compartment.

3. Install the fuse in the fuse holder (Figure 2).

Figure 2

Note:

Your mower comes with a fuse in the your

owner’s packet.

4. Install the battery cover.

Replacing the Fuse

If the battery does not charge or the engine does not
turn with the electric starter, the fuse may be blown.
Replace it with a 40-amp plug-in type fuse. Refer to
Installing the Fuse.

© 2009—The Toro® Company
8111 Lyndale Avenue South
Bloomington, MN 55420

Register at www.Toro.com.

Original Instructions (EN)

Printed in the USA

All Rights Reserved


Summary of Contents for 117-4092

Page 1: ...Figure 1 1 Battery cover 3 Fuse shown installed 2 Fuse holder 2 Locate the fuse holder from the upper left corner of the opening to the battery compartment Figure 1 Note The wire to the fuse holder is short you will not be able to pull the fuse holder fully out of the battery compartment 3 Install the fuse in the fuse holder Figure 2 Figure 2 Note Your mower comes with a fuse in the your owner s p...

Page 2: ...Sicherungsfassung 2 Die Sicherungsfassung befindet sich oben links an der Öffnung des Batteriefachs Bild 1 Hinweis Der Draht zur Sicherungsfassung ist kurz Sie können die Sicherungsfassung nicht ganz aus dem Batteriefach herausziehen 3 Setzen Sie die Sicherung in den Sicherungshalter ein Bild 2 Bild 2 Hinweis Das Eigentümerpaket enthält bei der Auslieferung des Rasenmähers eine Sicherung 4 Bringen...

Page 3: ...re 1 1 Couvercle de la batterie 3 Fusible 2 Porte fusible 2 Localisez le porte fusible dans l angle supérieur gauche de l ouverture du compartiment de la batterie Figure 1 Remarque Le fil relié au porte fusible est court et vous ne pourrez donc pas sortir complètement le porte fusible du compartiment de la batterie 3 Placez le fusible dans le porte fusible Figure 2 Figure 2 Remarque La tondeuse es...

Page 4: ...iguur 1 1 Accudeksel 3 Zekering 2 Zekeringhouder 2 De zekeringhouder bevindt zich in de linkerbovenhoek van de opening naar het accucompartiment Figuur 1 Opmerking De draad naar de zekeringhouder is kort u kunt de zekeringhouder niet volledig uit het accucompartiment trekken 3 Plaats de zekering in de zekeringhouder Figuur 2 Figuur 2 Opmerking De maaimachine wordt geleverd met een zekering in het ...

Page 5: ...ra 1 Figura 1 1 Tapa de la batería 3 Fusible 2 Portafusibles 2 Localice el portafusibles en la esquina superior izquierda del hueco del compartimiento de la batería Figura 1 Nota El cable del portafusibles es corto no podrá sacar el portafusibles del todo del compartimiento de la batería 3 Instale el fusible en el portafusibles Figura 2 Figura 2 Nota Su cortacésped incluye un fusible con la docume...

Page 6: ...Figura 1 1 Coperchio della batteria 3 Fusibile 2 Portafusibili 2 Localizzate il portafusibili dall angolo superiore sinistro dell apertura dello scomparto della batteria Figura 1 Nota Il cavo al portafusibili è corto e non consente di estrarre completamente il portafusibili dallo scomparto della batteria 3 Inserite il fusibile nel portafusibili Figura 2 Figura 2 Nota Il tosaerba è provvisto di un ...

Page 7: ......

Page 8: ......

Reviews: