Form No. 3363-186 Rev B
CE Kit
2010 and After Groundsmaster
®
5900/5910 Traction Unit
Model No. 117-9449
Installation Instructions
1
Install the Hood Latch
Parts needed for this procedure:
1
Latch Key
1
Latch
1
Latch Bracket
3
Carriage Screw
3
Flange Nut
Procedure
1. Park the machine on a level surface, lower the decks,
engage the parking brake and turn the engine off.
Remove the key from the ignition switch.
2. Unlatch and raise the hood.
3. Remove the plug from the square hole in the right
side of the hood. Discard the plug.
4. Remove the locking nut from the latch assembly
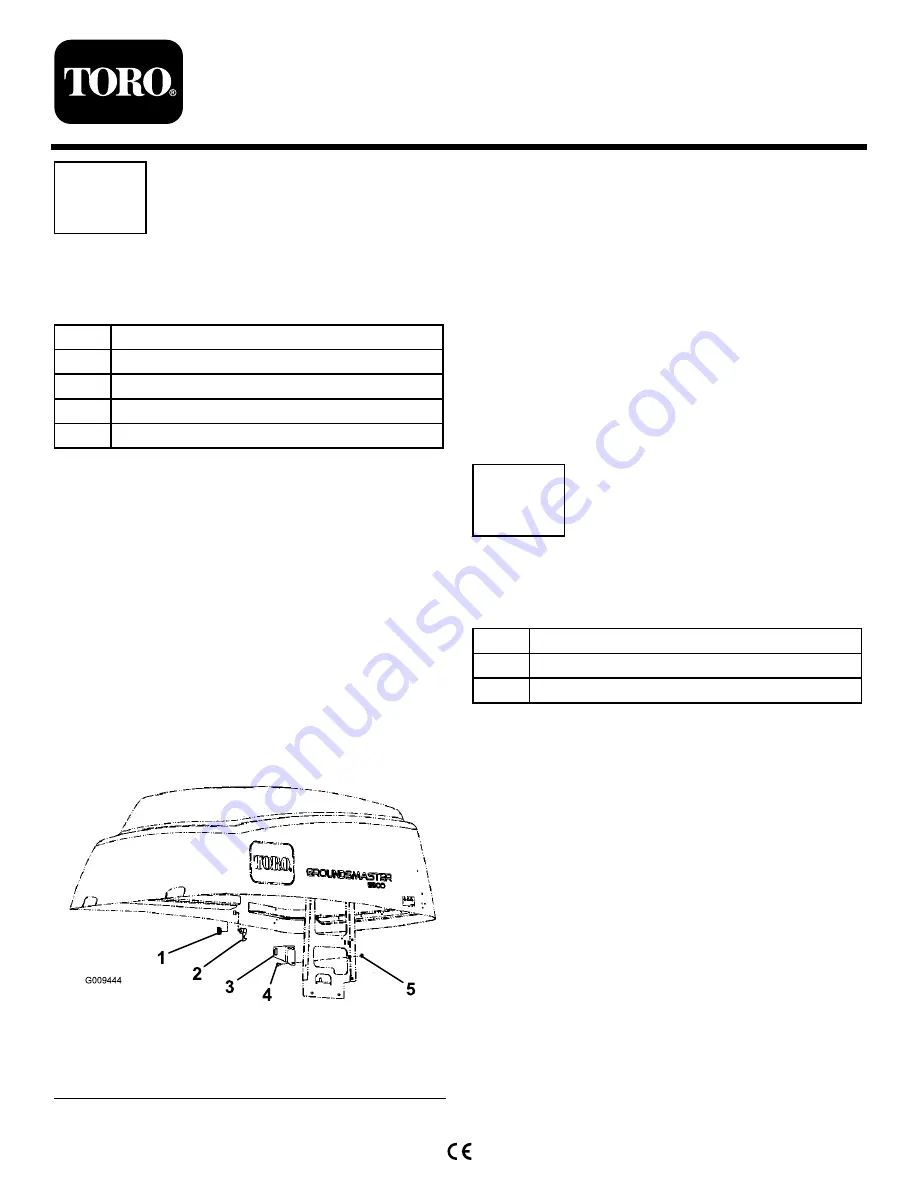
5. Install the locking latch through the square hole in
the right side of the hood (Figure 1). The catch
must be positioned inside the hood and pointing
downward.
Figure 1
1.
Latch key
4.
Carriage screw
2.
Latch
5.
Flange nut
3.
Latch bracket
6. Install the locking nut onto the latch to secure it to
the hood.
7. Locate the (3) holes in the right side of the radiator
support (Figure 1). Mount the latch bracket to the
radiator support with (3) carriage screws and flange
nuts. Position the latch bracket as shown in Figure 1.
8. Close the hood slowly to see if latch catches. If
it does not, loosen the screws securing the latch
bracket to the radiator support and adjust the bracket
as necessary. Tighten the screws and verify the latch
catches.
9. Use the key to lock/unlock latch. Store the key in a
convenient and memorable place.
2
Install the Side Panel Hardware
Parts needed for this procedure:
4
Screw (5/16 x 3/4 inch)
4
Push nut (5/16 inch)
1
Hex nut (5/16 inch) For assembling push nut only
Procedure
1. Remove the existing hardware securing the side
panel to the machine and discard (Figure 2). Remove
the side panel.
© 2009—The Toro® Company
8111 Lyndale Avenue South
Bloomington, MN 55420
Register at www.Toro.com.
Original Instructions (EN)
Printed in the USA.
All Rights Reserved


