background image

35

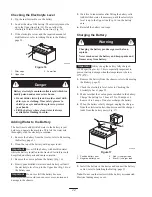
A broken or missing washout fitting could expose
you and others to thrown objects or blade contact.
Contact with blade or thrown debris contact will
cause injury or death.

Replace broken or missing washout fitting
immediately, before using mower again.

Plug any hole(s) in mower with bolts and
locknuts.

Never put your hands or feet under the mower
or through openings in the mower.

Warning

Cleaning and Storage

1. Disengage the PTO, set the parking brake, stop the

engine, and remove the ignition key.

2. Remove grass clippings, dirt, and grime from the

external parts of the entire machine, especially the
engine. Clean dirt and chaff from the outside of the
engine cylinder head fins and blower housing.

Important


You can wash the machine with mild

detergent and water. Do not use a pressure washer to
wash the machine.
 Pressure washing may damage the
electrical system or wash away necessary grease at friction
points. Avoid excessive use of water, especially near the
control panel, lights, engine, and battery.

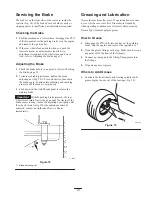
3. Check the brake; refer to Servicing the Brake, page 25.

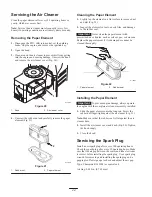
4. Service the air cleaner; refer to Servicing the Air

Cleaner, page 24.

5. Grease the chassis; refer to Greasing and Lubrication,

page 23.

6. Change the crankcase oil; refer to Servicing the Engine

Oil, page 20.

7. Check the tire pressure; refer to Checking the Tire

Pressure, page 25.

8. For storage over 30 days, prepare the traction unit as

follows:

A. Add a petroleum based stabilizer/conditioner to fuel

in the tank. Follow the mixing instructions from
stabilizer manufacturer (1 oz. per gallon). Do not
use an alcohol based stabilizer (ethanol or
methanol).

Note: A fuel stabilizer/conditioner is most effective when
mixed with fresh gasoline and used at all times.

B. Run the engine to distribute conditioned fuel

through the fuel system (5 minutes).

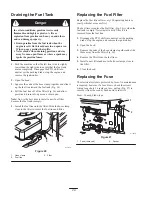
C. Stop the engine, allow it to cool, and drain the fuel

tank; refer to Draining the Fuel Tank, page 26.

D. Restart engine and run it until it stops.

E. Choke or prime the engine.

F. Start and run the engine until it will not start. Use

the primer, if equipped on the machine, several
times to ensure that no fuel remains in primer
system.

G. Dispose of fuel properly. Recycle as per local codes.

Important


Do not store stabilizer/conditioned gasoline

over 90 days.

9. Remove the spark plug(s) and check its condition; refer

to Servicing the Spark Plug, page 24. With the spark
plug(s) removed from the engine, pour two tablespoons
of engine oil into the spark plug hole. Use the electric
starter to crank the engine and distribute the oil inside
the cylinder. Install the spark plug(s); refer to Servicing
the Spark Plug, page 24. Do not install the wire on the
spark plug(s).

10. Disconnect the negative battery cable. Clean the battery

and battery terminals. Check the electrolyte level and
charge it fully; refer to Servicing the Battery, page 21.
Leave the negative battery cable disconnected from the
battery during storage.

Important


The battery must be fully charged to prevent

it from freezing and being damaged at temperatures below
32

°

F (0

°

C). A fully charged battery can be stored one

winter season without recharging.

11. Check and tighten all bolts, nuts, and screws. Repair or

replace any part that is worn or damaged.

12. Paint all scratched or bare metal surfaces. Paint is

available from your Authorized Service Dealer.

13. Store the machine in a clean, dry garage or storage area.

Remove the ignition and KeyChoice keys from the
mower and keep them in a memorable place. Cover the
machine to protect it and keep it clean.

Summary of Contents for 12-32XL Wheel Horse

Page 1: ...Operator s Manual English EN Form No 3324 772 Rev A 12 32XL Wheel Horse Lawn Tractor Model No 71199 210000001 and Up ...

Page 2: ...hink Safety First 12 Controls 12 Parking Brake 12 Positioning the Seat 13 Headlights 13 Using the Blade Control PTO 13 Page Setting the Height of Cut 13 Starting and Stopping the Engine 14 The Safety System 15 Testing the Safety System 16 Driving Forward or Backward 16 Selecting Ground Speeds 16 Stopping the Machine 16 Side Discharge or Mulch Grass 17 Installing the Discharge Cover 17 Tips for Mow...

Page 3: ...h means CAUTION WARNING or DANGER personal safety instruction Failure to comply with the instruction may result in personal injury or death Safe Operating Practices The following instructions are from ANSI standard B71 1 1998 This product is capable of amputating hands and feet and throwing objects Always follow all safety instructions to avoid serious injury or death General Operation Read unders...

Page 4: ...ragic accidents can occur if the operator is not alert to the presence of children Children are often attracted to the machine and the mowing activity Never assume that children will remain where you last saw them Keep children out of the mowing area and under the watchful care of another responsible adult Be alert and turn the machine off if children enter the area Before and while backing look b...

Page 5: ... hot from operation Allow to cool before attempting to maintain adjust or service Battery acid is poisonous and can cause burns Avoid contact with skin eyes and clothing Protect your face eyes and clothing when working with a battery Battery gases can explode Keep cigarettes sparks and flames away from battery Use only genuine replacement parts to ensure that original standards are maintained Use ...

Page 6: ...6 ...

Page 7: ...7 Slope Chart ...

Page 8: ...8 ...

Page 9: ...ecals Safety decals and instructions are easily visible to the operator and are located near any area of potential danger Replace any decal that is damaged or lost 99 8140 92 2461 99 5339 93 1122 92 2462 66 1340 55 4300 99 2985 ...

Page 10: ...094 68 3650 104 4163 1 Explosion hazard 2 No sparks flame or smoking 3 Caustic liquid hazard burns to hand and damage to items 4 Wear eye protection 5 Read the operator s manual 6 Keep bystanders away 104 4164 ...

Page 11: ...uipment from the truck or trailer and refuel the equipment with its wheels on the ground If this is not possible then refuel such equipment on a truck or trailer from a portable container rather than from a gasoline dispenser nozzle If a gasoline dispenser nozzle must be used keep the nozzle in contact with the rim of the fuel tank or container opening at all times until fueling is complete Using ...

Page 12: ... PTO 6 Ground speed selector 7 Height of cut lever deck lift 8 Parking brake lever 9 Throttle lever 10 Hood opening 11 Operating in reverse light 12 KeyChoice switch Parking Brake Always set the parking brake when you stop the machine or leave it unattended Setting the Parking Brake 1 Push the clutch brake pedal Fig 2 down and hold it in the depressed position 2 Lift the parking brake lever Fig 2 ...

Page 13: ...r to the blade s Engaging the Blade s 1 Depress the clutch brake pedal to stop the machine 2 Move the blade control PTO to Engaged Fig 4 m 1852 1 3 2 Figure 4 1 Disengaged 2 Engaged 3 Blade control PTO Disengaging the Blade s 1 Depress the clutch brake pedal to stop the machine 2 Move the PTO to Disengaged Fig 4 Setting the Height of Cut The height of cut lever deck lift is used to raise and lower...

Page 14: ... Fig 9 When the engine starts release the key Important If the engine does not start after 30 seconds of continuous cranking turn the ignition key to Off and let the starter motor cool refer to Troubleshooting page 37 7 After the engine starts slowly move the throttle lever to Fast Fig 8 If the engine stalls or hesitates move the throttle lever back to Choke for a few seconds Then move the throttl...

Page 15: ...ith mower blades or other attachment running the engine will stop Do not mow in reverse unless absolutely necessary If you need to use the PTO while backing up you can turn off this interlock feature using the KeyChoice switch located near the seat bracket Fig 10 Danger You could back over a child or bystander while the mower blade s or other attachment is engaged and cause serious injury or death...

Page 16: ... Move the PTO lever to the Disengage position and the operating in reverse warning light should turn off Driving Forward or Backward The throttle control regulates the engine speed as measured in rpm revolutions per minute To go forward or backward depress the clutch brake pedal Move the ground speed selector to the desired forward speed or reverse As you slowly release the pedal the machine will ...

Page 17: ...r try to clear the discharge area or mower blades unless you move the power take off PTO to Off and rotate the ignition key to Off Also remove the key and pull the wire off of the spark plug s The mower has a hinged grass deflector that disperses clippings to the side and down toward the turf To mulch grass clippings you must install the discharge cover optional on some models into the opening in ...

Page 18: ...wth rate slows in mid summer mow less frequently If you cannot mow for an extended period first mow at a high cutting height then mow again 2 days later at a lower height setting Avoid Cutting Too Low If the cutting width of the mower is wider than the mower you previously used raise the cutting height one notch to ensure uneven turf is not cut too short Long Grass If the grass is ever allowed to ...

Page 19: ...ge Perform all of the maintenance procedures listed above Check the belts for wear cracks Drain the fuel tank Paint chipped surfaces Charge the battery and disconnect the cables After storage Check the safety system Check the brakes Check the spark plug Check the battery electrolyte Check the tire pressure 1More often in dusty dirty conditions 2More often when operating the engine under heavy load...

Page 20: ...ain and look at the metal end If the oil level is low slowly pour only enough oil into the filler tube to raise the level to the Full mark Important Do not overfill the crankcase with oil because the engine may be damaged m 1868 1 2 3 Figure 13 1 Oil dipstick 2 Metal end 3 Filler tube Changing and Draining the Oil 1 Start the engine and let it run for five minutes This warms the oil so that it dra...

Page 21: ...hift into neutral set the parking brake stop the engine and remove the key 2 Tip the seat forward to see the battery 3 Disconnect the negative black ground cable from the battery post Fig 15 Incorrect battery cable routing could damage the tractor and cables causing sparks Sparks can cause the battery gasses to explode resulting in personal injury Always disconnect the negative black battery cable...

Page 22: ...l until the electrolyte level is up to the Upper line Fig 16 on the battery case Important Do not overfill the battery because electrolyte sulfuric acid can cause severe corrosion and damage to the chassis 5 Wait five to ten minutes after filling the battery cells Add distilled water if necessary until the electrolyte level is up to the Upper line Fig 16 on the battery case 6 Reinstall the battery...

Page 23: ... clutch brake pedal to release the parking brake Important With the parking brake released the rear wheels must rotate freely when you push the tractor If the brake seems to drag loosen the adjusting nut slightly until the wheels rotate freely If both conditions cannot be achieved contact an Authorized Service Dealer immediately m 1895 1 Figure 18 1 Brake adjusting nut Greasing and Lubrication Gre...

Page 24: ... Important Never clean the paper element with pressurized air or liquids such as solvent gas or kerosene Replace the paper element if it is damaged or cannot be cleaned thoroughly m 1867 1 2 Figure 22 1 Paper element 2 Rubber seal Installing the Paper Element Important To prevent engine damage always operate the engine with the complete air cleaner assembly installed 1 Slide the paper element onto...

Page 25: ... Always replace the spark plug when it has a black coating worn electrodes an oily film or cracks 2 Check the gap between the center and side electrodes Fig 24 Bend the side electrode Fig 24 if the gap is not correct m 1870 0 030 in 0 762 mm 2 3 1 Figure 24 1 Center electrode insulator 2 Side electrode 3 Air gap not to scale Installing the Spark Plug 1 Install the spark plug and metal washer Make ...

Page 26: ...l a new fuel filter because the fuel tank is empty 5 Install the fuel line onto the filter Slide the hose clamp close to the filter to secure the fuel line and filter m 1873 1 2 3 Figure 26 1 Hose clamp 2 Fuel line 3 Filter Replacing the Fuel Filter Replace the fuel filter after every 100 operating hours or yearly whichever occurs first The best time to replace the fuel filter Fig 26 is when the f...

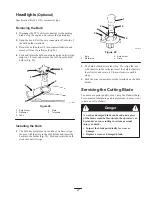
Page 27: ...ith the slots in the bulb holder and insert the base into the holder Fig 29 Push and rotate the bulb clockwise until it stops m 1875 1 2 3 4 2 4 Figure 29 1 Bulb 2 Metal pins 3 Bulb holder 4 Slots 2 The bulb holder has two tabs Fig 28 Align the tabs with the slots in the reflector insert the bulb holder into the reflector and rotate it 1 4 turn clockwise until it stops 3 Push the wire connectors o...

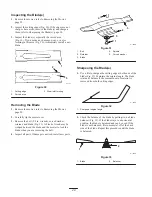
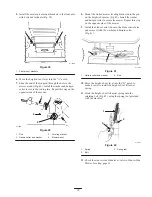
Page 28: ... block of wood may be wedged between the blade and the mower to lock the blade when you are removing the bolt 4 Inspect all parts If damage is noticed install new parts m 1886 1 2 3 4 5 Figure 31 1 Bolt 2 Retainer 3 Blade 4 Spindle 5 Curved washer Sharpening the Blade s 1 Use a file to sharpen the cutting edge at both ends of the blade Fig 32 Maintain the original angle The blade retains its balan...

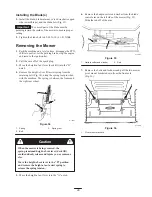
Page 29: ...Fig 34 using the spring tool provided with the machine The spring is between the frame and the right rear wheel 1 2 3 m 1851 Figure 34 1 Spring 2 Bolt 3 Spring tool When the mower is being removed the spring tensioned height of cut lever deck lift could suddenly release and injure you or someone else Move the height of cut lever to the D position and remove the height of cut assist spring to relea...

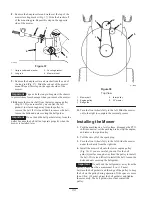
Page 30: ... mower is installed later m 1898 1 2 3 4 5 Figure 38 Top View 1 Mower belt 2 Engine pulley 3 Belt guide 4 Idler pulley 5 32 mower 11 Turn the front wheels fully to the left Slide the mower out to the right to complete the removal process Installing the Mower 1 Park the machine on a level surface disengage the PTO shift into neutral set the parking brake stop the engine and remove the ignition key ...

Page 31: ...bracket onto the pin on the height of cut arm Fig 40 Install the washer and hairpin cotter to secure the mower Repeat this step on the opposite side of the mower 9 Install the blade control rod onto the blade control arm and secure it with the washer and hairpin cotter Fig 41 m 1897 1 2 Figure 41 1 Hairpin cotter and washer 2 Rod 10 Move the height of cut lever into the D notch to make it easier t...

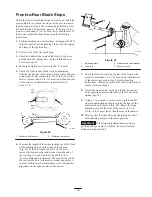
Page 32: ...e in the front and rear tires to the recommended inflation refer to Checking the Tire Pressure page 25 1 Park the machine on a level surface disengage the PTO shift into neutral set the parking brake stop the engine and remove the ignition key 2 Pull the wire off of the spark plug 3 Move the height of cut lever into the C notch 4 Carefully rotate the blade s side to side Fig 44 Measure between the...

Page 33: ...ck on the sides of the chassis Fig 47 If the rod length is not 5 8 in 16 mm remove the hairpin cotter and washer from the end of the rod Fig 47 and turn the rod until the 5 8 in 16 mm dimension is obtained Then install the end of the rod into the hole in the mower mount and secure it in place with the washer and hairpin cotter Repeat this procedure on the opposite side of the mower m 1805 5 8 in 1...

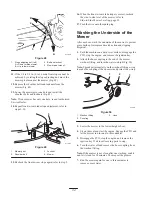
Page 34: ...onto the spark plug Washing the Underside of the Mower After each use wash the underside of the mower to prevent grass buildup for improved mulch action and clipping dispersal 1 Park the machine on a hard level surface disengage the PTO stop the engine and remove the ignition key 2 Attach the hose coupling to the end of the mower washout fitting and turn the water on high Fig 50 Note Spread petrol...

Page 35: ...t effective when mixed with fresh gasoline and used at all times B Run the engine to distribute conditioned fuel through the fuel system 5 minutes C Stop the engine allow it to cool and drain the fuel tank refer to Draining the Fuel Tank page 26 D Restart engine and run it until it stops E Choke or prime the engine F Start and run the engine until it will not start Use the primer if equipped on th...

Page 36: ...RIDE LAMP BK VIO GY VIO GN T BN BK NMIR MODULE 5 1 3 4 6 2 S7 LIGHT SWITCH OR GY SHOWN WITH PTO DISENGAGED 3 2 1 S2 PTO T GY 10A F2 PK R BU OR PK B Y A KEY SW X S B I S4 S A I KEY SWITCH OFF NO CONNECTION ON B I A AND X Y START B I S IGNITION BLUE BROWN WIRE COLOR CODES GREY WHITE VIOLET RED YELLOW TAN GREEN ORANGE BLACK PINK R VIO W GY BU BN OR GN T Y PK BK R R BATTERY GND ALTERNATOR FUEL SOLENIO...

Page 37: ...ct 5 Install a new correctly gapped spark plug 6 The choke is not closing 6 Adjust the throttle cable 7 There is dirt in the fuel filter 7 Replace the fuel filter 8 The idle speed is too low or the mixture is incorrect 8 Adjust the carburetor idle speed and idle mixture 9 Dirt water or stale fuel is in the fuel system 9 Contact an Authorized Service Dealer The engine loses power 1 The engine load ...

Page 38: ...ey 4 Tighten the appropriate pulley 5 The engine pulley is damaged 5 Contact an Authorized Service Dealer The blade s does not rotate 1 The blade drive belt is worn loose or broken 1 Install a new blade drive belt 2 The blade drive belt is off of the pulley 2 Install the blade drive belt and check the idler pulley and belt guides for the correct position The machine does not drive 1 The traction b...

Page 39: ...39 ...

Page 40: ...Customer Service Department Toro Warranty Company 8111 Lyndale Avenue South Bloomington MN 55420 1196 952 888 8801 or 800 421 9684 Owner Responsibilities You must maintain your Toro Product by following the maintenance procedures described in the operator s manual Such routine maintenance whether performed by a dealer or by you is at your expense Items and Conditions Not Covered There is no other ...

Reviews: