background image

4

Installing the Discharge
Plate

Parts needed for this procedure:

1

Discharge plate

1

Carriage bolt (5/16 x 7/8 inch)

1

Flange nut (5/16 inch)

2

Flange nut (3/8 inch)

2

Carriage bolt (3/8 x 1 inch)

Procedure

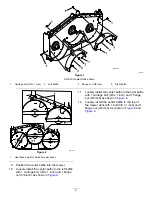
1.

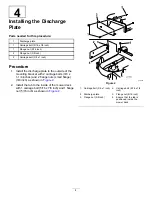
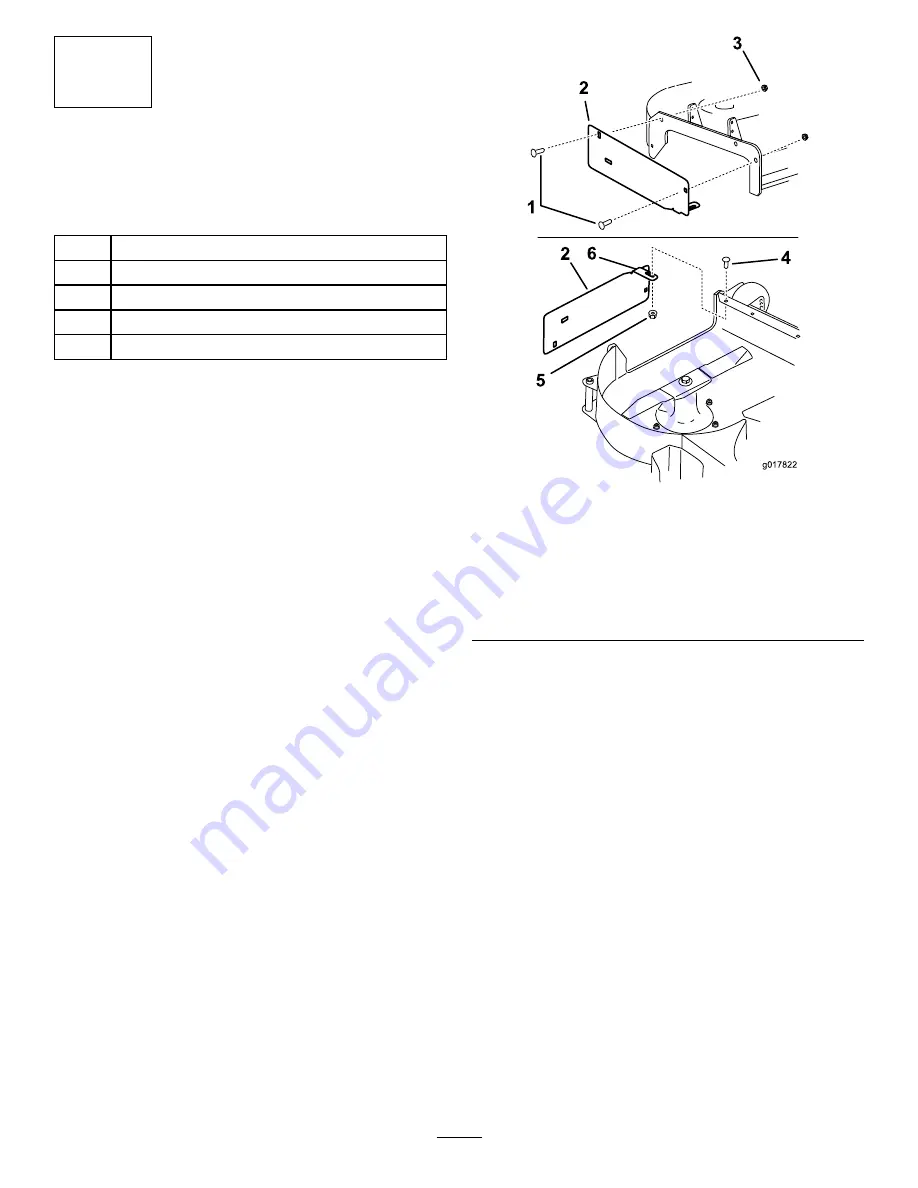
Install the discharge plate to the outside of the
mounting bracket with 2 carriage bolts (3/8 x
1-1/4 inches) and 2 flange nuts (small flange)
(3/8 inch) as shown in

Figure 2

.

2.

Install the tab to the inside of the mower deck
with 1 carriage bolt (5/16 x 7/8 inch) and 1 flange
nut (5/16 inch) as shown in

Figure 2

.

g017822

Figure 2

1.

Carriage bolt (3/8 x 1 inch)

4.

Carriage bolt (5/16 x 7/8
inch)

2.

Discharge plate

5.

Flange nut (5/16 inch)

3.

Flange nut (3/8 inch)

6.

Ensure that the tab is
positioned inside the
mower deck.

4


Summary of Contents for 144-0386

Page 1: ...r death Never remove the grass deflector from the mower deck because the grass deflector routes material down toward the turf If the grass deflector is ever damaged replace it immediately Never put your hands or feet under the mower deck Never try to clear the discharge area or mower blades unless you move the blade control switch PTO to the OFF position rotate the key switch to the OFF position a...

Page 2: ...8 inch 1 Flange nut 5 16 inch 1 Flange nut 3 8 inch 2 4 Carriage bolt 3 8 x 1 inch 2 Install the discharge plate Left baffle 1 Center baffle 1 Right baffle 1 Flange nut 3 8 inch 9 5 Carriage bolt 3 8 x 1 inch 9 Install the baffles for 48 inch and 52 inch mower decks Left baffle 1 Center baffle 1 Right baffle 1 Flange nut 3 8 inch 9 6 Carriage bolt 3 8 x 1 inch 9 Install the baffles for 60 inch mow...

Page 3: ...s personal injury Wear gloves or wrap the sharp edges of the blade with a rag Refer to the Operator s Manual for instructions on removing the blades The recycler blades are sold separately Contact your Authorized Service Dealer 3 Removing the Existing Baffle No Parts Required Procedure 1 Remove the flange nuts holding the baffle in place Figure 1 2 Remove the bolts holding the baffle in place Figu...

Page 4: ...ounting bracket with 2 carriage bolts 3 8 x 1 1 4 inches and 2 flange nuts small flange 3 8 inch as shown in Figure 2 2 Install the tab to the inside of the mower deck with 1 carriage bolt 5 16 x 7 8 inch and 1 flange nut 5 16 inch as shown in Figure 2 g017822 Figure 2 1 Carriage bolt 3 8 x 1 inch 4 Carriage bolt 5 16 x 7 8 inch 2 Discharge plate 5 Flange nut 5 16 inch 3 Flange nut 3 8 inch 6 Ensu...

Page 5: ...to Figure 4 and Figure 5 for the correct holes to use 4 Loosely install the right baffle to the mower deck with 1 carriage bolt 3 8 x 1 inch and 1 flange nut 3 8 inch as shown in Figure 3 5 Position the left baffle into the mower deck 6 Loosely install the left baffle to the top of the mower deck with 1 bolt 3 8 x 1 inch and 1 flange nut 3 8 inch as shown in Figure 3 Refer to Figure 4 and Figure 5...

Page 6: ...th 1 carriage bolt 3 8 x 1 inch and 1 flange nut 3 8 inch as shown in Figure 6 Refer to Figure 4 and Figure 5 for the correct holes to use 11 Loosely install the center baffle to the right baffle with 1 carriage bolt 3 8 x 1 inch and 1 flange nut 3 8 inch as shown in Figure 6 12 Loosely install the center baffle to the top of the mower deck with 1 bolt 3 8 x 1 inch and 1 flange nut 3 8 inch as sho...

Page 7: ...n in Figure 7 3 Loosely install the right baffle to the top of the mower deck with 1 carriage bolt 3 8 x 1 inch and 1 flange nut 3 8 inch Refer to Figure 7 and Figure 8 4 Loosely install the right baffle to the mower deck with 1 carriage bolt 3 8 x 1 inch and 1 flange nut 3 8 inch as shown in Figure 7 5 Position the left baffle into the mower 6 Loosely install the left baffle to the top of the mow...

Page 8: ...10 Loosely install the center baffle to the left baffle with 1 carriage bolt 3 8 x 1 inch and 1 flange nut 3 8 inch as shown in Figure 9 11 Loosely install the center baffle to the right baffle with 1 carriage bolt 3 8 x 1 inch and 1 flange nut 3 8 inch as shown in Figure 9 12 Loosely install the center baffle to the top of the mower deck with 1 bolt 3 8 x 1 inch and 1 flange nut 3 8 inch as shown...

Page 9: ...arp edges of the blade with a rag Refer to the Operator s Manual for instructions on installing the blades The recycler blades are sold separately Contact your Authorized Service Dealer 8 Tightening all Fasteners No Parts Required Procedure 1 Tighten all nuts and bolts for the baffles Figure 2 Figure 3 Figure 6 Figure 7 and Figure 9 2 Rotate the blades and ensure that there is clearance between th...

Page 10: ...wer and back up if the mower starts to clog Mowing at Correct Intervals Grass grows at different rates at different times of the year To maintain the same cutting height mow more often in early spring As the grass growth rate slows in mid summer mow less frequently If you cannot mow for an extended period first mow at a high cutting height then mow again 2 days later at a lower height setting Mowi...

Page 11: ...Notes ...

Page 12: ......

Reviews: