CHECK THE ENGINE OIL (Fig. 1)
The engine is shipped with 3.3 1 of oil. However, check
the oil level before and after you first start the engine.
1.
Position the machine on a level surface.
2.
Unscrew the dipstick and wipe it with a clean cloth.
Screw the dipstick into the tube and make sure it is
seated fully. Unscrew the dipstick and check the oil
level. If it is low, remove the filler cap and add oil.
3.
Use any high-quality detergent oil having the
American Petroleum Institute—API—”service
classification” SE, SF or SG. Recommended
viscosity (weight) is SAE 30. Refer to the Engine
Operator’s Manual for additional information.
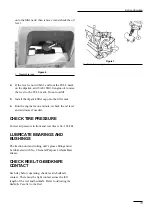
Figure 1
1. Dipstick
2. Filler
cap
4.
Pour the oil into opening in the valve cover until the
oil level is up to the ”FULL’” mark on the dipstick.
Add the oil slowly and check the level often during
this process. DO NOT OVERFILL.
IMPORTANT Check the oil level every 8
operating hours or daily. Initially, change the oil
after the first 8 hours of operation; thereafter,
under normal conditions, change the oil every 50
hours and filter every 100 hours. However,
change it more often when operating the engine
in extremely dusty or dirty conditions.
5.
Install the filler cap and the dipstick.
CHECK THE COOLING SYSTEM
(Fig. 2)
Clean debris from the hood screens, engine and radiator
daily—more often if conditions are extremely dusty and
dirty; refer to the section on the Engine Cooling System.
The cooling system is filled with a 50/50 solution of
water and permanent ethylene glycol anti-freeze.
Check level of coolant in expansion tank at beginning of
each day before starting the engine.
1.
Check the level of coolant in the expansion tank.
Coolant level should be between the marks on the
side of the tank.
Figure 2
1. Expansion
Tank
2. If coolant level is low, remove the expansion tank
cap and replenish the system. DO NOT
OVERFILL.
3.
Install the expansion tank cap.
FILL FUEL TANK (Fig. 3)
Fuel tank capacity is 20 liters.
1.
Remove the fuel tank cap.
11
Before Operating
1
1
1
2
If the engine has been running, pressurized hot coolant
can escape when the radiator cap is removed and cause
burns.
CAUTION
Summary of Contents for 2003
Page 16: ...Figure 15 1 Fuel valve Controls 16 1 ...
Page 24: ...Figure 25 Figure 26 Figure 27 Figure 28 Figure 29 Figure 30 Figure 31 24 Maintenance ...
Page 34: ......
Page 35: ......
Page 36: ......


