background image

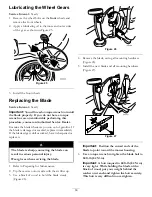
Lubricating the Wheel Gears

Service Interval:

Yearly

1. Remove the wheel bolts on the

front

wheels and

remove the front wheels.

2. Apply a lubricating oil to the inner and outer sides

of the gear as shown in Figure 25.

Figure 25

3. Install the front wheels.

Replacing the Blade

Service Interval:

Yearly

Important:

You will need a torque wrench to install

the blade properly

. If you do not have a torque

wrench or are uncomfortable performing this
procedure, contact an Authorized Service Dealer.

Examine the blade whenever you run out of gasoline. If
the blade is damaged or cracked, replace it immediately.
If the blade edge is dull or nicked, have it sharpened or
replace it.

The blade is sharp; contacting the blade can
result in serious personal injury.

Wear gloves when servicing the blade.

1. Refer to Preparing for Maintenance.

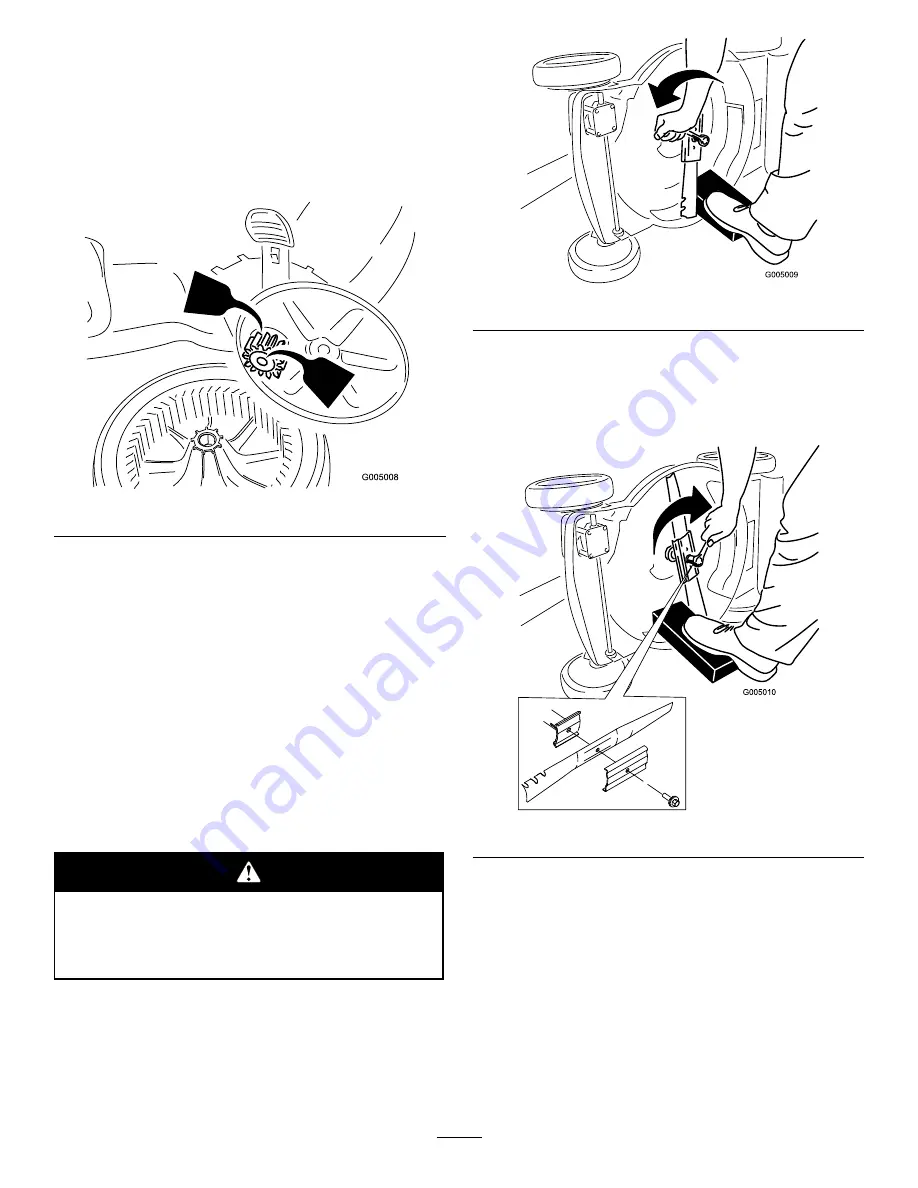
2. Tip the mower onto its side with the air filter up.

3. Use a block of wood to hold the blade steady

(Figure 26).

Figure 26

4. Remove the blade, saving all mounting hardware

(Figure 26).

5. Install the new blade and all mounting hardware

(Figure 27).

Figure 27

Important:

Position the curved ends of the

blade to point toward the mower housing.

6.

Use a torque wrench to tighten the blade bolt to
60 ft-lb (82 N

⋅⋅⋅

m).

Important:

A bolt torqued to 60 ft-lb (82 N

⋅⋅⋅

m)

is very tight. While holding the blade with a
block of wood, put your weight behind the
ratchet or wrench and tighten the bolt securely.
This bolt is very difficult to overtighten.

16

Summary of Contents for 20064

Page 1: ...he product model and serial numbers in the space below Model No Serial No This manual identifies potential hazards and has safety messages identified by the safety alert symbol Figure 2 which signals a hazard that may cause serious injury or death if you do not follow the recommended precautions Figure 2 1 Safety alert symbol This manual uses 2 words to highlight information Important calls attent...

Page 2: ...Be sure the area is clear of bystanders before operating Stop machine if anyone enters the area Do not operate machine barefooted or while wearing sandals Always wear substantial footwear Do not pull machine backward unless absolutely necessary Always look down and behind before and while moving backward Never direct discharged material toward anyone Avoid discharging material against a wall or ob...

Page 3: ...d refuel it on the ground If this is not possible then refuel such equipment with a portable container rather than from a gasoline dispenser nozzle Keep the nozzle in contact with the rim of the fuel tank or container opening at all times until fueling is complete Do not use a nozzle lock open device If fuel is spilled on clothing change clothing immediately Never overfill fuel tank Replace gas ca...

Page 4: ...of hand or foot mower blade stay away from moving parts 2 Thrown object hazard keep bystanders a safe distance from the machine 5 Cutting dismemberment hazard of hand or foot mower blade do not operate up and down slopes operate side to side on slopes stop the engine before leaving the operating position and look behind you when backing 3 Cutting dismemberment hazard of hand or foot mower blade re...

Page 5: ...e the upper handle forward until the handle halves are in line and nest together as shown Figure 3 Figure 3 2 Tighten the handle knobs Figure 4 Figure 4 3 Rotate the handle rearward as shown until it clicks into place Figure 5 Figure 5 2 Filling the Engine with Oil Procedure Your mower does not come with oil in the engine but it does come with a bottle of oil 1 Remove the dipstick Figure 6 Figure ...

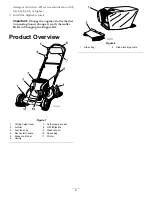
Page 6: ... the first 5 operating hours change it yearly thereafter Refer to Changing the Engine Oil Product Overview Figure 7 1 Cutting height lever 7 Self propel drive bar 2 Air filter 8 Oil fill Dipstick 3 Fuel tank cap 9 Washout port 4 Recoil start handle 10 Spark plug 5 Blade control bar 11 Primer 6 Handle Figure 8 1 Grass bag 2 Side discharge chute 6 ...

Page 7: ... use methanol gasoline containing methanol or gasohol containing more than 10 ethanol because the fuel system could be damaged Do not mix oil with gasoline Important To reduce starting problems add fuel stabilizer to the fuel all season mixing it with gasoline less than 30 days old Figure 9 Checking the Engine Oil Level Service Interval Before each use or daily 1 Remove the dipstick wipe it clean ...

Page 8: ...e and wait for all moving parts to stop Do not put your fingers under the housing when adjusting the cutting height If the engine has been running the muffler will be hot and can severely burn you Keep away from the hot muffler Adjust the cutting height as desired Set the front wheels to the same height as the rear wheels Figure 11 Figure 11 8 ...

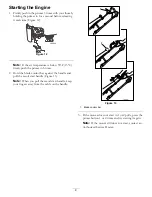
Page 9: ... primer in 5 times 2 Hold the blade control bar against the handle and pull the recoil start handle Figure 13 Note When you pull the recoil start handle keep your fingers away from the cable on the handle Figure 13 1 Blade control bar 3 If the mower does not start in 1 or 2 pulls press the primer button 1 or 2 times and try starting it again Note If the mower still does not start contact an Author...

Page 10: ...move it refer to Removing the Grass Bag before recycling the clippings If the side discharge chute is on the mower remove it and lock the side discharge door refer to Removing the Side Discharge Chute before recycling the clippings Bagging the Clippings Use the grass bag when you want to collect grass and leaf clippings from the lawn A worn grass bag could allow small stones and other similar debr...

Page 11: ...If the bag is on the mower remove it before side discharging the clippings The blade is sharp contacting the blade can result in serious personal injury Stop the engine and wait for all moving parts to stop before leaving the operating position Installing the Side Discharge Chute 1 Unlock the side discharge door Figure 17 Figure 17 2 Install the side discharge chute Figure 18 11 ...

Page 12: ...cutting season begins Replace the blade when necessary with a Toro replacement blade Cutting Grass Cut only about a third of the grass blade at a time Do not cut below the 2 inch 51 mm setting unless the grass is sparse or it is late fall when grass growth begins to slow down Refer to Adjusting the Cutting Height When cutting grass over 6 inches 15 cm tall mow at the highest cutting height setting...

Page 13: ...he grass more frequently Overlap cutting swaths instead of cutting a full swath with each pass Set the cutting height on the front wheels one notch lower than the rear wheels For example set the front wheels at 2 inches 51 mm and the rear wheels at 2 3 8 inches 60 mm Cutting Leaves After cutting the lawn ensure that half of the lawn shows through the cut leaf cover You may need to make more than o...

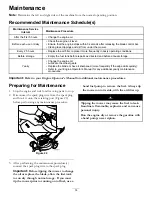
Page 14: ...our Engine Operator s Manual for any additional yearly maintenance procedures Important Refer to your Engine Operator s Manual for additional maintenance procedures Preparing for Maintenance 1 Stop the engine and wait for all moving parts to stop 2 Disconnect the spark plug wire from the spark plug and hook it onto the retaining post Figure 20 before performing any maintenance procedure Figure 20 ...

Page 15: ...ereafter Run the engine a few minutes before changing the oil to warm it Warm oil flows better and carries more contaminants 1 Refer to Preparing for Maintenance 2 Remove the dipstick Figure 23 Figure 23 3 Tip the mower onto its side with the air filter up to drain the used oil out through the oil fill tube Figure 24 Figure 24 4 Slowly pour oil into the oil fill tube until the oil level reaches th...

Page 16: ...ll or nicked have it sharpened or replace it The blade is sharp contacting the blade can result in serious personal injury Wear gloves when servicing the blade 1 Refer to Preparing for Maintenance 2 Tip the mower onto its side with the air filter up 3 Use a block of wood to hold the blade steady Figure 26 Figure 26 4 Remove the blade saving all mounting hardware Figure 26 5 Install the new blade a...

Page 17: ... position behind the handle when the engine is running Do not allow bystanders in the area For best results clean the mower soon after you have completed mowing 1 Lower the mower to its lowest cutting height setting Refer to Adjusting the Cutting Height 2 Move the mower onto a flat paved surface 3 Attach a garden hose that is connected to a water supply to the washout port on the mower housing Fig...

Page 18: ...t the wire onto the retaining post 7 Remove the spark plug add 1 oz 30 ml of oil through the spark plug hole and pull the starter rope slowly several times to distribute oil throughout the cylinder to prevent cylinder corrosion during the off season 8 Loosely install the spark plug 9 Tighten all nuts bolts and screws Folding the Handle Folding or unfolding the handle improperly can damage the cabl...

Page 19: ...Notes 19 ...
Page 20: ...ts to correct starting difficulties due to the following Failure to follow proper maintenance procedures Rotary mower blade striking an object Contaminants in the fuel system Improper fuel consult your Operator s Manual if in doubt Failure to drain the fuel system prior to any period of non use over one month Special operational conditions where starting may require more than two pulls First time ...

Reviews: