background image

8.

Install the dipstick securely.

9.

Recycle the used oil properly.

Replacing the Blade

Service Interval:

Yearly

Important:

You will need a torque wrench to install the

blade properly. If you do not have a torque wrench or
are uncomfortable performing this procedure, contact
an Authorized Service Dealer.

Examine the blade whenever you run out of gasoline. If the
blade is damaged or cracked, replace it immediately. If the
blade edge is dull or nicked, have it sharpened or replace it.

WARNING

The blade is sharp; contacting the blade can result
in serious personal injury.

Disconnect the wire from the spark plug.

Wear gloves when servicing the blade.

1.

Disconnect the spark-plug wire from the spark plug.
Refer to

Preparing for Maintenance (page 11)

.

2.

Tip the machine onto its side, with the air filter up.

3.

Use a block of wood to hold the blade steady.

4.

Remove the blade (turn the blade bolt
counterclockwise), saving all the mounting
hardware.

5.

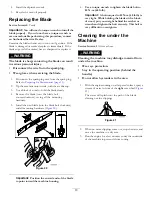
Install the new blade (turn the blade bolt clockwise)
and all mounting hardware (

Figure 20

).

Figure 20

Important:

Position the curved ends of the blade

to point toward the machine housing.

6.

Use a torque wrench to tighten the blade bolt to
82 N-m (60 ft-lb).

Important:

A bolt torqued to 82 N-m (60 ft-lb) is

very tight. While holding the blade with a block
of wood, put your weight behind the ratchet or
wrench and tighten the bolt securely. This bolt is
very difficult to overtighten.

Cleaning the under the
Machine

Service Interval:

After each use

WARNING

Cleaning the machine may dislodge material from
under the machine.

Wear eye protection.

Stay in the operating position (behind the
handle).

Do not allow bystanders in the area.

1.

With the engine running on a flat paved surface, spray a
stream of water in front of the

right

rear wheel (

Figure

21

).

The water will splash into the path of the blade,
cleaning out the clippings.

Figure 21

2.

When no more clippings come out, stop the water and
move the machine to a dry area.

3.

Run the engine for a few minutes to dry the underside
of the machine to prevent it from rusting.

13


Summary of Contents for 20319

Page 1: ...us injury or death if you do not follow the recommended precautions Figure 2 1 Safety alert symbol This manual uses 2 words to highlight information Important calls attention to special mechanical information and Note emphasizes general information worthy of special attention WARNING CALIFORNIA Proposition 65 Warning This product contains a chemical or chemicals known to the State of California to...

Page 2: ...derstand and follow all instructions on the machine and in the manual s before starting the engine Do not put hands or feet near or under the machine Keep clear of the discharge opening at all times Only allow responsible adults who are familiar with the instructions to operate this machine Clear the area of objects such as rocks wire toys etc which could be thrown by the blade Stay behind the han...

Page 3: ...c liner Always place containers on the ground away from your vehicle before filling Remove gas powered equipment from the truck or trailer and refuel it on the ground If this is not possible then refuel such equipment with a portable container rather than from a gasoline dispenser nozzle Keep the nozzle in contact with the rim of the fuel tank or container opening at all times until fueling is com...

Page 4: ...mberment hazard of hand or foot mower blade do not mow up and down slopes only mow across stop the mower and engine pick up debris before operating look behind and down when reversing Setup Important Remove and discard the protective plastic sheet that covers the engine 1 Unfolding the Handle No Parts Required Procedure WARNING Folding or unfolding the handle improperly can damage the cables causi...

Page 5: ...be Note Max fill 0 47 L 16 oz type 10W 30 or SAE 30 detergent oil with an API service classification of SJ or higher G020039 Figure 5 3 Wipe off the dipstick end with a clean cloth 4 Insert the dipstick into the oil fill tube 5 Remove the dipstick and read the oil level on the dipstick Figure 5 If the oil level is below the Add mark add a small amount of oil slowly to the oil fill tube wait 3 minu...

Page 6: ...igure 6 g027257 1 2 3 Figure 6 1 Handle 3 Grass bag 2 Frame Note Do not slip the bag over the handle Figure 6 2 Hook the bottom channel of the bag onto the bottom of the frame Figure 7 g027258 Figure 7 3 Hook the top and side channels of the bag onto the top and sides of the frame respectively Figure 7 6 ...

Page 7: ...d Wipe up spills Do not handle gasoline when smoking or around an open flame or sparks Store gasoline in an approved fuel container out of the reach of children For best results use only clean fresh less than 30 days old unleaded gasoline with an octane rating of 87 or higher R M 2 rating method Oxygenated fuel with up to 10 ethanol or 15 MTBE by volume is acceptable Ethanol Gasoline with up to 10...

Page 8: ...el is above the Full mark drain the excess oil until the oil level on the dipstick is at the Full mark To drain the excess oil refer to Changing the Engine Oil page 12 Important If the oil level in the crankcase is too low or too high and you run the engine you may damage the engine 6 Install the dipstick securely Adjusting the Cutting Height Adjust the cutting height as desired Set all 4 wheels t...

Page 9: ...e clippings Refer to Removing the Grass Bag page 9 Bagging the Clippings Use the grass bag when you want to collect grass and leaf clippings from the lawn WARNING A worn grass bag could allow small stones and other similar debris to be thrown toward you or bystanders resulting in serious personal injury or death Check the grass bag frequently If it is damaged install a new Toro replacement bag WAR...

Page 10: ...ry grass or leaves Wet grass and leaves tend to clump on the yard and can cause the machine to plug or the engine to stall WARNING Wet grass or leaves can cause serious injury if you slip and contact the blade Mow only in dry conditions Alternate the mowing direction This helps disperse the clippings over the lawn for even fertilization If the finished lawn appearance is unsatisfactory try 1 or mo...

Page 11: ...harpened more frequently if the edge dulls quickly Refer to your engine owner s manual for any additional yearly maintenance procedures Important Refer to your engine owner s manual for additional maintenance procedures Preparing for Maintenance 1 Stop the engine and wait for all moving parts to stop 2 Disconnect the spark plug wire from the spark plug Figure 16 before performing any maintenance p...

Page 12: ...dipstick down then remove the dipstick to drain the used oil out through the oil fill tube Figure 18 G020050 Figure 18 3 After draining the used oil return the machine to the normal operating position 4 Remove the dipstick and pour about 3 4 of the crankcase capacity of oil into the oil fill tube Note Max fill 0 47 L 16 oz type 10W 30 or SAE 30 detergent oil with an API service classification of S...

Page 13: ...ng hardware 5 Install the new blade turn the blade bolt clockwise and all mounting hardware Figure 20 Figure 20 Important Position the curved ends of the blade to point toward the machine housing 6 Use a torque wrench to tighten the blade bolt to 82 N m 60 ft lb Important A bolt torqued to 82 N m 60 ft lb is very tight While holding the blade with a block of wood put your weight behind the ratchet...

Page 14: ...ark plug and tighten it with a torque wrench to 20 N m 15 ft lb 8 Tighten all nuts bolts and screws Folding the Handle WARNING Folding or unfolding the handle improperly can damage the cables causing an unsafe operating condition Do not damage the cables when folding or unfolding the handle If a cable is damaged contact an Authorized Service Dealer 1 Loosen the handle knobs until you can move the ...

Page 15: ...Notes 15 ...

Page 16: ...arts such as filters fuel lubricants oil changes spark plugs air filters blade sharpening or worn blades cable linkage adjustments or brake and clutch adjustments Components failing due to normal wear Any product or part which has been altered or misused or neglected and requires replacement or repair due to accidents or lack of proper maintenance Pickup and delivery charges Repairs or attempted r...

Reviews: