Fuel System
Maintenance
Under certain conditions, diesel fuel and fuel
vapors are highly flammable and explosive. A
fire or explosion from fuel can burn you and
others and can cause property damage.
•
Use a funnel and fill the fuel tank outdoors,
in an open area, when the engine is off and
is cold. Wipe up any fuel that spills.
•
Do not fill the fuel tank completely full. Add
fuel to the fuel tank until the level is 1/4 to
1/2 in. (6 to 13 mm) below the bottom of
the filler neck. This empty space in the tank
allows the fuel to expand.
•
Never smoke when handling fuel, and stay
away from an open flame or where fuel
fumes may be ignited by a spark.
•
Store fuel in a clean, safety-approved
container and keep the cap in place.
Checking the Fuel Lines and
Connections
Service Interval:
Every 400 hours/Yearly (whichever
comes first)
Inspect the fuel lines and connections for deterioration,
damage, or loose connections. Tighten any loose
connections and contact your Authorized Service Dealer
for assistance in fixing damaged fuel lines.
Draining the Fuel Filter/Water
Separator
Service Interval:
Before each use or daily
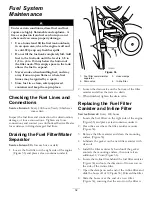
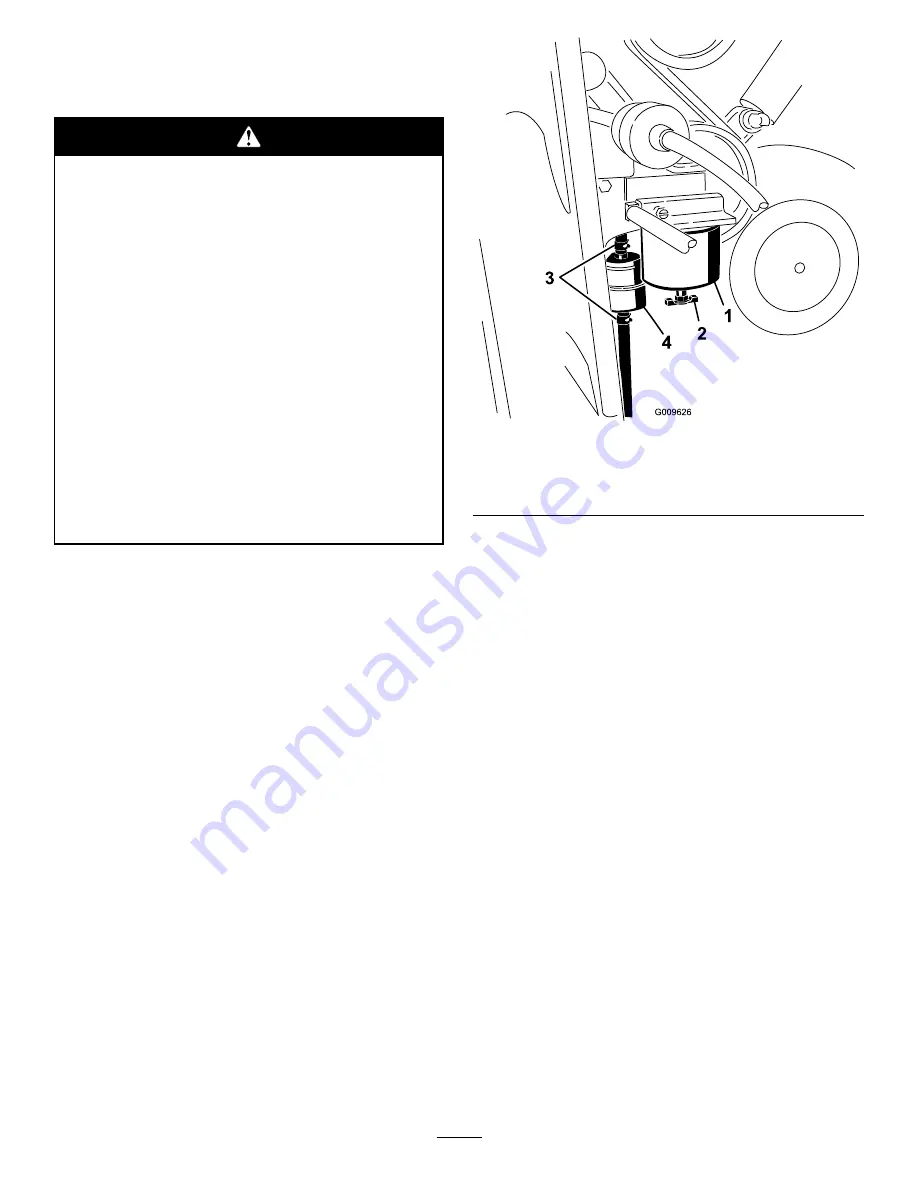
1. Locate the fuel filter on the right side of the engine
(Figure 36) and place a clean container under it.
Figure 36
1.
Fuel filter canister/water
separator
3.
Hose clamps
2.
Drain valve
4.
In-line filter
2. Loosen the drain valve on the bottom of the filter
canister and allow the water to drain.
3. When finished, tighten the drain valve.
Replacing the Fuel Filter
Canister and In-line Filter
Service Interval:
Every 400 hours
1. Locate the fuel filters on the right side of the engine
(Figure 36) and place a clean container under it.
2. Clean the area where the filter canister mounts
(Figure 36).
3. Remove the filter canister and clean the mounting
surface (Figure 36).
4. Lubricate the gasket on the new filter canister with
clean oil.
5. Install the filter canister by hand until the gasket
contacts the mounting surface, then rotate it an
additional 1/2 turn (Figure 36).
6. Locate the in-line filter behind the fuel filter canister
(Figure 36) and note the direction of flow arrow on
the side of the in-line filter.
7. Open the clamps on each end of the in-line filter and
slide the hoses off of it (Figure 36). Discard the filter.
8. Slide the hoses over the end of a new filter
(Figure 36), ensuring that the arrow on the filter is
32
Summary of Contents for 22319
Page 7: ...Slope Indicator 7...
Page 49: ...Schematics G007388 Electrical Schematic Rev B 49...
Page 50: ...Hydraulic Schematic Rev A 50...
Page 51: ...Notes 51...

