WARNING
Electrical system will not perform proper
safety shut off with Operator Presence Control
(OPC) levers held in place.
•
Make sure Operator Presence Control
(OPC) levers are working when adjustment
is completed.
•
Never operate this unit with Operator
Presence Control (OPC) levers held in
place.
8.
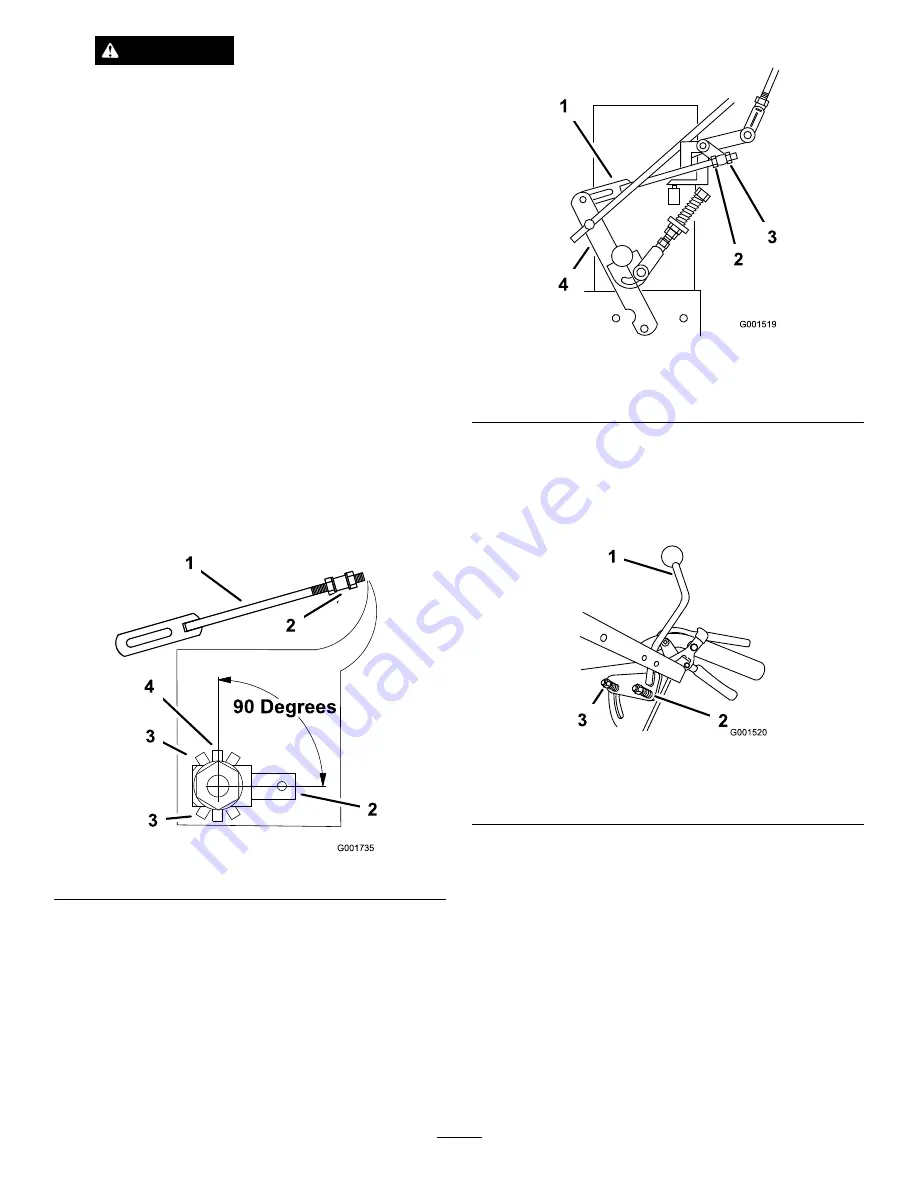
Loosen the front adjusting nut on left hydro control
linkage as shown in Figure 39.
9.
Turn the left rear adjusting nut counter-clockwise until
wheel rotates forward (Figure 39).
10.
Turn the rear adjusting nut clockwise 1/4 of a turn at
a time. Then move the speed control lever forward
and back to neutral. Repeat this until left wheel stops
rotating forward (Figure 39).
11.
Turn the rear nut an additional 1/2 turn and tighten the
front adjusting nut.
Note:
Make sure flat part of linkage is perpendicular
to pin part of swivel.
Figure 38
12.
After adjusting the left hydro control linkage, move
the speed control lever forward and then back to the
neutral position.
13.
Hold the OPC levers down.
Note:
The OPC levers must be held down whenever
the speed control lever is out of the neutral position or
the engine will kill.
14.
Make sure the speed control lever is in the neutral
position and the tire does not rotate.
15.
Repeat the adjustment if needed.
Figure 39
1.
Hydro control linkage
3.
Rear adjusting nut
2.
Front adjustingnut
4.
Control arm
Note:
If inconsistent neutral occurs, check to be
sure both springs are properly tightened on the speed
control lever under the console, especially the rear
pivot spring. Repeat above adjustments if necessary
(Figure 40).
Figure 40
1.
Speed control lever
3.
spring
2.
Rear pivot spring
Adjusting the Right Side Linkage
1.
Place the speed control lever in the neutral position.
2.
Place the right drive lever in the full forward position.
3.
Adjust the right side linkage by turning the quick track
knob counterclockwise until the tire begins to rotate
forward (Figure 41).
4.
Turn the knob clockwise 1/4 of a turn at a time. Then
move the speed control forward and back to neutral.
Repeat this until right wheel stops rotating forward
(Figure 41).
5.
Hold the OPC levers down.
32
Summary of Contents for 30934
Page 49: ...Schematics Electrical Schematic Rev Hydraulic Schematic Rev 49 ...
Page 50: ...Notes 50 ...
Page 51: ...Notes 51 ...


