5. Loosen both set screws (22) on bearing (5). Slide
flangettes (6 and 7) and bearing (5) off the motor shaft.
6. Remove grease fitting (25) from the hydraulic motor
and hub assembly (2). Remove four lug nuts (23) and
wheel (24) from the hub drive studs.
Rear Wheel (3WD) Installation (Fig. 26)
1. Make sure grease fitting (25) is removed from the
hydraulic motor and hub assembly (2).
2. Secure wheel (24) to the four drive studs of the hy-
draulic motor and hub assembly (2) with four lug nuts
(23). Torque nuts from 45 to 55 ft–lb, (6.2 to 7.6 kg–m).
3. Reinstall grease fitting into hydraulic motor and hub
assembly (2) so it points away from the wheel (24).
4. Install flangette (7), bearing (5), and relube flangette
(6) onto the motor shaft.
5. Position hydraulic motor and hub assembly (2), flan-
gettes (6 and 7) with bearing (5), and wheel (24) into the
castor fork (1). Make sure hose fittings on the motor face
the rear.
6. Secure hydraulic motor and hub assembly (2)
loosely to the left inside of the castor fork (1) with both
socket head screws (11) lock nuts (12).
7. Secure flangettes (6 and 7) with bearing (5) loosely
to the right inside of the castor fork (1).
A. Position grease fitting (21) facing downward.
B. Torque socket head screws (11) to 85 ft–lb (11.8
kg–m).
C. Install capscrews (9) and lock nuts (10) to flan-
gettes. Torque cap screws (9) to 30 ft–lb (4.2 kg–m).
8. Apply loctite to both set screws (22). torque both
screws from 80 to 100 in–lb (92 to 115 kg–cm).
1 2
3
4
8
7
6
4
1
2
3
5
7
9
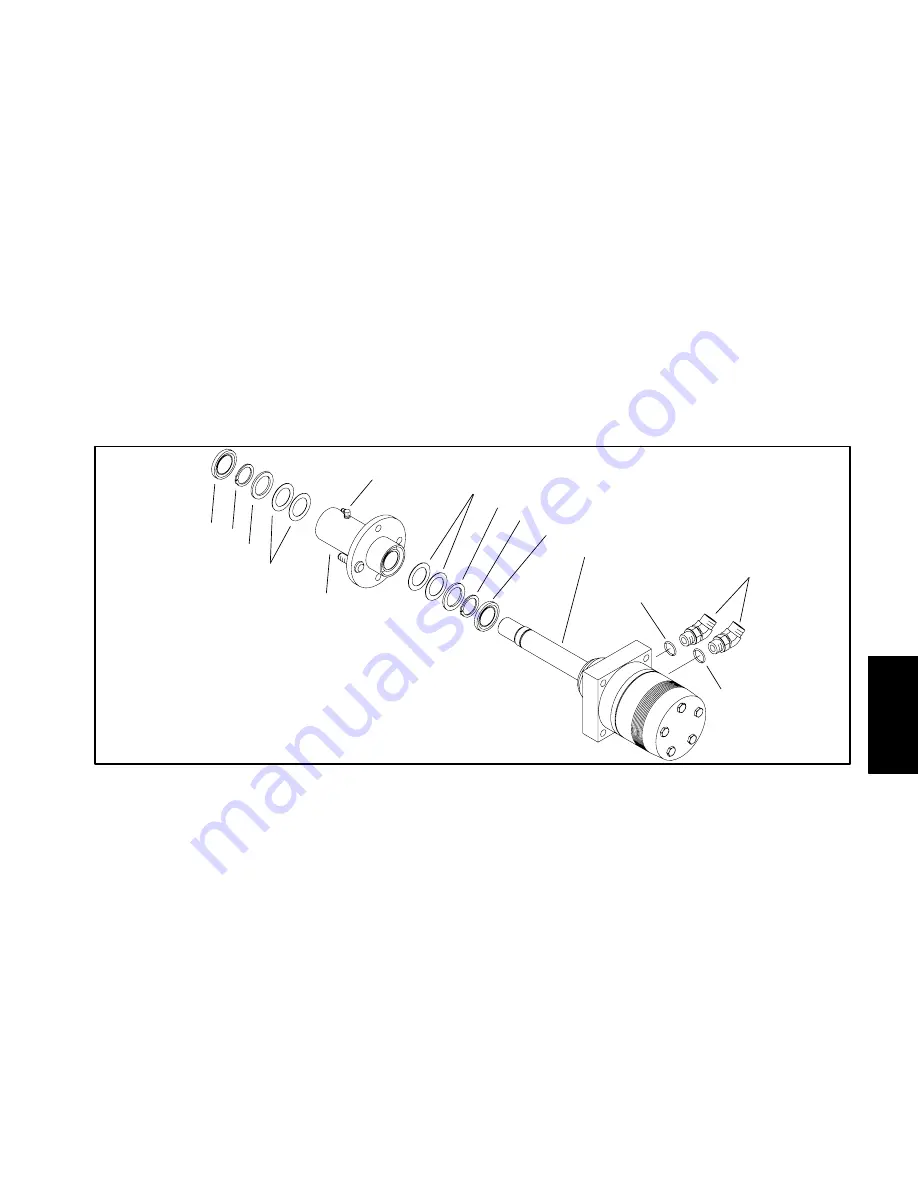
Hydraulic
System
Figure 27
1. Grease
seal
4. Thrust
washer
7. O–ring
2. Retaining
ring
5. Hub
assembly
8. Hydraulic
motor
3. Washer
6. Hydraulic
fitting
9. Grease
fitting
Motor and Hub Assembly Disassembly (Fig. 27)
Motor and Hub Assembly Reassembly (Fig. 27)
1. Remove hydraulic fittings and O–rings from the hy-
1. Grease inner edge of new grease seal with No. 2
draulic motor. Plug motor ports to prevent contamina-
multipurpose lithium base grease. Slide seal onto motor
tion.
shaft past groove closest to the motor. Install retaining
ring into groove.
2. Remove grease seal and retaining ring from the end
of the motor shaft.
2. Slide flat washer and two thrust washers onto the
motor shaft. Slide hub on the shaft with short side first.
3. Slide hub assembly off the motor shaft with washers
and thrust washers. Remove remaining retaining ring
3. Slide remaining thrust washers and flat washer onto
and grease seal from the shaft.
the motor shaft. Install remaining retaining ring into the
shaft groove.
4. Slide new grease seal onto shaft. Press grease
seals into the hub so they are flush with both ends.
Greensmaster 3200/3200–D
Page 5 – 53
Hydraulic System
Summary of Contents for 3200
Page 2: ...Greensmaster 3200 3200 D ...
Page 4: ...Greensmaster 3200 3200 D ...
Page 6: ...Greensmaster 3200 3200 D ...
Page 12: ...Safety Page 1 6 Greensmaster 3200 3200 D ...
Page 14: ...Equivalents and Conversions Product Records and Maintenance Page 2 2 Greensmaster 3200 3200 D ...
Page 17: ...Product Records and Maintenance Page 2 6 Greensmaster 3200 3200 D ...
Page 72: ...Perkins Diesel Engine Page 4 30 Greensmaster 3200 D ...
Page 113: ...Hydraulic System Greensmaster 3200 3200 D Page 5 41 Hydraulic System ...
Page 161: ...Hydraulic System Greensmaster 3200 3200 D Page 5 89 Hydraulic System ...
Page 173: ...Hydraulic System Greensmaster 3200 3200 D Page 5 101 Hydraulic System ...
Page 234: ...Wheels and Brakes Page 7 12 Greensmaster 3200 3200 D ...
Page 261: ...Cutting Units Greensmaster 3200 3200 D Page 8 27 Cutting Units ...
Page 273: ......
Page 274: ...Commercial Products FORM 96 900 SL E The Toro Company 1997 Printed in U S A ...


