background image

Gas

Powered

Snow

Products

The Toro Total Coverage Guarantee

A Two-Year Full Warranty (Limited Warranty for Commercial Use)

Conditions and Products Covered

The Toro Company and its afliate, Toro Warranty Company,

pursuant to an agreement between them, jointly promise to

repair any Toro Product used for normal residential purposes* if

defective in materials or workmanship.
The following time periods apply from the date of purchase:

Snow Products

Warranty Period

All products and attachments

2-year full warranty

Power Max™ snow products:

Chute

5-year full warranty

Chute deector

5-year full warranty

Impeller housing cover

5-year full warranty

This warranty includes the cost of parts and labor, but you must

pay transportation costs. Transportation within a fteen mile

radius of the servicing dealer is covered under this warranty for

two-stage snowthrowers only.
This warranty applies to all gasoline powered snow products.
* Normal residential purposes means use of the product on

the same lot as your home. Use at more than one location is

considered commercial use, and the commercial use warranty

would apply.

Limited Warranty for Commercial Use

Toro Consumer Products used for commercial, institutional,

or rental use are warranted against defects in materials or

workmanship for 45 days from the date of purchase.

Instructions for Obtaining Warranty Service

If you think that your Toro Product contains a defect in materials

or workmanship, follow this procedure:
1. Contact any Toro Authorized or Master Service Dealer

to arrange service at their dealership. To locate a dealer

convenient to you, refer to the Yellow Pages of your

telephone directory (look under "Lawn Mowers") or access

our website at www.Toro.com. U.S. Customers may also call

800-248-8676 to use our 24-hour Toro dealer locator system.

2. Bring the product and your proof of purchase (sales receipt)

to the Service Dealer.

If for any reason you are dissatised with the Service Dealer’s

analysis or with the assistance provided, contact us at:

Customer Care Department, Consumer Division

Toro Warranty Company

8111 Lyndale Avenue South

Bloomington, MN 55420-1196

866-336-5205 Toll free (U.S. customers)

866-854-9033 Toll free (Canada customers)

Owner Responsibilities

You must maintain your Toro Product by following the

maintenance procedures described in the operator’s manual.

Such routine maintenance, whether performed by a dealer or by

you, is at your expense.

Items and Conditions Not Covered

There is no other express warranty except for special emission

system coverage on some products and the Toro Starting

Guarantee on GTS engines. This express warranty does not cover:

Cost of regular maintenance service or parts, such as lters,

fuel, lubricants, tune-up parts, brake and clutch adjustments

Any product or part which has been altered, misused,

or required replacement or repair due to normal wear,

accidents, or lack of proper maintenance

Repairs necessary due to improper fuel, contaminants in the

fuel system, or failure to properly prepare the fuel system

prior to any period of non-use over three months

All repairs covered by this warranty must be performed by an

Authorized Toro Service Dealer using Toro approved replacement

parts.

General Conditions

Repair by an Authorized Toro Service Dealer is your sole remedy

under this warranty.
Neither The Toro Company nor Toro Warranty Company is liable

for indirect, incidental or consequential damages in connection

with the use of the Toro Products covered by this warranty,

including any cost or expense of providing substitute equipment

or service during reasonable periods of malfunction or non-use

pending completion of repairs under this warranty.
Some states do not allow exclusions of incidental or consequential

damages, or limitations on how long an implied warranty lasts,

so the above exclusions and limitations may not apply to you.
This warranty gives you specic legal rights, and you may also

have other rights which vary from state to state.

Countries Other than the United States or Canada

Customers who have purchased Toro products exported from the United States or Canada should contact their Toro Distributor

(Dealer) to obtain guarantee policies for your country, province, or state. If for any reason you are dissatised with your Distributor’s

service or have difculty obtaining guarantee information, contact the Toro importer. If all other remedies fail, you may contact us

at Toro Warranty Company.

374-0011 Rev B

Summary of Contents for 38605

Page 1: ...ure 1 identifies the location of the model and serial numbers on the product Write the numbers in the space provided Figure 1 1 Model and serial number location Model No Serial No This manual identifies potential hazards and has safety messages identified by the safety alert symbol Figure 2 which signals a hazard that may cause serious injury or death if you do not follow the recommended precautio...

Page 2: ...rve the following safety instructions could result in serious injury Training Read understand and follow all instructions on the machine and in the manual s before operating this unit Be thoroughly familiar with the controls and the proper use of the equipment Know how to stop the unit and disengage the controls quickly Never allow children to operate the equipment Never allow adults to operate th...

Page 3: ...is generally a warning of trouble Stop the engine whenever you leave the operating position before unclogging the auger impeller housing or discharge chute and when making any repairs adjustments or inspections When cleaning repairing or inspecting the snow thrower stop the engine and make certain the auger impeller and all moving parts have stopped Disconnect the spark plug wire and keep the wire...

Page 4: ...p the engine remove the ignition key and wait for all moving parts to stop To unclog the discharge chute stay in the operating position and release the left hand traction lever While running the auger impeller push down on the handles to raise the front of the snow thrower a few inches centimeters off the pavement Then lift the handles quickly to bump the front of the snow thrower on the pavement ...

Page 5: ...ects keep bystanders a safe distance from the snowthrower 2 Engage 4 Auger drive 6 Do not place your hand in the chute stop the engine before leaving the operator s position use the tool to clear the chute 8 Keep away from moving parts remove the ignition key and read the instructions before servicing or performing maintenance 112 6634 1 Do not place your hand in the chute stop the engine before l...

Page 6: ...Reverse drive speed setting 1 Warning hot surface do not touch Tecumseh Part No 36501 1 Primer 1 2 3 4 5 6 5 7 Tecumseh Part No 35077 1 Key ignition 5 Increasing scale 2 Engage to start the engine 6 Slow 3 Disengage to stop the engine 7 Stop the engine 4 Fast 6 ...

Page 7: ...mbly rod and bracket worm gear and bracket 1 Carriage bolt 1 Belleville washer 1 Hex head bolt 1 5 Locknut 2 Install the chute control rod 6 No parts required Fill the engine with oil 7 No parts required Check the tire pressure 8 No parts required Check the skids and scraper 1 Installing the Handle 1 Handle 4 Bolts 4 Belleville washers 1 Flange nut Procedure 1 Remove the tie straps that secure the...

Page 8: ...e of the handle 6 Align the holes in the right side of the handle with the holes in the right side plate and secure the handle with 2 cap screws and Belleville washers until they are finger tight 7 Ensure that the handles are at the same height then tighten the handle fasteners securely 8 Slide the wheels outward and insert each axle pin through the hole in each wheel hub and through the outer hol...

Page 9: ...move into third gear adjust the speed selector before continuing Refer to Adjusting the Speed Selector in Maintenance 5 Slowly pull the snowthrower backward while slowly pressing the traction control lever toward the handgrip Note The adjustment is correct when the wheels stop rolling backward and the distance between the top of the handgrip and the bottom of the traction control lever is 1 to 2 i...

Page 10: ...e you remove the slack from the auger impeller drive belt 5 To adjust the distance A Remove the clevis pin B Loosen the jam nut C Thread the clevis up or down to increase or decrease the distance between the top of the handgrip and the bottom of the auger impeller drive control lever Figure 8 6 When the adjustment is correct install the clevis pin and secure it in place with the cotter pin Figure ...

Page 11: ...ound the dipstick Figure 12 Figure 12 1 Fuel tank cap 3 Filler hole 2 Dipstick 3 Remove the dipstick by rotating the cap counterclockwise and pulling it out 4 Slowly pour about 3 4 of the crankcase capacity of oil into the crankcase 5 Wipe the dipstick clean with a clean cloth 6 Install the dipstick into the filler neck then remove it Note To ensure an accurate oil level reading you must fully ins...

Page 12: ...ft counterclockwise to move the chute to the right Chute Deflector Handle Move the deflector handle forward to move the snow stream down move it rearward to move the snow stream up Fuel shutoff Valve Close the valve by rotating clockwise Open the valve by rotating it counterclockwise Close the valve when you do not use the snowthrower Ignition Switch Insert the ignition key before starting the eng...

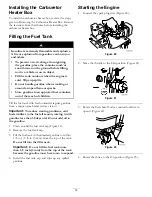
Page 13: ...is above 40 F 4 C remove the carburetor heater box Figure 18 Figure 18 1 Spark plug wire 3 Carburetor heater box 2 Self tapping screw 4 Screws 1 Disconnect the wire from the spark plug and ensure that the wire does not contact the plug Figure 18 2 Remove the key from the ignition Figure 14 3 Pull the choke knob off Figure 14 4 Remove the fasteners that secure the carburetor heater box in place Fig...

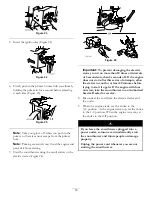
Page 14: ...ll the fuel tank with fresh unleaded regular gasoline from a major name brand service station Important To reduce starting problems add fuel stabilizer to the fuel all season mixing it with gasoline less than 30 days old Do not add oil to the gasoline 1 Clean around the fuel tank cap Figure 12 2 Remove the fuel tank cap 3 Fill the fuel tank with unleaded gasoline to within 1 4 to 1 2 6 to 13 mm fr...

Page 15: ...s at intervals of 5 seconds on then 5 seconds off If the engine does not start after this series of attempts allow the starter to cool for at least 40 minutes before trying to start it again If the engine still does not start take the snowthrower to an Authorized Service Dealer for service 8 Disconnect the cord from the electric starter and the outlet 9 When the engine starts set the choke to the ...

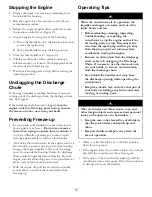
Page 16: ...e chute control to prevent it from freezing Stop the engine wait for all moving parts to stop and remove all ice and snow from the snowthrower With the engine off pull the recoil starter handle several times to prevent the recoil starter from freezing up Operating Tips When the snowthrower is in operation the impeller and auger can rotate and cut off or injure hands and feet Before adjusting clean...

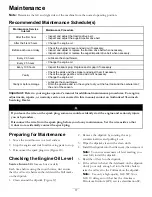
Page 17: ... service not covered in this manual contact an Authorized Tecumseh Servicing Dealer If you leave the wire on the spark plug someone could accidently start the engine and seriously injure you or bystanders Disconnect the wire from the spark plug before you do any maintenance Set the wire aside so that it does not accidentally contact the spark plug Preparing for Maintenance 1 Move the snowthrower t...

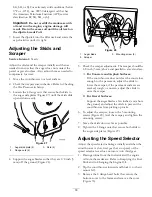
Page 18: ... blade 3 Mounting screw 5 2 Scraper 5 Check the scraper adjustment The scraper should be 1 8 inch 3 mm above and parallel to a level surface A For Concrete and Asphalt Surfaces If the snowthrower does not clear the snow close enough to the pavement adjust the skids to lower the scraper if the pavement surfaces are cracked rough or uneven adjust the skids to raise the scraper B For Gravel Surfaces ...

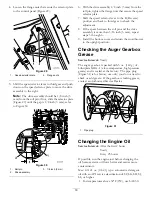
Page 19: ...pace between the roll pin and the drive assembly is more than 3 16 inch 5 mm repeat steps 3 through 6 9 Install the bottom cover and return the snowthrower to the upright position Checking the Auger Gearbox Grease Service Interval Yearly The auger gearbox is packed with 5 oz 140 g of Lubriplate MAG 1 a low temperature high pressure grease and is sealed at the factory The pipe plug Figure 31 is for...

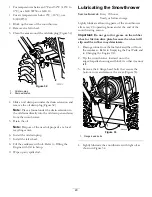
Page 20: ... with oil Refer to Filling the Engine with Oil in Setup 9 Wipe up any spilled oil Lubricating the Snowthrower Service Interval Every 20 hours Yearly or before storage Lightly lubricate all moving parts of the snowthrower after every 20 operating hours and at the end of the snowthrowing season Important Do not get oil or grease on the rubber wheel or friction drive plate because the wheel will slip...

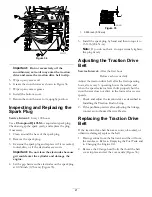
Page 21: ...6 mm Figure 35 Figure 35 1 0 030 inch 0 76 mm 5 Install the spark plug by hand and then torque it to 15 ft lb 20 4 N m Note If you do not have a torque wrench tighten the plug firmly Adjusting the Traction Drive Belt Service Interval After the first hour Before each use or daily Adjust the traction drive belt after the first operating hour after every 5 operating hours thereafter and when the spee...

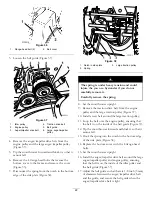
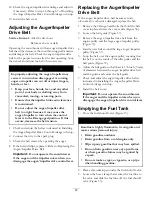
Page 22: ...remove it Carefully remove the spring 8 Set the snowthrower upright 9 Remove the traction drive belt from the engine pulley and the large traction pulley Figure 37 10 Install a new belt around the large traction pulley 11 Loop the belt over the engine pulley ensuring that the belt is on the inside of the belt guide Figure 37 12 Tip the snowthrower forward and block it so that it cannot fall 13 Hoo...

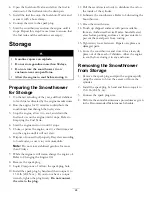
Page 23: ...sengage the auger impeller drive control lever Replacing the Auger Impeller Drive Belt If the auger impeller drive belt becomes worn oil soaked or otherwise damaged replace the belt 1 Remove the 2 flange head bolts that hold the belt cover in place and set the cover aside Figure 36 2 Loosen the belt guide Figure 37 3 Remove the auger impeller drive belt from the engine pulley and the large auger i...

Page 24: ...ur automobile Note Do not store stabilized gasoline for more than 90 days 7 While the engine is still warm change the engine oil Refer to Changing the Engine Oil 8 Remove the spark plug 9 Squirt 2 teaspoons of oil into the spark plug hole 10 Install the spark plug by hand and then torque it to 15 ft lb 20 4 N m If you do not have a torque wrench tighten the plug firmly Do not connect the wire to t...

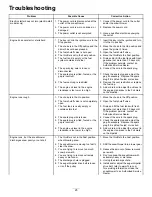
Page 25: ...ow or too high 9 Add or drain oil to adjust the oil level in the engine crankcase to the Full mark on the dipstick 1 The choke is in the On position 1 Move the choke to the Off position 2 The fuel shutoff valve is not completely open 2 Open the fuel shutoff valve 3 The fuel tank is nearly empty or contains stale fuel 3 Drain and fill the fuel tank with fresh gasoline not more than 30 days old If t...

Page 26: ...ed Service Dealer Discharge chute either does not lock into place or does not move 1 The discharge chute latch is not properly adjusted 1 Adjust the discharge chute latch 1 The skids and or scraper are not properly adjusted 1 Adjust the skids and or the scraper Snowthrower does not properly clear the snow off the surface 2 The pressure in the tires is not equal 2 Check and adjust the pressure in o...

Page 27: ...Notes 27 ...

Page 28: ... 866 336 5205 Toll free U S customers 866 854 9033 Toll free Canada customers Owner Responsibilities You must maintain your Toro Product by following the maintenance procedures described in the operator s manual Such routine maintenance whether performed by a dealer or by you is at your expense Items and Conditions Not Covered There is no other express warranty except for special emission system c...

Reviews: