background image

16

3329-770 Rev A

Changing the Engine Oil

Change the engine oil after the first 2 operating hours,
then annually thereafter. If possible, run the engine
just before changing the oil because warm oil flows
better and carries more contaminants.

Max. fill: 26 oz. (0.77 l), type: automotive detergent oil
with an API service classification of SF, SG, SH, SJ,
SL, or higher.

For temperatures above 32

°

F (0

°

C), use

SAE 30W.

For temperatures between 0

°

F and 32

°

F (–18

°

C

to 0

°

C), use SAE 5W30 or SAE 10W.

For air temperatures below 0

°

F (–18

°

C), use

SAE 0W30.

1.

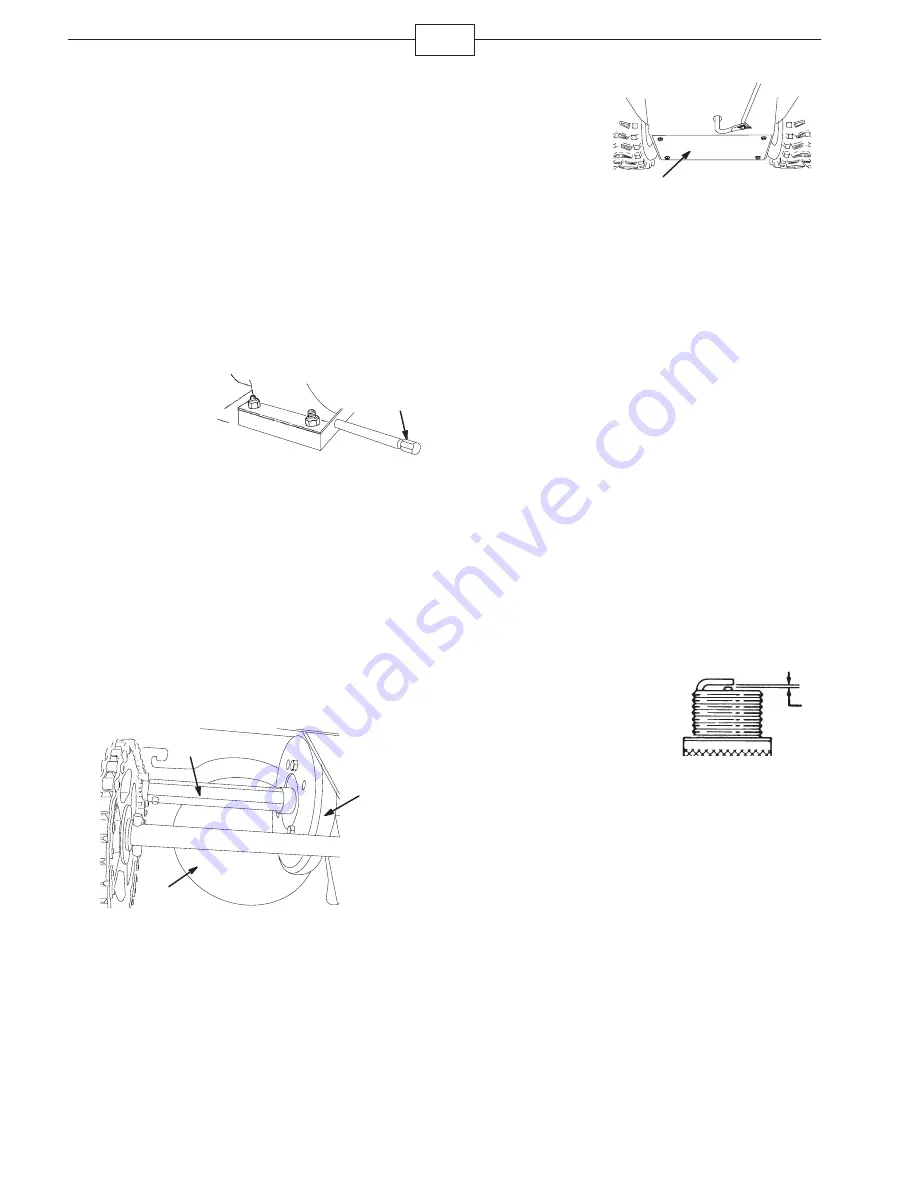
Clean the area

around the oil drain
cap (A).

m-4036

A

2.

Slide an oil drain pan under the drain extension

and remove the oil drain cap.

3.

Drain the oil.

Note: Dispose of the used oil properly at a local
recycling center.

4.

Install the oil drain cap.

5.

Fill the crankcase with oil. Refer to Filling the

Engine Crankcase with Oil on page 8.

Lubricating the Hex Shaft

Lightly lubricate the hex shaft (A) annually.

m-6967

A

C

B

Important: Do not get oil on the rubber wheel (B) or
the aluminum friction drive plate (C) because the
traction drive will slip.

1.

Drain the gasoline from the fuel tank.

2.

Tip the snowthrower forward onto its auger

housing and block it so that it cannot fall.

3.

Remove the

back cover.

m–6971

4.

Move the speed selector lever to Position R2.

5.

Dip your finger in automotive oil and lightly

lubricate hex shaft (A).

6.

Move the speed selector lever to Position 6.

7.

Lubricate the other end of the hex shaft.

8.

Move the speed selector lever forward and

rearward a few times.

9.

Install the back cover and return the snowthrower

to the operating position.

Inspecting and Replacing
the Spark Plug

Use a Champion RJ-19LM or equivalent spark plug.
Check and gap the spark annually, and replace the
plug if necessary.

1.

Clean around the base of the spark plug.

2.

Remove the spark plug.

3.

Examine the spark plug and replace it if it is

cracked, fouled, dirty, or if the electrodes are worn.

Important: Do not clean the electrodes because grit
could enter the cylinder and damage the engine.

4.

Set the gap between

the electrodes on the
spark plug at 0.030 in.
(0.76 mm).

110

5.

Install the spark plug by hand and then torque it

to 15 ft-lb (20.4 N

m).

Note: If you do not have a torque wrench, tighten the
plug firmly.

Replacing the Drive Belts

If the auger/impeller drive belt or the traction drive
belt becomes worn, oil-soaked, or otherwise
damaged, go to www.Toro.com for additional service
information or have an Authorized Service Dealer
replace the belt.

Summary of Contents for 38620

Page 1: ...injury if you do not follow the recommended precautions This manual uses 2 other words to highlight information Important calls attention to special mechanical information and Note emphasizes general information worthy of special attention Warning California Proposition 65 Warning The engine exhaust from this product contains chemicals known to the State of California to cause cancer birth defects...

Page 2: ...ar or under rotating parts Keep clear of the discharge opening at all times Exercise extreme caution when crossing gravel drives walks or roads Stay alert for hidden hazards or traffic After striking a foreign object stop the engine remove the wire from the spark plug thoroughly inspect the snowthrower for any damage and repair the damage before operating the snowthrower If the unit should start t...

Page 3: ...stop the engine remove the key and wait for all moving parts to stop Disconnect the wire from the spark plug and keep it away from the spark plug to prevent someone from accidentally starting the engine To unclog the discharge chute stay in the operating position and release the left hand traction lever While running the auger impeller push down on the handles to raise the front of the snowthrower...

Page 4: ...rator s Position 472 Caution Improper use may result in loss of fingers hands or feet impeller close to the of the opening The low speed auger has a moving pinch point close to the opening There is a high speed m 6936 Safety Instruction Decals Important Safety and instruction decals are located near areas of potential danger Replace damaged decals 53 7670 1 Cutting dismembermentof foot auger ...

Page 5: ...ast 2 Forward speeds 3 Slow 4 Reverse speeds Tecumseh Part No 36501 1 Primer Tecumseh Part No 35077 1 Key ignition 2 Engage to start the engine 3 Disengage to stop the engine 4 Fast 5 Increasing scale 6 Slow 7 Stop the engine Tecumseh Part No 37119 ...

Page 6: ...tion switch 2 Choke 3 Throttle 4 Primer 5 Electric starter 6 Recoil starter Setup Installing the Upper Handle Assembly 1 Lift and rotate the upper handle assembly and position it over the lower handle Note Ensure that the 2 cables attached to the Quick Stick are routed inside the upper handle legs and that the 2 lever cables and the wire for the headlight are not pinched between the handle section...

Page 7: ...f the trunnion does not fit into the hole when you lift up on the speed control rod rotate the trunnion upward or downward on the speed control rod until it fits into the hole 7 Secure the trunnion and upper end of the speed control rod with the outer washer and a hairpin cotter you previously removed Note To make the installation easier you can look down through the opening in the speed selector ...

Page 8: ...r contains 25 oz of oil Max fill 26 oz 0 77 l type automotive detergent oil with an API service classification of SF SG SH SJ SL or higher For temperatures above 32 F 0 C use SAE 30W For temperatures between 0 F and 32 F 18 C to 0 C use SAE 5W30 or SAE 10W For air temperatures below 0 F 18 C use SAE 0W30 1 Remove the dipstick 2 Slowly pour oil into the oil fill tube to raise the oil level to the F...

Page 9: ... gasoline in an approved fuel container out of the reach of children Fill the fuel tank with fresh unleaded regular gasoline from a major name brand service station Important To reduce starting problems add fuel stabilizer to the fuel all season mixing it with gasoline less than 30 days old Do not add oil to the gasoline m 6106 Operation Note Determine the left and right sides of the machine from ...

Page 10: ...ic start only 9 When the engine starts set the choke to the 3 4 position As the engine warms up set the choke to the 1 2 position When the engine is warm set the choke to the Off position Caution If you leave the snowthrower plugged into a power outlet someone can inadvertently start the snowthrower and injure people or damage property Unplug the power cord whenever you are not starting the snowth...

Page 11: ...r drive squeeze the right hand auger impeller lever to the handgrip 2 To stop the auger and impeller release the right hand lever Important When you engage both the auger impeller lever and the traction lever the traction lever locks the auger impeller lever down freeing your right hand To release both levers simply release the left hand traction lever 3 If the auger and impeller continue to rotat...

Page 12: ...t the snowthrower into a lower gear If the front continues to ride up lift up on the handles Unclogging the Discharge Chute If the auger impeller is running but there is no snow coming out of the discharge chute the discharge chute may be clogged To unclog the discharge chute stay in the operating position and release the left hand traction lever While running the auger impeller push down on the h...

Page 13: ...y Refer to Checking and Adjusting the Auger Impeller Cable on page 15 Inspect the spark plug Replace and or gap it if necessary Refer to Inspecting and Replacing the Spark Plug on page 16 Check the auger gearbox oil and add oil if necessary Refer to Checking the Auger Gearbox Oil Level on page 15 Check the tire pressure and inflate them to the proper pressure Refer to Checking the Tire Pressure on...

Page 14: ...se the scraper For gravel surfaces adjust the skids further down to prevent the snowthrower from picking up rocks 5 Move the skids down until they are even with the ground 6 Firmly tighten the nuts that secure both skids to the auger sides Note To quickly adjust the skids if they loosen support the scraper 1 8 inch 3 mm off the pavement then adjust the skids down to the pavement Note If the skids ...

Page 15: ...on the cable m 6903 A B 7 Adjust the turnbuckle until you obtain the proper gap 8 Tighten the jam nut 9 Insert the 2 screws you previously removed on the belt cover 10 If the auger impeller cable is properly adjusted but a problem remains contact an Authorized Service Dealer Checking the Auger Gearbox Oil Level Check the auger gearbox oil annually and add oil if necessary 1 Move the snowthrower to...

Page 16: ...forward onto its auger housing and block it so that it cannot fall 3 Remove the back cover m 6971 4 Move the speed selector lever to Position R2 5 Dip your finger in automotive oil and lightly lubricate hex shaft A 6 Move the speed selector lever to Position 6 7 Lubricate the other end of the hex shaft 8 Move the speed selector lever forward and rearward a few times 9 Install the back cover and re...

Page 17: ... engine to run until it stops When you can no longer start the engine it is sufficiently dry 9 Stop the engine and allow it to cool 10 Remove the ignition key 11 Disconnect the spark plug wire 12 Remove the spark plug add 1 oz 30 ml of oil through the spark plug hole and pull the starter rope slowly several times to distribute oil throughout the cylinder to prevent cylinder corrosion during the of...

Page 18: ...e to the On position and press the primer 3 times 3 The fuel shutoff valve is not open 3 Open the fuel shutoff valve 4 The throttle is not in the Fast position 4 Move the throttle to the Fast position 5 The fuel tank is empty or the fuel system contains stale fuel 5 Drain and or fill the fuel tank with fresh gasoline not more than 30 days old If the problem persists contact your Authorized Service...

Page 19: ...ove the throttle to the Fast position 2 The snowthrower is moving too fast to clear the snow 2 Shift the snowthrower into a lower gear 3 You are trying to remove too much snow per swath 3 Reduce the amount of snow removed for per swath 4 You are trying to remove extremely heavy or wet snow 4 Don t overload the snowthrower with extremely heavy or wet snow 5 The discharge chute is plugged 5 Refer to...

Page 20: ...6 336 5205 Toll free U S customers 866 854 9033 Toll free Canada customers Owner Responsibilities You must maintain your Toro Product by following the maintenance procedures described in the operator s manual Such routine maintenance whether performed by a dealer or by you is at your expense Items and Conditions Not Covered There is no other express warranty except for special emission system cove...

Reviews: