Checking the
Auger-Gearbox-Oil Level
Service Interval:
Yearly—Check the auger-gearbox
oil and add oil if necessary.
1.
Move the machine to a level surface.
2.
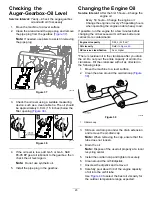
Clean the area around the pipe plug and remove
the pipe plug from the gearbox (
Note:
If needed, use pliers to assist in removing
the pipe plug.
g257725
Figure 37
3.
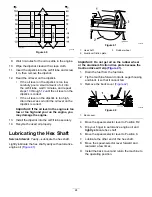
Check the oil level using a suitable measuring
device, such as a clean cable tie. The oil should
be approximately 3.8 cm (1.5 inches) below the
filler opening (
g257737
Figure 38
4.
If the oil level is low, add GL-5 or GL-6, SAE
85-95 EP gear oil lubricant to the gearbox, then
check the oil level again.
Note:
Do not use synthetic oil.
5.
Install the pipe plug in the gearbox.
Changing the Engine Oil
Service Interval:
After the first 5 hours—Change the
engine oil.
Every 50 hours—Change the engine oil.
Change the engine oil every 25 operating hours
when operating the engine under a heavy load.
If possible, run the engine for a few minutes before
changing the oil because warm oil flows better and
carries more contaminants.
Engine oil capacity
0.95 L (32 fl oz)*
Oil viscosity
Refer to
.
API service classification
SJ or higher
*There is residual oil in the crankcase after you drain
the oil. Do not pour the entire capacity of oil into the
crankcase. Fill the crankcase with oil as directed in
the following steps.
1.
Move the machine to a level surface.
2.
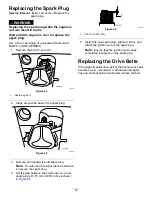
Clean the area around the oil-drain cap (
g016496
Figure 39
1.
Oil-drain cap
3.
Slide an oil-drain pan under the drain extension
and remove the oil-drain cap.
Note:
When removing the cap, ensure that the
tube does not loosen.
4.
Drain the oil.
Note:
Dispose of the used oil properly at a local
recycling center.
5.
Install the oil-drain cap and tighten it securely.
6.
Clean around the oil fill/dipstick.
7.
Unscrew the dipstick and remove it.
8.
Carefully pour about 3/4 of the engine capacity
of oil into the oil-fill tube.
Use
to select the best oil viscosity for
the outdoor temperature range expected:
23
Summary of Contents for 38841
Page 14: ...g322740 Figure 18 Recoil Start g257505 Figure 19 14 ...
Page 30: ...Notes ...
Page 32: ......


