Inspecting the Nylon Pivot
Bushings
Service Interval:
Every 400 hours/Yearly (whichever comes
first)
1.
Position the sprayer on a level surface, set the parking
brake, stop the pump, stop the engine, and remove the
key from the starter switch.
2.
Extend the booms to the spray position and support
the booms using stands or straps from a lift.
3.
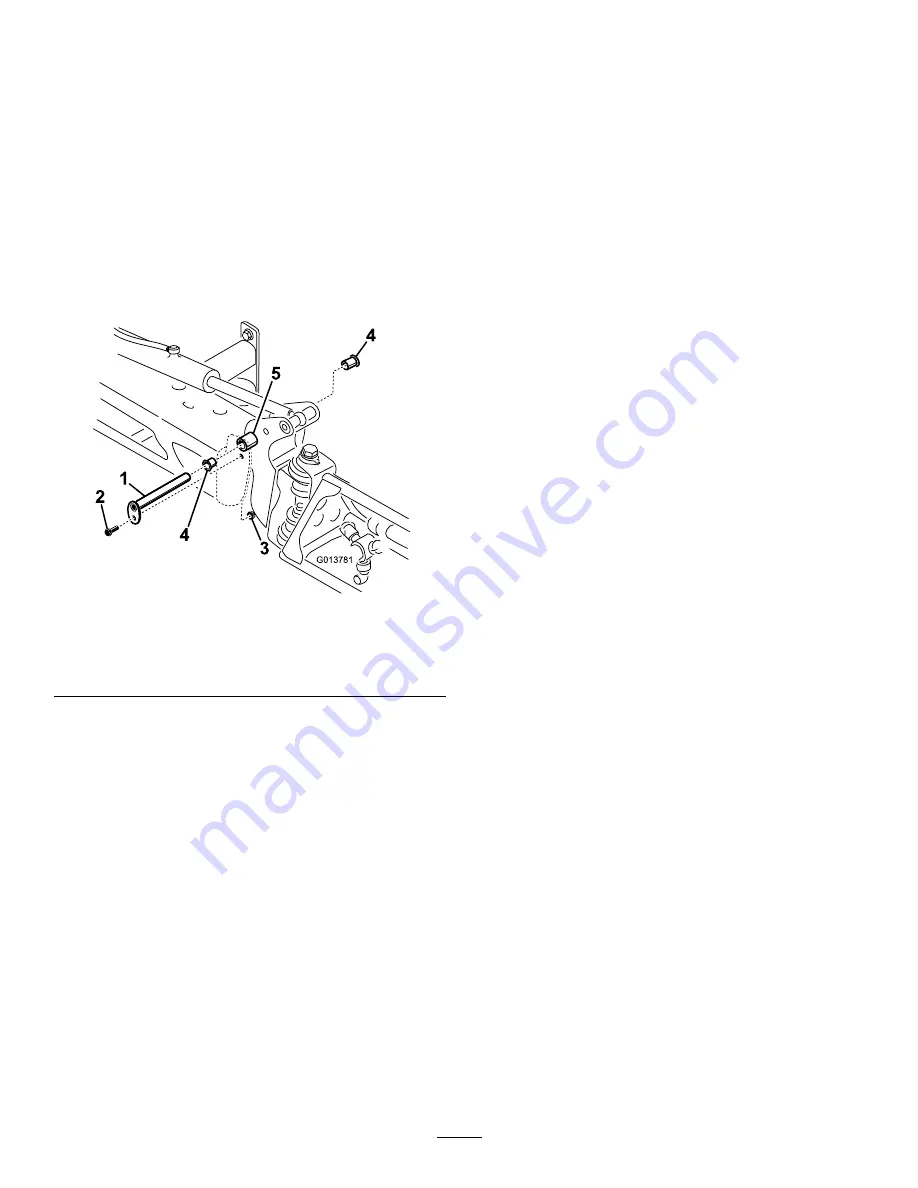
With the weight of the boom supported, remove
the bolt and nut securing the pivot pin to the boom
assembly (
).
G013781
2
3
1
4
4
5
Figure 81
1.
Pivot pin
4.
Nylon bushing
2.
Bolt
5.
Pivot bracket
3.
Nut
4.
Remove the pivot pin (
5.
Remove the boom and pivot bracket assembly from
the center frame to access the nylon bushings.
6.
Remove and inspect the nylon bushings from the front
and back sides of the pivot bracket (
Note:
Replace any damaged bushings.
7.
Place a small amount of oil on the nylon bushings and
install them into pivot bracket.
8.
Install the boom and pivot bracket assembly into the
center frame, aligning the openings (
9.
Install the pivot pin and secure it with the bolt and nut
removed previously.
10.
Repeat this procedure for each boom.
Cleaning
Cleaning the Radiator Cooling
Fins
Service Interval:
Every 200 hours—Clean the radiator fins.
Important:
Do not spray water into a hot engine
compartment.
1.
Position the sprayer on a level surface, set the parking
brake, stop the pump, stop the engine, and remove the
key from the starter switch.
2.
Tilt the driver and passenger seats forward and align
the prop rod into the detent in the prop rod guide slot.
3.
Allow the cooling system to cool.
4.
Remove the seat base access cover; refer to
the Seat Base Access Panel (page 41)
.
5.
Using a soft brush and low-pressure compressed air,
clean the fins of the radiator.
Note:
Clean the radiator fines more often if needed.
Check all coolant hoses and replace any that are worn,
leaking, or damaged.
6.
Lower the driver and passenger seats.
7.
Install the seat base access cover; refer to
Seat Base Access Panel (page 41)
.
Cleaning the Sprayer Valves
•
To clean the rate control valve, refer to the following
sections:
1.
Removing the Valve Actuator (page 61)
2.
Removing the Rate Control Manifold Valve (page
62)
3.
Cleaning the Manifold Valve (page 65)
4.
Assembling the Manifold Valve (page 66)
5.
Installing the Rate Control Manifold Valve (page
67)
6.
Installing the Valve Actuator (page 69)
•
To clean the agitation valve; refer to the following
sections:
1.
Removing the Valve Actuator (page 61)
2.
Removing the Agitation Manifold Valve (page 62)
3.
Cleaning the Manifold Valve (page 65)
4.
Assembling the Manifold Valve (page 66)
5.
Installing the Agitation Manifold Valve (page 67)
6.
Installing the Valve Actuator (page 69)
•
To clean the master boom valve, refer to the following
sections:
1.
Removing the Valve Actuator (page 61)
60


