


6
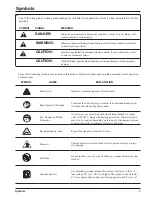
Specific Safety Rules
Specific Safety Rules
General Safety Rules
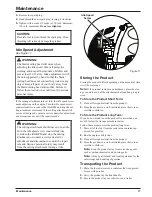
Allow the engine to cool; empty the fuel tank into a con-
tainer approved for fuel and secure the unit from moving
before transporting in a vehicle.
Wear your protective equipment and observe all safety
instructions. For units equipped with a clutch, be sure the
cutting attachment stops turning when the engine idles.
When the unit is turned off make sure the cutting attach-
ment has stopped before the unit is set down.
This product is intended for infrequent use by homeown
-
ers and other occasional users for such general applica-
tions as trimming light and heavy vegetation, etc. It is
not intended for prolonged use. Prolonged periods of
operation can cause circulatory problems in the user’s
hands due to vibration. For such use, it may be appropri
-
ate to use a product having an anti-vibration feature.
Specific Safety Rules for Trimmer Use
Inspect before use. Replace damaged parts. Make sure
fasteners are in place and secure. Check for fuel leaks.
Replace string head if cracked, chipped, or damaged in
any way. Be sure the string head or blade is properly in
-
stalled and securely fastened. Failure to do so can cause
serious injury.
Make sure all guards, straps, deflectors, and handles are
properly and securely attached.
Use only the manufacturer’s replacement line in the
cutting head. Do not use any other cutting attachment.
To install any other brand of replacement line or cutting
head to this string trimmer can result in serious personal
injury. Never use, for example, wire or wire-rope, which
can break off and become a dangerous projectile.
Never operate unit without the grass deflector in place
and in good condition.
Maintain a firm grip on both handles while trimming.
Keep string head below waist level. Never cut with the
string head located over 30 in. or more above the ground.
Specific Safety Rules for Brushcutter
and Blade Use
Brushcutter blades coast after throttle trigger is released
or engine is stopped. Keep the rotating blade in thicker
weeds or pulpy stalks until the blade completely stops.
Do not operate the brushcutter unless the brushcutter
guard is firmly secured in place and in good condition.
Use heavy gloves when operating the brushcutter and
when installing or removing blades.
Always stop the engine and remove the spark plug wire
before attempting to remove any obstruction caught or
jammed in the blade or before removing and installing
the blade.
Do not attempt to touch or stop the blade when it is rotat
-
ing.
A coasting blade can cause injury while it continues
to spin after the engine is stopped or throttle trigger
released. Maintain proper control until the blade has
completely stopped rotating.
Replace any blade that has been damaged. Always make
sure blade is installed correctly and securely fastened
before each use. Failure to do so can cause serious injury.
Use only the manufacturer’s replacement blade intended
for use on this brushcutter. Do not use any other blade.
To install any other brand blade or cutting head to this
brushcutter can result in serious personal injury.
The blade is suited for cutting thicker weeds or pulpy
stalks only. Do not use for any other purpose. Never use
the blade to cut woody brush.
Exercise extreme caution when using the blade with this
unit. Blade thrust is the reaction that may occur when the
spinning blade contacts anything it cannot cut. This con
-
tact may cause the blade to stop for an instant, and sud
-
denly “thrust” the unit away from the object that was hit.
This reaction can be violent enough to cause the operator
to lose control of the unit. Blade thrust can occur without
warning if the blade snags, stalls, or binds. This is more
likely to occur in areas where it is difficult to see the ma
-
terial being cut. For cutting ease and safety, approach the
weeds being cut from the right to the left. In the event an
unexpected object or woody stock is encountered, this
could minimize the blade thrust reaction.
Never cut any material over 1/2 in. diameter.
Always wear the shoulder harness
when using the brush
-
cutter and adjust to a comfortable operating position.
Maintain a firm grip on both handles while cutting with
a blade. Keep the blade away from your body and below
waist level.
Never use the brushcutter with the blade located 30 in. or
more above the ground level.
Save these instructions.
Refer to them frequently and use
them to instruct others who may use this tool. If you loan
someone this tool, loan them these instructions also.
NOTE: ADDITIONAL SPECIFIC SAFETY RULES CAN BE FOUND IN
THE APPLICABLE ATTACHMENT’S OPERATOR’S MANUAL
Summary of Contents for 51945
Page 22: ...Notes...


