Operation
16
IMPORTANT: To prevent excessive wear, do
not “Ride the Brakes,” or use brakes to slow
ground speed when in gear. On hills shift to a
lower gear for slower ground speed.
Side Discharge
or Mulch Grass
POTENTIAL HAZARD
•
Without the grass deflector, discharge
cover, or complete grass catcher assembly
mounted in place, you and others are
exposed to blade contact and thrown
debris.
WHAT CAN HAPPEN
•
Contact with rotating mower blade(s) and
thrown debris will cause injury or death.
HOW TO AVOID THE HAZARD
•
NEVER remove the grass deflector from
the mower because the grass deflector
routes material down toward the turf. If the
grass deflector is ever damaged, replace it
immediately.
•
Never put your hands or feet under the
mower.
•
Never try to clear discharge area or mower
blades unless you move the blade control
(PTO) to “DISENGAGED” and rotate the
ignition key to “OFF.” Also remove the key
and pull the wire off the spark plug.
1.
The mower has a hinged grass deflector that
disperses clippings to the side and down toward
the turf.
2.
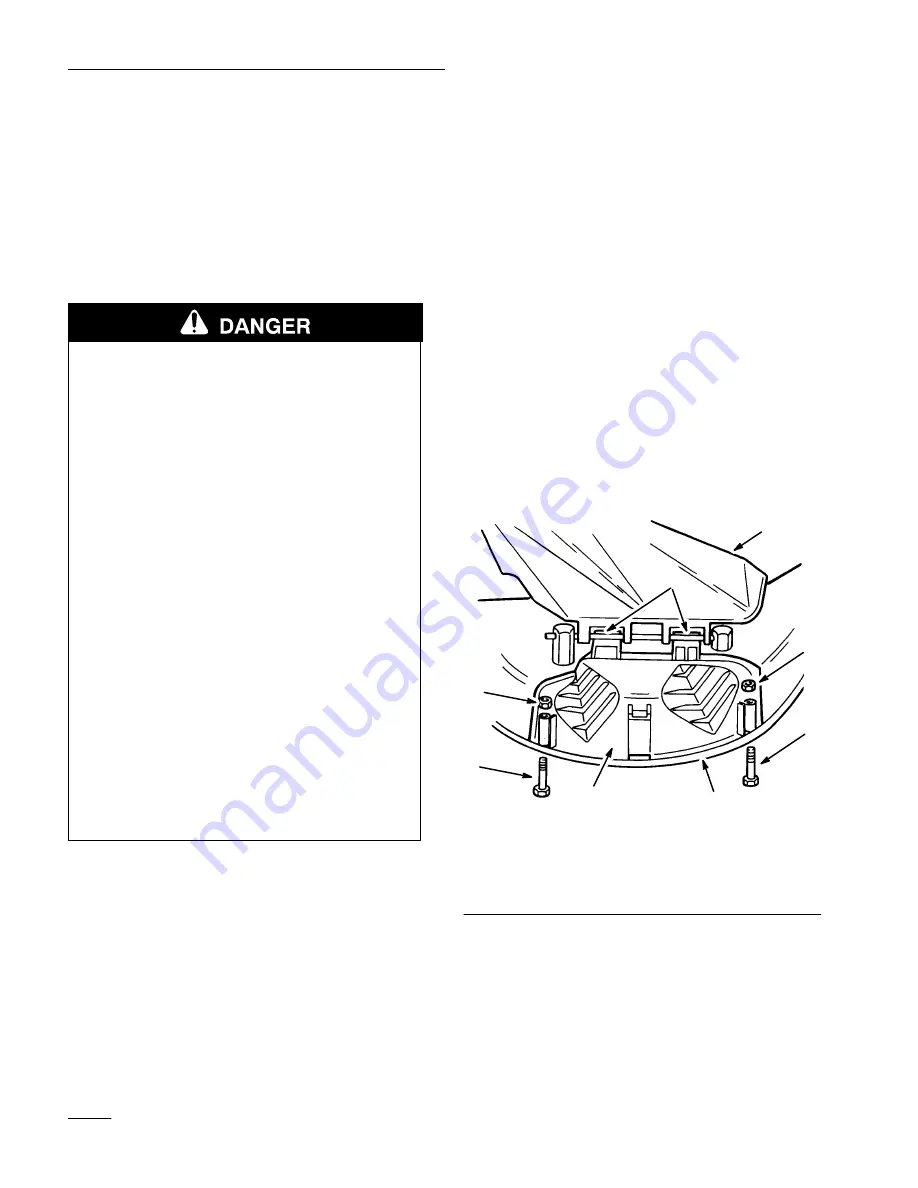
To mulch grass clippings you must install the
discharge cover (optional on some models) into
the opening in the side of the mower; refer to
Installing the Discharge Cover, page 16.
Installing the
Discharge Cover
To convert from side discharge to a mulching mower,
install the discharge cover into the opening at the side
of the mower.
1.
Shut the engine off and remove the ignition key.
2.
Lift the grass deflector and slide the tabs on top
of the discharge cover under the grass deflector
retaining rod. Rotate the discharge cover down
over the opening, and onto the lower lip of the
mower (Fig. 12).
3.
Secure the discharge cover to the lower lip of the
mower with bolts and nuts (Fig. 12).
Note:
Do not over-tighten nuts, distorting
cover causing blade contact.
m–1883
1
6
5
4
3
6
5
2
Figure 12
1.
Grass deflector
2.
Tabs under rod
3.
Discharge cover
4.
Lower lip
5.
Bolt
6.
Nut
4.
To convert back to a side discharge mower,
remove the discharge cover and lower the grass
deflector over the discharge opening.
Summary of Contents for 71198
Page 7: ...Safety 5 Slope Chart Read all safety instructions on pages 2 4...
Page 8: ...6...
Page 46: ......
Page 47: ......


