background image

Troubleshooting

Problem

Possible Cause

Corrective Action

1. Cutting blade(s) is/are bent or

unbalanced.

1. Install new cutting blade(s).

2. Blade mounting bolt is loose.

2. Tighten the blade-mounting bolt.

3. The blower pulley or pulley assembly

is loose.

3. Tighten the appropriate pulley.

4. The bagger belt is worn.

4. Replace the belt.

There is abnormal vibration.

5. Blower fan blade(s) is/are bent or

unbalanced.

5. Contact an Authorized Service Dealer.

1. The engine speed is low.

1. Always operate the bagger at full

throttle.

2. The screen in the bagger hood is

plugged.

2. Remove debris, leaves, or grass

clippings from the screen.

3. The bagger belt is loose.

3. Replace the bagger belt.

4. A tube or blower is plugged.

4. Locate and remove plugged debris.

The bagging performance is reduced.

5. The bags are full.

5. Empty the hopper.

1. The bags are too full.

1. Dump more frequently.

2. The engine speed is low.

2. Always operate the bagger at full

throttle.

3. Grass is too wet.

3. Cut grass when it is dry.

4. Grass is too long.

4. Cut no more than 51 to 76 mm (2 to

3 inches) or 1/3 of the grass height,
which ever is less.

5. The screen in the bagger hood is

plugged.

5. Remove debris, leaves or grass

clippings from the screen.

6. The ground speed is too fast.

6. Drive slower at full throttle.

The blower and tubes plug too frequently.

7. The bagger belt is worn.

7. Replace the belt.

1. The bags are too full.

1. Dump the bags more frequently.

2. The ground speed is too fast.

2. Drive slower at full throttle.

Debris are blowing out.

3. The mower deck is not leveled.

3. Refer to the machine’s

Operator's

Manual

for leveling the mower deck.

1. The blower is plugged.

1. Remove debris, leaves, or grass

clippings from the blower impeller.

The blower impeller does not spin freely.

2. The impeller is not aligned.

2. Contact an Authorized Service Dealer.

26


Summary of Contents for 78531

Page 1: ...267 Rev A 48in or 52in E Z Vac Bagger Z400 Series Z Master Mowers Model No 78531 Serial No 315000001 and Up Model No 78532 Serial No 315000001 and Up Register at www Toro com Original Instructions EN...

Page 2: ...No Serial No Figure 2 Bagger Serial Number 1 Bagger model and serial number location Model No Serial No This manual identifies potential hazards and has safety messages identified by the safety alert...

Page 3: ...A heavy grass catcher could cause loss of control or overturn the machine Slow down and use extra care on hillsides Be sure to travel in the recommended direction on hillsides Turf conditions can aff...

Page 4: ...tional Decals Safety decals and instructions are easily visible to the operator and are located near any area of potential danger Replace any decal that is damaged or lost 1 653558 98 5954 106 3339 11...

Page 5: ...bagger belt into the blower assembly Blower assembly from Blower and Drive Kit 1 6 Spring from Blower and Drive Kit 1 Install the blower assembly 7 No parts required Adjust the flow baffle Upper tube...

Page 6: ...the 8 bolts and nuts securing the rear of the heat shield to the engine straps and rear bumper Figure 4 Note Discard the bolts and nuts 2 Remove the 4 bolts washers and nuts securing the sides of the...

Page 7: ...ition 6 Install the bagger bracket and heat shield to the rear of the engine straps and rear bumper with 8 new bolts 5 16 x 1 inch and 8 new flange nuts 5 16 inch as shown in Figure 9 7 Install the ba...

Page 8: ...e 10 Note Save the bolts and flange nuts Figure 10 1 Bolt 4 Engine guard strap 2 Flange nut 5 Rear weight 3 Rear bumper Note Make sure to install the bagger bracket correctly as shown in Figure 11 Fig...

Page 9: ...embly 2 Install the 2 clevis pins into the hood assembly and bagger mounting bracket Secure it with 2 hairpin cotters Figure 14 Figure 14 1 Hood assembly 3 Hairpin cotter 2 Bagger mounting bracket 4 C...

Page 10: ...eded for this procedure 1 Bagger belt from Blower and Drive Kit Procedure 1 Loosen the belt guide bolt Figure 18 2 Install the belt around the blower pulley Figure 18 3 Install the belt between the fi...

Page 11: ...you remove the grass chute 1 Remove the side discharge chute from the mower deck Figure 19 1 Bolt 5 Spring installed 2 Spacer 6 Grass deflector 3 Locknut 7 L end of spring place behind deck edge befo...

Page 12: ...e Flow Baffle No Parts Required Procedure 1 Swing the lever up to loosen the cam lock Figure 24 2 Align the flow baffle and cam lock in the slot to the edge of the blower assembly 3 Swing the lever ba...

Page 13: ...ening and pull it back out so that the rubber seal is protruding out Figure 25 Figure 25 1 Upper tube 3 Bagger hood 2 Bagger opening 6 With the hood in the down position and the right hand bag removed...

Page 14: ...top and bottom of the blower housing Figure 29 1 Blower assembly 3 Latch 2 Lower tube 10 Make sure that the mower deck is in the lowest height of cut position and the mark on the upper tube is still...

Page 15: ...r tube from the blower 13 Join the upper and lower tubes with 3 bolts 10 x 3 4 inches 3 flat washers 7 32 inch and 3 locknuts 10 as shown inFigure 31 Figure 31 1 Lower tube 4 Locknut 10 2 Upper tube 5...

Page 16: ...2 inches 2 Locknut 3 8 inch 4 Washer 3 8 inch Procedure To comply with ANSI OPEI B71 4 2012 Standard add front weight to the machine CAUTION The bagger adds a lot of weight to the rear of the machine...

Page 17: ...control 1 Install 2 bolts 3 8 x 3 inches and 2 washers 3 8 inch to the frame under the foot rest Figure 34 2 Install the weights with the decal facing the front to the bolts with 2 washers 3 8 inch an...

Page 18: ...the engine off and wait for all moving parts to stop before clearing an obstruction from the bagging system Never do maintenance or repairs while the engine is running Set the parking brake WARNING Wi...

Page 19: ...37 1 Bag 2 Bottom handle 6 Repeat for the other bag 7 Install the bag tab into the notch in the bagger support frame Do this for both bags 8 Lower the bagger hood over the bags 9 Latch the bagger hoo...

Page 20: ...Deflector DANGER Without the grass deflector discharge cover or complete grass catcher assembly mounted in place you and others are exposed to blade contact and thrown debris Contact with rotating mo...

Page 21: ...he bagger If this happens the tube and blower may plug To avoid plugging the bagging system mow the grass at a high height of cut then lower the mower to your normal cutting height and repeat the bagg...

Page 22: ...ide of the machine Use a mild automotive detergent to remove dirt 2 Make sure that you remove matted grass from all parts 3 After washing all parts let them dry thoroughly Note With all parts installe...

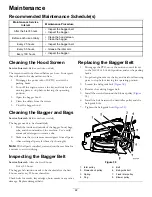
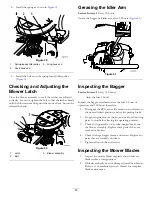
Page 23: ...ry 100 hours After the first 8 hours Inspect the bagger attachment after the first 8 hours of operation and 100 hours thereafter 1 Disengage the PTO move the motion control levers to the neutral locke...

Page 24: ...ess you install a cover plate a mulch plate or a grass chute and catcher Make sure that the grass deflector is in the down position 1 Remove the locknut bolt spring and spacer holding the deflector to...

Page 25: ...er to Inspecting the Bagger page 23 3 Make sure the bags are empty and thoroughly dry 4 Check the belt for wear or cracks 5 Store the machine in a clean dry place out of direct sunlight If you must st...

Page 26: ...y the hopper 1 The bags are too full 1 Dump more frequently 2 The engine speed is low 2 Always operate the bagger at full throttle 3 Grass is too wet 3 Cut grass when it is dry 4 Grass is too long 4 C...

Page 27: ...Notes 27...

Page 28: ...Notes 28...

Page 29: ...Notes 29...

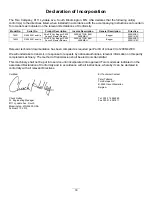
Page 30: ...Bagger 2006 42 EC 2000 14 EC Relevant technical documentation has been compiled as required per Part B of Annex VII of 2006 42 EC We will undertake to transmit in response to requests by national aut...

Page 31: ...3766 3636 Jean Heybroek b v Netherlands 31 30 639 4611 Victus Emak Poland 48 61 823 8369 European Privacy Notice The Information Toro Collects Toro Warranty Company Toro respects your privacy In order...

Page 32: ...the Service Dealer s analysis or with the assistance provided contact us at RLC Customer Care Department Toro Warranty Company 8111 Lyndale Avenue South Bloomington MN 55420 1196 888 865 5676 U S Cust...

Reviews: