ENGINE
4-7
TX525 Service Manual
Rev. 000
Oil Cooler Installation
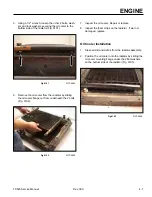
5. Using a 1/2” wrench, loosen the other 2 bolts, wash-
ers and lock washers securing the oil cooler to the
bottom side of the radiator (Fig. 0101).
7. Inspect the oil cooler. Repair or replace.
8. Inspect the foam strips on the radiator. If worn or
damaged, replace.
Fig 0101
PICT-5064
1. Clean all dirt and debris from the radiator assembly.
2. Position the oil cooler onto the radiator by sliding the
oil cooler mounting flange under the 2 flat washers
on the bottom side of the radiator (Fig. 0103).
6. Remove the oil cooler from the radiator by sliding
the oil cooler flange out from underneath the 2 bolts
(Fig. 0102).
Fig 0103
PICT-5066
Fig 0102
PICT-5065
Summary of Contents for Dingo TX 525
Page 1: ...TX525 Service Manual Sitework Systems Form No 492 9195...
Page 3: ...ii Rev 000 TX525 Service Manual 8 01 10 Revision 000 REVISIONS...
Page 11: ...x Rev 000 TX525 Service Manual TABLE OF CONTENTS THIS PAGE INTENTIONALLY LEFT BLANK...
Page 243: ...ENGINE 4 190 Rev 000 TX525 Service Manual THIS PAGE INTENTIONALLY LEFT BLANK...
Page 263: ...ELECTRICAL 5 20 Rev 000 TX525 Service Manual THIS PAGE INTENTIONALLY LEFT BLANK...
Page 377: ...HYDRAULIC SYSTEM 6 114 Rev 000 TX525 Service Manual THIS PAGE INTENTIONALLY LEFT BLANK...
Page 479: ...DRIVE SYSTEM 7 102 Rev 000 TX525 Service Manual THIS PAGE INTENTIONALLY LEFT BLANK...
Page 553: ...HYDRAULIC TESTING 9 20 Rev 000 TX525 Service Manual THIS PAGE INTENTIONALLY LEFT BLANK...


