29
GTS 200
Compression
Remove Valves
1. Place cylinder head on work surface.
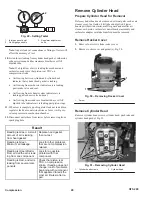
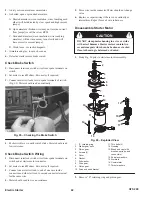
2. Remove valve cap from valve stems, Fig. 52.
1
2
Fig. 52 – Removing Valves
1.
Valve spring retainer
2.
Valve cap
3. With thumbs, press down on valve spring retainer and
spring to compress until large end of slot in retainer can
line up with end of valve stem, Fig. 52.
4. Release pressure on retainer and spring.
5. Remove retainer, spring, and intake valve seal, if removing
intake valve, Fig. 52.
Inspect Valve Guides
1. Measure intake and exhaust valve guides using Briggs &
Stratton Tool #19122.
2. If flat end of gauge can enter guide for 1/4” (6.35mm) or
more, cylinder head must be replaced.
3. If plug gauge is not available, refer to Table No. 1,
Page 32 for reject size.
Valve Service
Reface Valves and Seats
Although valve faces can be resurfaced on a commercially
available valve grinding tool, we do not recommend this
practice as a high quality repair procedure. Valve replacement
is recommended for damaged or worn valves. Valve seats are
cut using Briggs & Stratton Tool #19237 or #19343, Neway
Valve Seat Cutter Kit, to 45
°
on exhaust and some intake
seats. Other intake seats are cut to 30
°
. Valve and seat are
lapped in using Briggs & Stratton Tool #19258, Valve Lapping
Tool, and Briggs & Stratton Part #94150, Valve Lapping
Compound, to assure a good seal between the valve face and
the seat.
1. Thoroughly clean lapping compound from valve seat and
valve face.
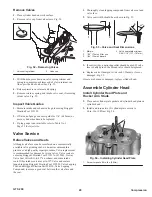
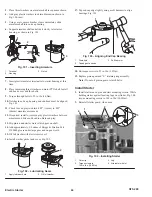
2. Valve seat width should be as shown in Fig. 53.
1
3
2
45
°
4
Fig. 53 – Valve and Seat Dimensions
1.
Margin
2.
1/32” (.79mm) fit for use
3.
1/64” (.38mm) discard
4.
Valve seat width minimum
3/64–1/16” (1.17–1.57mm)
3. If seat is wider, a narrowing cutter should be used. If valve
face is badly burned, the burned valve should be replaced.
4. Replace valve if margin is 1/64 inch (.39mm) or less or
damaged, Fig. 53.
If seats are burned or damaged, replace cylinder head.
Assemble Cylinder Head
Install Cylinder Head Plate and
Rocker Arm Studs
1. Place new cylinder plate gasket and cylinder head plate on
cylinder head.
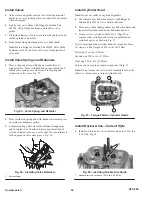
2. Install and torque two (2) cylinder plate screws to
80 in. lbs. (9.0Nm), Fig. 54.
1
Fig. 54 – Installing Cylinder Head Plate
1.
Screw: torque to 80 in. lbs. (9.0Nm)

