background image

Form No. 3385-215 Rev A

Power Clear

®

721 R/E Snowthrower

Model No. 38741—Serial No. 315000001 and Up

Model No. 38742—Serial No. 315000001 and Up

Operator's Manual

Introduction

WARNING

CALIFORNIA

Proposition 65 Warning

This product contains a chemical or chemicals

known to the State of California to cause cancer,

birth defects, or reproductive harm.

The engine exhaust from this product

contains chemicals known to the State of

California to cause cancer, birth defects,

or other reproductive harm.

This machine is intended to be used by residential
homeowners or professional, hired operators. It is
designed primarily for removing snow from paved
surfaces, such as driveways and sidewalks, and other
surfaces for traffic on residential or commercial
properties. It is not designed for removing materials
other than snow, nor is it designed for clearing off gravel
surfaces.

Read this information carefully to learn how to operate and
maintain your machine properly and to avoid injury and
machine damage. You are responsible for operating the
machine properly and safely.

You may contact Toro directly at www.Toro.com for machine
and accessory information, help finding a dealer, or to register
your machine.

Whenever you need service, genuine Toro parts, or additional
information, contact an Authorized Service Dealer or Toro
Customer Service and have the model and serial numbers of
your machine ready. Figure 1 identifies the location of the
model and serial numbers on the machine. Write the numbers
in the space provided.

G016241

Figure 1

1.

Model and serial number location

Model No.

Serial No.

This manual identifies potential hazards and has safety
messages identified by the safety alert symbol (Figure 2),
which signals a hazard that may cause serious injury or death
if you do not follow the recommended precautions.

Figure 2

1.

Safety alert symbol

This manual uses 2 words to highlight information.

Important

calls attention to special mechanical information

and

Note

emphasizes general information worthy of special

attention.

© 2014—The Toro® Company
8111 Lyndale Avenue South
Bloomington, MN 55420

Register at www.Toro.com.

Original Instructions (EN)

Printed in the USA

All Rights Reserved

*3385-215* A

Summary of Contents for Power Clear 721 E 38742

Page 1: ...ge You are responsible for operating the machine properly and safely You may contact Toro directly at www Toro com for machine and accessory information help finding a dealer or to register your machine Whenever you need service genuine Toro parts or additional information contact an Authorized Service Dealer or Toro Customer Service and have the model and serial numbers of your machine ready Figu...

Page 2: ...e machine Never allow adults to operate the machine without proper instruction Keep the area of operation clear of all persons particularly small children Exercise caution to avoid slipping or falling Preparation Thoroughly inspect the area where the machine is to be used and remove all doormats sleds boards wires and other foreign objects Do not operate the machine without wearing adequate winter...

Page 3: ...ldren and others away Do not overload the machine capacity by attempting to clear snow at too fast a rate Look behind and use care when backing up with the machine Disengage power to the rotor blades when machine is transported or not in use Never operate the machine without good visibility or light Always be sure of your footing and keep a firm hold on the handles Walk never run Never touch a hot...

Page 4: ...safety device or decal is damaged illegible or lost repair or replace it before beginning operation Also tighten any loose fasteners Do not smoke while handling gasoline Do not use the machine on a roof Do not touch the engine while it is running or soon after it has stopped because the engine may be hot enough to cause a burn Perform only those maintenance instructions described in this manual Be...

Page 5: ... stop the engine before leaving the machine 7 Primer 3 Thrown object hazard keep bystanders a safe distance from the machine 8 Push the primer three times to prime the engine 4 Fuel spill hazard do not tip machine backward 9 Read the Operator s Manual before checking engine oil level 5 Engine switch On 117 9103 Model 38742 only Order part no 117 6046 1 Warning read the Operator s Manual 6 Engine s...

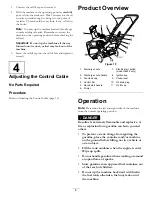
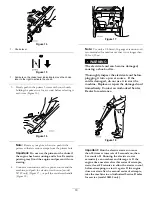
Page 6: ...Parts Required Procedure 1 Loosen the handle knobs pull out the U shaped handle locks until you can move the handle freely and rotate the handle to the operating position Figure 4 G016242 Figure 4 1 U shaped handle lock 2 2 Handle knobs 2 Insert the end of the U shaped handle lock into the open hole in the handle and tighten the handle knobs until they are snug Figure 5 Figure 5 Important Ensure t...

Page 7: ...s come with a bottle of oil Important Before starting the engine fill the engine with oil Note The bottle of oil may contain an ounce or two more than the engine requires Do not overfill or under fill the engine Max fill 20 oz 0 6 l type automotive detergent oil with an API service classification of SJ SL or higher Use Figure 8 below to select the best oil viscosity for the outdoor temperature ran...

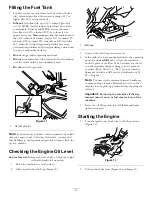
Page 8: ...uct Overview 1 2 G016243 Figure 10 1 Discharge chute 7 Electric start button model 38452 only 2 Discharge chute handle 8 Ignition key 3 Fuel tank cap 9 Choke lever 4 Control bar 10 Oil drain plug 5 Recoil start handle 11 Oil fill cap 6 Primer Operation Note Determine the left and right sides of the machine from the normal operating position DANGER Gasoline is extremely flammable and explosive A fi...

Page 9: ... stabilizer to newly purchased gasoline to keep it fresh for up to 6 months Checking the Engine Oil Level Service Interval Before each use or daily Check the engine oil level and add oil if necessary 1 Move the machine to a level surface 2 Clean around the oil fill cap Figure 12 Figure 12 1 Oil fill cap 3 Unscrew the oil fill cap and remove it 4 If the oil level is low keep the machine in the oper...

Page 10: ...7 Note Use only a UL listed 16 gauge extension cord recommended for outdoor use that is not longer than 50 feet 15 m WARNING The electrical cord can become damaged causing a shock or fire Thoroughly inspect the electrical cord before plugging it into a power source If the cord is damaged do not use it to start the machine Replace or repair the damaged cord immediately Contact an Authorized Service...

Page 11: ... injure people or damage property model 38742 only Unplug the power cord whenever you are not starting the machine Engaging the Rotor Blades To engage the rotor blades hold the control bar against the handle Figure 19 Figure 19 1 Control bar Disengaging the Rotor Blades To disengage the rotor blades release the control bar Figure 20 Figure 20 Stopping the Engine To stop the engine turn the ignitio...

Page 12: ...eft and right to free it from any ice buildup With the ignition key in the Off position pull the recoil starter handle several times or connect the electrical cord to a power source and the machine and push the electric start button once to prevent the recoil starter and or the electric starter from freezing up In snowy and cold conditions some controls and moving parts may freeze Do not use exces...

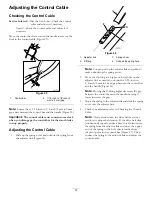
Page 13: ...ck the control cable and adjust it if necessary Check for loose fasteners and tighten them if necessary After the first 2 hours Change the engine oil Before each use or daily Check the engine oil level and add oil if necessary Yearly Check the control cable and adjust it if necessary Inspect the rotor blades and have an Authorized Service Dealer replace the rotor blades and scraper if necessary Ch...

Page 14: ...ver 2 Z fitting 4 Unhook the spring here Note You can pull up the adjuster link and cable to make unhooking the spring easier 2 Move the Z fitting to a higher or lower hole on the adjuster link as needed to obtain the 1 16 inch to 1 8 inch 2 mm to 3 mm gap between the control bar and the handle Figure 26 Note Moving the Z fitting higher decreases the gap between the control bar and the handle movi...

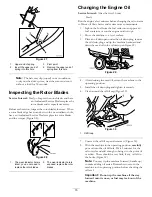
Page 15: ... warm it Warm oil flows better and carries more contaminants 1 Siphon the fuel from the fuel tank into an approved fuel container or run the engine until it stops 2 Move the machine to a level surface 3 Place an oil drain pan under the oil drain plug remove the oil drain plug and tip the machine backward and drain the used oil in the oil drain pan Figure 29 Figure 29 4 After draining the used oil ...

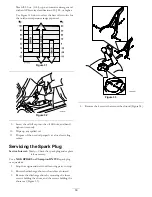
Page 16: ... Dispose of the used oil properly at a local recycling center Servicing the Spark Plug Service Interval Yearly Check the spark plug and replace it if necessary Use a NGK BPR6ES or Champion RN9YC spark plug or equivalent 1 Stop the engine and wait for all moving parts to stop 2 Rotate the discharge chute so that it faces forward 3 Remove the discharge chute by removing the three screws holding the ...

Page 17: ...t the wire to the spark plug Note Ensure that the breather tube is routed above the spark plug wire as shown in Figure 36 Figure 36 1 Breather tube 2 Carburetor drain bolt 14 Remove the fuel tank cap 15 Install the shroud with the screws you removed in step 4 Note Ensure that the upper and lower shrouds fit together in the side grooves 16 Install the fuel tank cap 17 Install the chute seal the dis...

Page 18: ...ere 3 Engine pulley 2 Idler pulley 4 Rotor pulley Note Route the new drive belt first around the engine pulley then the idler pulley and finally around the loose rotor pulley positioned just above the rotor shaft Figure 37 6 Install the rotor pulley onto the rotor shaft Figure 37 7 Install the curved washer and the rotor pulley bolt and tighten them securely Figure 37 Note The concave side of the ...

Page 19: ... engine start it a third time and run the engine until it will not start 6 Drain the fuel in the carburetor through the carburetor drain bolt Figure 36 into an approved gasoline container 7 Dispose of unused fuel properly Recycle it according to local codes or use it in your automobile 8 While the engine is still warm change the engine oil Refer to Changing the Engine Oil 9 Remove the spark plug 1...

Page 20: ...Notes 20 ...

Page 21: ...Notes 21 ...

Page 22: ...pplication for certification The warranty period begins on the date the small off road engine equipment is delivered to an ultimate purchaser The warranted period is two years Subject to certain conditions and exclusions as stated below the warranty on evaporative emissions related parts is as follows 1 Any warranted part that is not scheduled for replacement as required maintenance in the written...

Page 23: ...ction System Air cleaner Intake manifold Crankcase vent and line s Purge line and fittings 3 Ignition System Spark plug s and wire s Magneto ignition system 4 Catalytic Exhaust System Catalytic converter Exhaust manifold Air injector system and valve s 5 Miscellaneous Items Used in Emission Control System Valves switches and linkages Connectors fittings and brackets 374 0295 Rev A ...

Page 24: ... regular maintenance or replacement of wear parts such as rotor blades paddles scraper blades belts fuel lubricants oil changes spark plugs cable linkage or brake adjustments Any product or part which has been altered or misused and requires replacement or repair due to accidents or lack of proper maintenance Repairs necessary due to failure to use fresh fuel less than one month old or failure to ...

Reviews: