background image

Starting the Engine

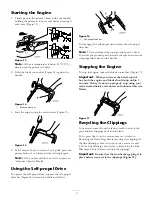
1. Firmly push in the primer 3 times with your thumb,

holding the primer in for a second before releasing it
each time (Figure 13).

Figure 13

Note:

If the air temperature is below 55°F (13°C),

firmly push the primer in 5 times.

2. Hold the blade control bar (Figure 14) against the

handle.

Figure 14

1. Blade control bar

3. Start the engine using the recoil starter (Figure 15).

Figure 15

4. If the mower does not start in 1 or 2 pulls, press the

primer button 1 or 2 times and try starting it again.

Note:

If the mower still does not start, contact an

Authorized Service Dealer.

Using the Self-propel Drive

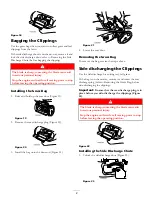
To operate the self-propel drive, squeeze the self-propel
drive bar (Figure 16) toward the handle and hold it.

Figure 16

1. Self-propel drive bar

To disengage the self-propel drive, release the self-propel
drive bar.

Note:

The maximum self-propel ground speed is fixed.

To reduce the ground speed, increase the space between the
self-propel drive bar and the handle.

Stopping the Engine

To stop the engine, release the blade control bar (Figure 17).

Important:

When you release the blade control

bar, both the engine and blade should stop within 3
seconds. If they do not stop properly, stop using your
mower immediately and contact an Authorized Service
Dealer.

Figure 17

Recycling the Clippings

Your mower comes from the factory ready to recycle the
grass and leaf clippings back into the lawn.

If the grass bag is on the mower, remove it (refer to
Removing the Grass Bag) before recycling the clippings. If
the side discharge chute is on the mower, remove it and
lock the side discharge door (refer to Removing the Side
Discharge Chute) before recycling the clippings.

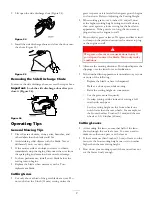
Important:

Ensure that the rear discharge plug is in

place before you recycle the clippings (Figure 18).

7

Summary of Contents for Recycler 20016

Page 1: ...ortant This engine is not equipped with a spark arrester muffler It is a violation of California Public Resource Code Section 4442 to use or operate the engine on any forest covered brush covered or grass covered land Other states or federal areas may have similar laws This spark ignition system complies with Canadian ICES 002 The enclosed Engine Owner s Manual is supplied for information regarding...

Page 2: ...n when operating machine See manufacturer s instructions for proper operation and installation of accessories Only use accessories approved by the manufacturer Slope Operation Slopes are a major factor related to slip and fall accidents which can result in severe injury Operation on all slopes require extra caution If you feel uneasy on a slope do not mow it Mow across the face of slopes never up ...

Page 3: ...ep machine free of grass leaves or other debris build up Clean up oil or fuel spillage and remove any fuel soaked debris Allow machine to cool before storing If you strike a foreign object stop and inspect the machine Repair if necessary before starting Never make any adjustments or repairs with the engine running Disconnect the spark plug wire and ground against engine to prevent unintended start...

Page 4: ... 2 Tighten the handle knobs Figure 4 Figure 4 3 Rotate the handle rearward Figure 5 until it clicks into place Figure 5 2 Filling the Engine with Oil Your mower does not come with oil in the engine but it does come with a bottle of oil 1 Remove the dipstick Figure 6 Figure 6 2 Slowly pour oil into the oil fill tube until the oil level reaches the Full line on the dipstick Figure 6 Do not overfill Ma...

Page 5: ...hen smoking or around an open flame or sparks Store gasoline in an approved fuel container out of the reach of children Fill the fuel tank with fresh unleaded regular gasoline from a major name brand service station Figure 9 Important To reduce starting problems next season add fuel stabilizer to the fuel all season mixing it with gasoline less than 30 days old Figure 9 Checking the Engine Oil Leve...

Page 6: ...as been running the muffler will be hot and can severely burn you Keep away from the hot muffler Adjust the cutting height as desired Set all four wheels to the same height Note Only a front cutting height lever is shown Figure 11 Adjusting the Handle Height Squeeze the bottom of the handle halves together and change the handle holes in which the pins are mounted as shown in Figure 12 Figure 12 1 Pi...

Page 7: ...drive release the self propel drive bar Note The maximum self propel ground speed is fixed To reduce the ground speed increase the space between the self propel drive bar and the handle Stopping the Engine To stop the engine release the blade control bar Figure 17 Important When you release the blade control bar both the engine and blade should stop within 3 seconds If they do not stop properly sto...

Page 8: ...re 20 Figure 20 3 Install the bag onto the door rod Figure 21 Figure 21 4 Lower the rear door Removing the Grass Bag To remove the bag reverse the steps above Side discharging the Clippings Use the side discharge for cutting very tall grass If the bag is on the mower remove it and insert the rear discharge plug refer to Removing the Grass Bag before side discharging the clippings Important Ensure ...

Page 9: ...alk slower then mow again at a lower setting for the best lawn appearance If the grass is too long the mower may plug and cause the engine to stall Mow only dry grass or leaves Wet grass and leaves tend to clump on the yard and can cause the mower to plug or the engine to stall Wet grass or leaves can cause serious injury if you slip and contact the blade Mow only in dry conditions Alternate the m...

Page 10: ...nce procedures Preparing for Maintenance 1 Stop the engine and wait for all moving parts to stop 2 Disconnect the spark plug wire from the spark plug and hook it onto the retaining post Figure 27 before performing any maintenance procedure Figure 27 1 Spark plug retaining post 3 After performing the maintenance procedure s connect the spark plug wire to the spark plug Important Before tipping the ...

Page 11: ...l bolts on the front wheels and remove the front wheels 2 Apply a lubricating oil to the inner and outer sides of the gear as shown in Figure 32 Figure 32 3 Install the front wheels Replacing the Blade Important You will need a torque wrench to install the blade properly If you do not have a torque wrench or are uncomfortable performing this procedure contact an Authorized Service Dealer Examine t...

Page 12: ... than 30 days Do not store the mower in an enclosure near an open flame Allow the engine to cool before storing it 1 On the last refueling of the year add fuel stabilizer to the fuel as directed by the engine manufacturer 2 Dispose of any unused fuel properly Recycle it according to local codes or use it in your automobile Note Old fuel in the fuel tank is the leading cause of hard starting Do not ...

Page 13: ... outside of the handle knobs as you fold the upper handle Figure 36 3 To unfold the handle reverse the steps above Removing the Mower from Storage 1 Remove the spark plug and spin the engine rapidly using the starter to blow the excess oil from the cylinder 2 Install the spark plug and tighten it with a torque wrench to 15 ft lb 20 N m 3 Connect the wire to the spark plug 13 ...

Page 14: ......

Page 15: ......

Page 16: ...g difficulties due to the following Failure to follow proper maintenance procedures Rotary mower blade striking an object snowthrower auger paddles striking an object Contaminants in the fuel system Improper fuel or fuel oil mixture consult your Operator s Manual if in doubt Failure to drain the fuel system prior to any period of non use over one month Special operational conditions where starting...

Reviews: