background image

7

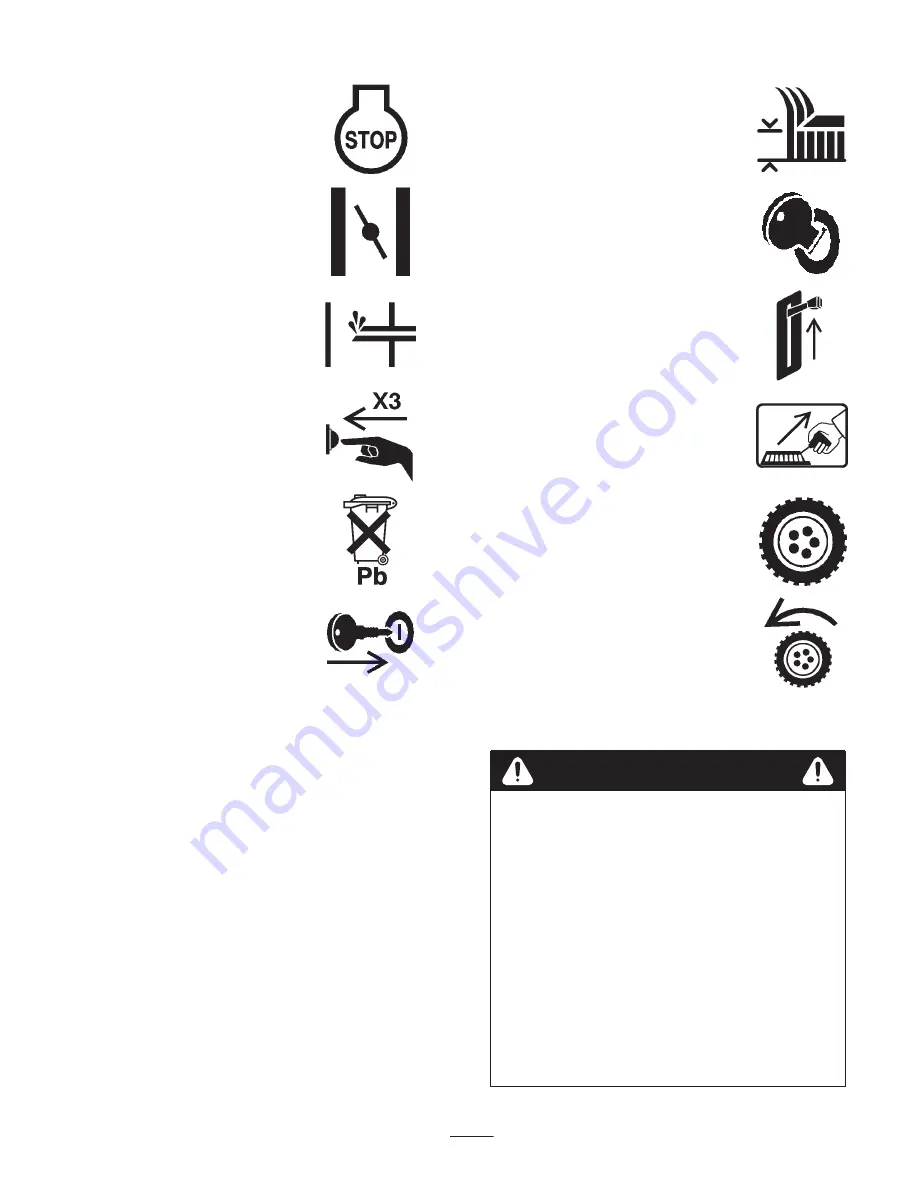
Engine stop

Cutting element — height
adjustment

Choke

Turn key in ignition
switch.

Primer (start aid)

Move control.

Push primer three times.

Pull rope.

Properly dispose of
batteries.

Wheel

Insert key in ignition
switch.

Wheel traction

Assembly

Note: Determine the left and right sides of the lawn
mower by standing in the operating position.

Unpacking the Lawn Mower

1. Remove the fillers from the box.

2. Remove the grass bag from the box, and set it aside for

future use.

3. Carefully remove the lawn mower from the box.

WARNING

POTENTIAL HAZARD

Folding or unfolding the handle improperly can
pinch, stretch, or damage one or more of the
cables.

WHAT CAN HAPPEN

Any pinched, stretched, or damaged cable may
cause an operational failure that results in an
unsafe operating condition.

HOW TO AVOID THE HAZARD

Do not pinch, stretch, or damage the cables.

Handle the cables with care when folding or
unfolding the handle.

Do not use the lawn mower if one or more of
the cables are pinched, stretched, or damaged.
Contact your Authorized Service Dealer.

Summary of Contents for Recycler 20826

Page 1: ...Operator s Manual International English GB Form No 3323 129 48 cm Recycler Walk Power Lawn Mower Model No 20826 200000001 and Up Model No 20827 200000001 and Up ...

Page 2: ... Tunnel 24 Emptying the Fuel Tank 24 Charging the Battery 24 Disposing of the Battery 24 Replacing the Fuse 25 Troubleshooting 25 Storage 26 Preparing the Fuel System 26 Preparing the Engine 26 General Information 26 Folding the Handle 27 Removing from Storage 27 Introduction Thank you for choosing a Toro product We want you to be completely satisfied with your new purchase Read this manual carefu...

Page 3: ...ever allow children or people unfamiliar with these instructions to use the mower Local regulations may restrict the age of the operator Never mow while people especially children or pets are nearby Stop mower if anyone enters the area Tragic accidents can occur if the operator is not alert to the presence of children Children are often attracted to the mower and the mowing activity Never assume t...

Page 4: ...e clearing blockages or unclogging chute before checking cleaning or working on the mower after striking a foreign object Inspect the mower for damage and make repairs before restarting and operating the mower if mower starts to vibrate abnormally check immediately Stop the engine whenever you leave the mower before refuelling Reduce the throttle setting during engine run out and if the engine is ...

Page 5: ...Toro replacement parts and accessories Do not use will fit parts and accessories they may cause a safety hazard Sound Pressure Level This unit has an equivalent continuous A weighted sound pressure at the operator ear of 84 dB A based on measurements of identical machines per ANSI B71 5 1984 procedures Sound Power Level This unit has a sound power level of 95 dB A 1 pW based on measurements of ide...

Page 6: ...s Rotary side mounted mower Keep deflector shield in place Disengage Stop engine before leaving operator position Battery charging condition Hourmeter elapsed operating hours Fuel Fast Neutral Slow First gear Decreasing Increasing Second gear Grease lubrication point Third gear Engine start Cutting element basic symbol ...

Page 7: ... bag from the box and set it aside for future use 3 Carefully remove the lawn mower from the box WARNING POTENTIAL HAZARD Folding or unfolding the handle improperly can pinch stretch or damage one or more of the cables WHAT CAN HAPPEN Any pinched stretched or damaged cable may cause an operational failure that results in an unsafe operating condition HOW TO AVOID THE HAZARD Do not pinch stretch or...

Page 8: ...ower until it seats into one of the handle height settings as shown in Figure 2 on page 8 To set the handle height refer to Adjusting the Handle Height on page 8 2 Remove the handle knobs and the oval head bolts from the upper handle section 3 Install the upper handle section onto the lower handle section with the oval head bolts and the handle knobs as shown in Figure 2 Tighten the handle knobs s...

Page 9: ... lead from battery 4 Wire lead from harness 3 Connect the wire lead from the battery to the wire lead from the electrical wire harness in the corrugated tube Fig 4 Assembling the Grass Bag 1 Insert the grass bag frame into the grass bag as shown in Figure 5 m 4788 3 1 2 4 5 Figure 5 1 Grass bag frame 2 Bag handle 3 Grass bag 4 Bag cover 5 Bag base Note Make sure that the bag handle is on the outsi...

Page 10: ...eum Institute API service classification SF SG SH or SJ Before each use make sure that the oil level is between the Add and the Full marks on the dipstick Fig 8 1 2 m 3665 284 Figure 8 1 Oil fill tube 2 Dipstick To add oil 1 Move the lawn mower to a level surface 2 Clean around the dipstick Fig 8 3 Remove the dipstick by rotating the cap counterclockwise 1 4 turn and pulling it out 4 Wipe the dips...

Page 11: ...soline and stay away from an open flame or where a spark may ignite the gasoline fumes Store gasoline in an approved container and keep it out of the reach of children Never buy more than a 30 day supply of gasoline DANGER POTENTIAL HAZARD When fueling under certain circumstances a static charge can develop igniting the gasoline WHAT CAN HAPPEN A fire or explosion from gasoline can burn you and ot...

Page 12: ...f they do not contact an Authorized Service Dealer Controls The starter handle and the blade control bail are on the upper handle as shown in Figure 10 2 3 1 Figure 10 1 Blade control bail 2 Upper handle 3 Starter handle Starting the Engine 1 Connect the wire to the spark plug Fig 11 m 3662 1 2 Figure 11 1 Spark plug wire 2 Primer 2 Push the primer three times waiting two seconds between each push...

Page 13: ...he lawn mower activating the self propelled drive The faster you walk the farther the handle will slide and the faster the lawn mower will propel Fig 14 m 4206 Figure 14 Note The lawn mower propels at the maximum speed when you push in the upper handle as far forward as possible To slow down the drive simply slow your walking speed to stop the drive stop walking Fig 14 Note If when backing up afte...

Page 14: ...ss blades to the letters on the wheel The letter on the SmartWheel that matches the tips of the grass blades is the proper cutting height 4 Press down on the red button and hold the cutting height adjustment handle to move the cutting height up or down Fig 16 m 4781 1 2 Figure 16 1 Cutting height adjustment handle 2 Red button 5 Move lift up or press down on the handle to the desired cutting heigh...

Page 15: ...NTIAL HAZARD Thrown objects may result if the rear door does not close completely WHAT CAN HAPPEN Thrown objects can cause serious personal injury or death HOW TO AVOID THE HAZARD If you cannot close the rear door because grass clippings clog the discharge area stop the engine wait for all moving parts to stop and remove the grass clippings with a stick not your hand until the door closes complete...

Page 16: ...nd may cause the lawn mower to plug or the engine to stall WARNING POTENTIAL HAZARD Wet grass or leaves can cause you to slip and contact the blade WHAT CAN HAPPEN Blade contact can seriously injure you HOW TO AVOID THE HAZARD Mow only in dry conditions Clean clippings or leaves from the underside of the lawn mower deck after each mowing See Cleaning the Underside of the Lawn Mower Housing on page...

Page 17: ...the spring to reduce the acidity of the leaves Maintenance Recommended Maintenance Schedule Service Item Service Operation Each Use 5 Hours 25 Hours 50 Hours 100 Hours Check the engine oil before each use X Engine Oil Drain and refill the engine crankcase with fresh oil after the first five hours of operation Thereafter change the oil every 50 operating hours or yearly X Housing Clean built up gra...

Page 18: ...the wire from the spark plug before you do any maintenance Set the wire aside so that it does not accidentally contact the spark plug Checking the Engine Oil Level Before you use the lawn mower make sure that the oil level between the Add and the Full marks as shown on the dipstick Fig 8 If the oil level is below the Add mark add oil Refer to Filling the Crankcase with Oil on page 10 Changing the ...

Page 19: ...page 24 3 Tip the lawn mower onto its left side and secure it to prevent it from falling 4 Place a drain pan under the lawn mower 5 Remove the oil drain plug return the lawn mower to its operating position and allow the oil to drain into the drain pan Fig 21 Avoid spilling the oil on the belt IMPORTANT You may need to move the blade to get to the oil drain plug Move the blade as little as possible...

Page 20: ...EN Contact with thrown debris or blade contact will cause injury or death HOW TO AVOID THE HAZARD Replace a broken or missing washout fitting immediately before using the lawn mower again Plug any hole s in the lawn mower with bolts and locknuts Never put your hands or feet under the lawn mower or through openings in the lawn mower Scraping Method If washing does not remove all the debris from und...

Page 21: ... the two knobs IMPORTANT Do not operate the engine without the air cleaner element extreme engine wear and damage may result Maintaining the Blade A straight sharp blade provides maximum cutting performance Regularly inspect and sharpen the blade WARNING POTENTIAL HAZARD The blade is sharp WHAT CAN HAPPEN Contact with a sharp blade can cause serious personal injury HOW TO AVOID THE HAZARD Wear glo...

Page 22: ... the blade stiffener in place can cause the blade to flex bend or break WHAT CAN HAPPEN A broken blade could cause serious injury or death to the operator or bystanders HOW TO AVOID THE HAZARD Do not operate the lawn mower without the blade stiffener 1 Grasp the end of the blade using a rag or a thickly padded glove 2 Remove the blade bolt the lock washer the blade and the blade stiffener Fig 25 N...

Page 23: ...he top speed begins to slow on the lawn mower adjust the self propel drive cable 1 Stop the engine and wait for all moving parts to stop 2 Remove the belt cover 3 Loosen the cable support nut Fig 30 m 4205 1 2 3 4 Figure 30 1 Cable jacket 2 Cable support 3 Nut 4 Upper handle 4 Push the belt guide tab down until it contacts the lawn mower then hold it in place Fig 31 m 4785 1 Figure 31 1 Belt guide...

Page 24: ...attery Electric Start Model only Charge a new or stored battery for 72 continuous hours to ensure a full charge The engine comes with an alternator which charges the battery during operation You do not need to charge the battery after each mowing During the lawn mowing season charge the battery for 48 hours every month or as needed IMPORTANT Do not overcharge the battery 1 Stop the engine and wait...

Page 25: ...rt 1 Fill the fuel tank with fresh gasoline 2 Press the primer three times 3 Connect the spark plug wire 4 Clean the spark plug check the spark plug gap and replace the spark plug if it is damaged Engine starts hard or loses power 1 Drain and fill the fuel tank with fresh gasoline g 2 Check the gasoline cap for ventilation if the cap does not vent air replace it 3 Clean the air filter 4 Clean the ...

Page 26: ... periods of time Do not store lawn mower with fuel in the tank in an enclosure with an open flame Example a furnace or water heater pilot light Allow the engine to cool before storing in any enclosure Empty the fuel tank when mowing the last time before storing the lawn mower 1 Run the lawn mower until the engine stops from running out of fuel 2 Prime the engine and start it again 3 Allow the engi...

Page 27: ...r handle section forward until it rests on the engine Fig 34 m 4790 Figure 34 4 Carefully swing the upper handle section rearward until it rests flat Fig 34 Removing from Storage WARNING POTENTIAL HAZARD Folding or unfolding the handle improperly can pinch stretch or damage one or more of the cables WHAT CAN HAPPEN Any pinched stretched or damaged cable may cause an operational failure that result...

Page 28: ......

Reviews: