Adjustments
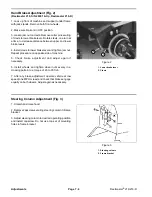
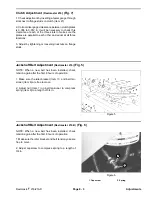
Hand Brake Adjustment (Fig. 1)
(Reelmaster 216 - S/N 19999 & Below)
Brake spacers
Figure 1
1. Jack up front of machine and support under frame
D. Right brake shoe should have approximately
with jack stands. Remove both front wheels.
1/16 in. clearance from upper and lower brake spac
ers in an approximately centered position. Use the
2. Make sure there are four (4) return springs on each
following procedure to adjust:
return spring bracket.
1) Loosen two (2) capscrews (Item 12) on left
NOTE: The upper two (2) springs (Item 17) are stronger
brake arm which hold slide plates (Item 15, 16).
than the lower springs (Item 21).
2) Put shims between right brake shoe and upper
and lower brake spacers.
3. Check operation of brake lever and linkage to make
3) While holding left brake shoe against brake
sure it moves freely without binding.
spacers, tap slide plates down against roll pin and
secure slide plates in this position.
4. A properly adjusted brake will have the following
4) Remove shims from behind right brake shoe.
clearances:
5. Clean any rust or debris from inside of wheel rims.
A. With handle fully released, left brake shoe should
Install wheels and tighten wheel nuts evenly in a cross
rest solidly against upper and lower brake spacers
ing pattern to a torque of 45 to 65 ft-lb.
in an approximately centered position.
6. After any brake adjustment, operate vehicle at low
B. There should be approximately 1/32 in. clearance
speed (one MPH or less) and check that brakes engage
between L.H. brake arm and lug nut (Item 27).
equally on both wheels. Adjust again as necessary.
C. Spring (Item 11) should be compressed with the
nut to a length of 3/4 in.
Reelmaster
®
216/216-D
Page 7 - 3
Adjustments
Summary of Contents for reelmaster 216
Page 2: ...This page is blank ...
Page 4: ...This page is blank ...
Page 8: ...Safety Instructions Page 1 4 Reelmaster 216 216 D ...
Page 12: ...Torque Specifications Page 2 4 Rev B Reelmaster 216 216 D ...
Page 26: ...Adjustments Page 4 4 Reelmaster 216 216 D ...
Page 40: ...Troubleshooting Page 5 14 Reelmaster 216 216 D ...
Page 42: ...Troubleshooting Page 5 16 Reelmaster 216 216 D ...
Page 72: ...Repairs Page 5 46 Reelmaster 216 216 D ...
Page 75: ...Reelmaster 216 S N 10001 19999 Reelmaster 216 216 D Page 6 3 Wiring Schematics ...
Page 76: ...Reelmaster 216 S N 20001 Up Wiring Schematics Page 6 4 Reelmaster 216 216 D ...
Page 77: ...Reelmaster 216 D Reelmaster 216 216 D Page 6 5 Wiring Schematics ...
Page 114: ...Repairs Page 7 8 Reelmaster 216 216 D ...
Page 124: ...Repairs Page 8 10 Reelmaster 216 216 D ...
Page 143: ...This page is blank ...

