Jackshaft, Bearing and Clutch Service
(Reelmaster 216-D
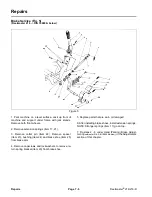
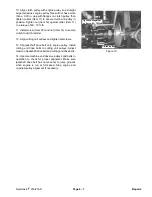
) (Fig. 9)
Figure 9
1. Remove tension from cutting unit drive belts and
jackshaft drive belt.
2. Remove nut (Item 14) and screw (Item 29) securing
clutch to clutch retainer.
3. With cutting unit belts off of pulleys, remove cap
screws (Item 5) and locknuts (Item 28) securing bearing
supports (Item 6) to frame. Slip jackshaft drive belt
(Item 37) off of clutch pulley (Item 36), lower jackshaft
assembly and slide it out from under the machine.
4. Loosen pulley set screws (Item 3). Remove pulleys
(Item 4), keys (Item 1), bearing assemblies (Item 7) and
locking collars (Item 9) from shaft (Item 2).To remove
eccentric locking collars, loosen setscrew (Item 10) and
turn locking collar in opposite direction of shaft rotation.
5. Loosen nut (Item 12). Loosen screws (Item 34).
Remove collars (Item 11), sleeve with nut, (Item 40),
spacers (Item 35) and clutch/pulley assembly
(Item 39, 36)
6. Inspect bearings (Item 8) and replace if necessary. If
replacing bearing, remove bearing assembly (Item 7)
from bearing support (Item 6). Install bearing flanges so
grease zerks are accessible from front of machine on
right side and from rear on left side.
7. Thoroughly clean jackshaft with solvent - degreaser
before assembling. Apply anti-seize compound to keys,
then assemble parts to jackshaft. Do not tighten collars
(Item 11) or locking collars (Item 9).Do not tighten pulley
setscrews.
8. Put belts around pulleys and mount jackshaft assem
bly to frame. Bearing assemblies (Item 7) should be
mounted to bearing supports (Item 6) with capscrews
(Item 31) snug, but not tightened.
9. Rotate shaft so self-aligning bearings can find the
proper alignment position. Tighten bearing mounting
capscrews. Set eccentric lock collars against bearings
by turning lock collars in direction of shaft rotation, then
tighten the set screws.
Repairs
Page 8 - 6
Reelmaster
®
216/216-D
Summary of Contents for reelmaster 216
Page 2: ...This page is blank ...
Page 4: ...This page is blank ...
Page 8: ...Safety Instructions Page 1 4 Reelmaster 216 216 D ...
Page 12: ...Torque Specifications Page 2 4 Rev B Reelmaster 216 216 D ...
Page 26: ...Adjustments Page 4 4 Reelmaster 216 216 D ...
Page 40: ...Troubleshooting Page 5 14 Reelmaster 216 216 D ...
Page 42: ...Troubleshooting Page 5 16 Reelmaster 216 216 D ...
Page 72: ...Repairs Page 5 46 Reelmaster 216 216 D ...
Page 75: ...Reelmaster 216 S N 10001 19999 Reelmaster 216 216 D Page 6 3 Wiring Schematics ...
Page 76: ...Reelmaster 216 S N 20001 Up Wiring Schematics Page 6 4 Reelmaster 216 216 D ...
Page 77: ...Reelmaster 216 D Reelmaster 216 216 D Page 6 5 Wiring Schematics ...
Page 114: ...Repairs Page 7 8 Reelmaster 216 216 D ...
Page 124: ...Repairs Page 8 10 Reelmaster 216 216 D ...
Page 143: ...This page is blank ...


