Cutting Unit Clutch (Reel Drive) Switch (Fig. 11, 12)
Reelmaster 216 (S/N 19999 and below)
To test switch independent of wiring harness, discon
nect wire harness connector(s) from switch terminals.
When the switch is ON (Engage), there should be
continuity between terminals A – B only. When the
switch is OFF (Disengage), terminals C – D and B – E
should show continuity.
Reelmaster 216
(S/N 20001 and up)
Reelmaster 216-D
To test switch independent of wiring harness, discon
nect wire connector(s) from switch terminals. When the
switch is ON (Engage), there should be continuity be
tween terminals 5 – 6 only. When the switch is OFF
(Disengage), terminals 1 – 2 and 4 – 5 should show
continuity.
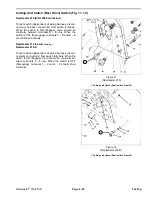
1
Figure 11
(Reelmaster 216)
1. Cutting unit clutch (Reel) switch (Item 20)
1
Figure 12
(Reelmaster 216-D)
1. Cutting unit clutch (Reel) switch (Item 24)
Reelmaster
®
216/216-D
Page 6 - 23
Testing
Summary of Contents for reelmaster 216
Page 2: ...This page is blank ...
Page 4: ...This page is blank ...
Page 8: ...Safety Instructions Page 1 4 Reelmaster 216 216 D ...
Page 12: ...Torque Specifications Page 2 4 Rev B Reelmaster 216 216 D ...
Page 26: ...Adjustments Page 4 4 Reelmaster 216 216 D ...
Page 40: ...Troubleshooting Page 5 14 Reelmaster 216 216 D ...
Page 42: ...Troubleshooting Page 5 16 Reelmaster 216 216 D ...
Page 72: ...Repairs Page 5 46 Reelmaster 216 216 D ...
Page 75: ...Reelmaster 216 S N 10001 19999 Reelmaster 216 216 D Page 6 3 Wiring Schematics ...
Page 76: ...Reelmaster 216 S N 20001 Up Wiring Schematics Page 6 4 Reelmaster 216 216 D ...
Page 77: ...Reelmaster 216 D Reelmaster 216 216 D Page 6 5 Wiring Schematics ...
Page 114: ...Repairs Page 7 8 Reelmaster 216 216 D ...
Page 124: ...Repairs Page 8 10 Reelmaster 216 216 D ...
Page 143: ...This page is blank ...


