Rev. B
Reelmaster 6500–D/6700–D
Page 5 – 48
Electrical System
#6 and #7 Reel On/Off Solenoids
1. Disconnect the wire connector.
2. Connect a 12 volt battery so the positive (+) battery
terminal is connected to colored solenoid lead. Connect
the negative (–) battery terminal to black lead. The valve
spool should retract completely as 12 V.D.C. is applied
between leads.
3. If valve spool does not operate properly check for
binding or damage to valve.
4. If valve moves smoothly, but does not engage when
12 V.D.C. is applied to solenoid leads, replace solenoid
coil.
5. If valve still does not operate after replacing solenoid
coil, replace the valve.
Solenoid coil resistance:
3.5 Ohms (+ 10%) at 77
_
F (25
_
C)
3
1
2
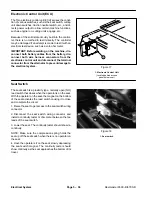
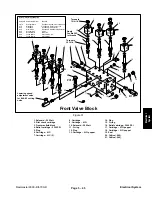
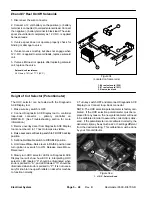
Figure 34
(Located on frame rails)
1. #6 reel solenoid (S10)
2. #7 reel solenoid (S11)
3. Rear valve block
Height of Cut Selector (Potentiometer)
The HOC selector can be tested with the Diagnostic
ACE Display tool.
1. Make sure key switch is OFF.
2. Connect Diagnostic ACE Display tool to controller
loop–back connector – primary controller on
RM6700–D. (See Troubleshooting section for more
information.)
3. Remove overlay decal from Diagnostic ACE Display
tool so numbers 0 to 17 next to lamps are visible.
4. Raise seat and set Backlap switch to FRONT backlap
position.
5. Set Enable/Disable switch to DISABLE position.
6. Hold Lower/Mow–Raise lever in RAISE position and
turn ignition key switch to ON. Release Lower/Mow–
Raise lever.
8. Slowly turn HOC selector. LED’s on Diagnostic ACE
Display tool will show how ECU is interpreting HOC
selector. LED labeled “0” should be illuminated when
knob is pointed to “A”, and LED labeled “15” should be
illuminated when knob is pointed to “P”. It is not neces-
sary for knob to line up with letters on decal for machine
to function normally.
9. Turn key switch OFF and disconnect Diagnostic ACE
Display tool. Connect loop–back connector.
NOTE: The HOC selection potentiometer is factory cali-
brated. If the HOC selection potentiometer must be re-
placed for any reason, the new potentiometer will need
to be calibrated in order to assure the correct clip is deliv-
ered. If the potentiometer is not calibrated correctly, the
delivered clip may be as much as 2 or 3 settings different
from the desired setting. This calibration must be done
by your Toro distributor.
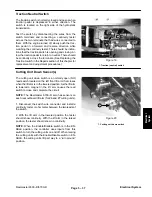
Figure 34a
1. H.O.C. Selector Knob
1
Summary of Contents for REELMASTER 6500 D
Page 2: ...Reelmaster 6500 D 6700 D ...
Page 4: ...Reelmaster 6500 D 6700 D ...
Page 10: ...Reelmaster 6500 D 6700 D Page 1 6 Safety ...
Page 12: ...Reelmaster 6500 D 6700 D Page 2 2 Product Records and Manuals Equivalents and Conversions ...
Page 20: ...Rev C Reelmaster 6500 D 6700 D Page 2 10 Product Records and Manuals ...
Page 24: ...Rev C Reelmaster 6500 D 6700 D Page 2 14 Product Records and Manuals ...
Page 86: ...Engine Page 3 62 Reelmaster 6500 D 6700 D ...
Page 202: ...Reelmaster 6500 D 6700 D Page 5 8 2 Electrical System Rev C This page is intentionally blank ...
Page 226: ...Reelmaster 6500 D 6700 D Page 5 26 6 Electrical System Rev B This page is blank ...
Page 276: ...Reelmaster 6500 D 6700 D Page 6 22 Axles Planetaries and Brakes ...
Page 300: ...Reelmaster 6500 D 6700 D Page 7 24 Cutting Units Rev B Model 03853 Model 03854 Model 03855 ...

