Reelmaster 7000
Page 6 -- 22
Axles, Planetaries and Brakes
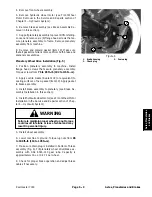
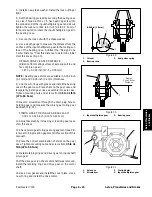
9. Remove the bevel gear case/axle case assembly
from the axle support. Coat a new O-ring with grease
and temporarily install the axle cover assembly. Position
a dial indicator at the tooths center. Prevent the axle
from turning and measure the lower bevel gear to axle
gear backlash (Fig. 22).
LOWER BEVEL GEAR BACKLASH:
0.004 to 0.016 inch (0.10 to 0.40 mm)
10.Adjust backlash by increasing or reducing axle bear-
ing shim thickness (see Axle Shafts in this section of this
manual).
NOTE:
Axle bearing shims are available in 0.008 inch
(0.2 mm), 0.012 inch (0.3 mm) and 0.020 inch (0.5 mm)
thickness.
11.Tighten axle cover screws from
17 to 20 ft-lb (23 to
27 N--m)
.
12.Coat a new O-ring with grease and install the bevel
gear case/axle case assembly on the axle support.
Tighten mounting screws and nuts from
35 to 41 ft-lb
(47 to 56 N--m)
(Fig. 13).
Differential Shafts
The following procedures assume the rear axle assem-
bly has been removed from the machine.
Removal
IMPORTANT: Do not interchange right and left dif-
ferential shaft assemblies.
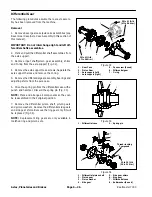
1. Remove the mounting screws, nuts and lock wash-
ers. Remove the bevel gear case/axle case assembly
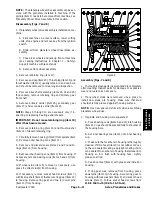
and O-ring from the axle support (Fig. 23).
2. Mark and pull the differential shaft assembly from the
axle support.
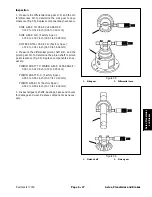
3. Remove the retaining ring and bevel gear (Fig 24).
4. Drive the differential shaft out of the bearings. Re-
move the bearings and bearing shims.
5. Inspect all gears, shafts, bearings and cases for
damage and wear. Replace components as necessary.
Installation
1. Press bearings onto differential shaft. Place correct
combination of bearing shims in axle support and drive
differential shaft and bearing assembly into axle sup-
port.
2. Install bevel gear and retaining ring.
3. Coat new O-ring with grease. Align differential shaft
splines with differential gear assembly and slide differ-
ential shaft assembly onto axle support.
4. Install bevel gear case/axle case assembly (see
Bevel Gear Case/Axle Case Assembly in this section of
this manual).
1
2
3
4
5
6
1. Cap screw (4 used)
2. Lock nut (2 used)
3. Lock washer (2 used)
4. Axle support
5. Bevel gear/axle case
assembly
6. O-ring
7. Stud (2 used)
Figure 23
7
35 to 41 ft--lb
(47 to 56 N--m)
35 to 41 ft--lb
(47 to 56 N--m)
1
2
3
4
5
6
1. Retaining ring
2. Bevel gear
3. Differential shaft
4. Bearing
5. Bearing shims
6. O-ring
Figure 24
Summary of Contents for Reelmaster 7000
Page 2: ...Reelmaster 7000 This page is intentionally blank ...
Page 4: ...Reelmaster 7000 This page is intentionally blank ...
Page 10: ...Reelmaster 7000 Page 1 6 Safety This page is intentionally blank ...
Page 12: ...0 09375 Reelmaster 7000 Page 2 2 Product Records and Maintenance Equivalents and Conversions ...
Page 34: ...Reelmaster 7000 Page 3 18 Kubota Diesel Engine This page is intentionally blank ...
Page 36: ...Reelmaster 7000 Hydraulic System Page 4 2 This page is intentionally blank ...
Page 45: ...Reelmaster 7000 Hydraulic System Page 4 11 This page is intentionally blank Hydraulic System ...
Page 115: ...Reelmaster 7000 Hydraulic System Page 4 81 This page is intentionally blank Hydraulic System ...
Page 131: ...Reelmaster 7000 Hydraulic System Page 4 97 This page is intentionally blank Hydraulic System ...
Page 139: ...Reelmaster 7000 Hydraulic System Page 4 105 This page is intentionally blank Hydraulic System ...
Page 147: ...Reelmaster 7000 Hydraulic System Page 4 113 This page is intentionally blank Hydraulic System ...
Page 151: ...Reelmaster 7000 Hydraulic System Page 4 117 This page is intentionally blank Hydraulic System ...
Page 168: ...Reelmaster 7000 Hydraulic System Page 4 134 This page is intentionally blank ...
Page 214: ...Reelmaster 7000 Page 5 46 Electrical System This page is intentionally blank ...
Page 247: ...Reelmaster 7000 Page 7 3 Chassis This page is intentionally blank Chassis ...
Page 264: ...Reelmaster 7000 Page 7 20 Chassis This page is intentionally blank ...
Page 271: ...Reelmaster 7000 DPA Cutting Units Page 8 7 This page is intentionally blank DPA Cutting Units ...
Page 304: ...Reelmaster 7000 DPA Cutting Units Page 8 40 This page is intentionally blank ...
Page 306: ...Reelmaster 7000 Foldout Drawings Page 9 2 This page is intentionally blank ...
Page 310: ...Page 9 6 Reelmaster 7000 Main Wire Harness ...
Page 312: ...Page 9 8 Reelmaster 7000 Seat and Console Wire Harness ...
Page 314: ...Page 9 10 Reelmaster 7000 Power Center Wire Harness ...

