background image

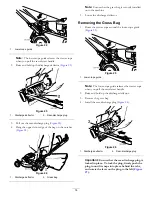
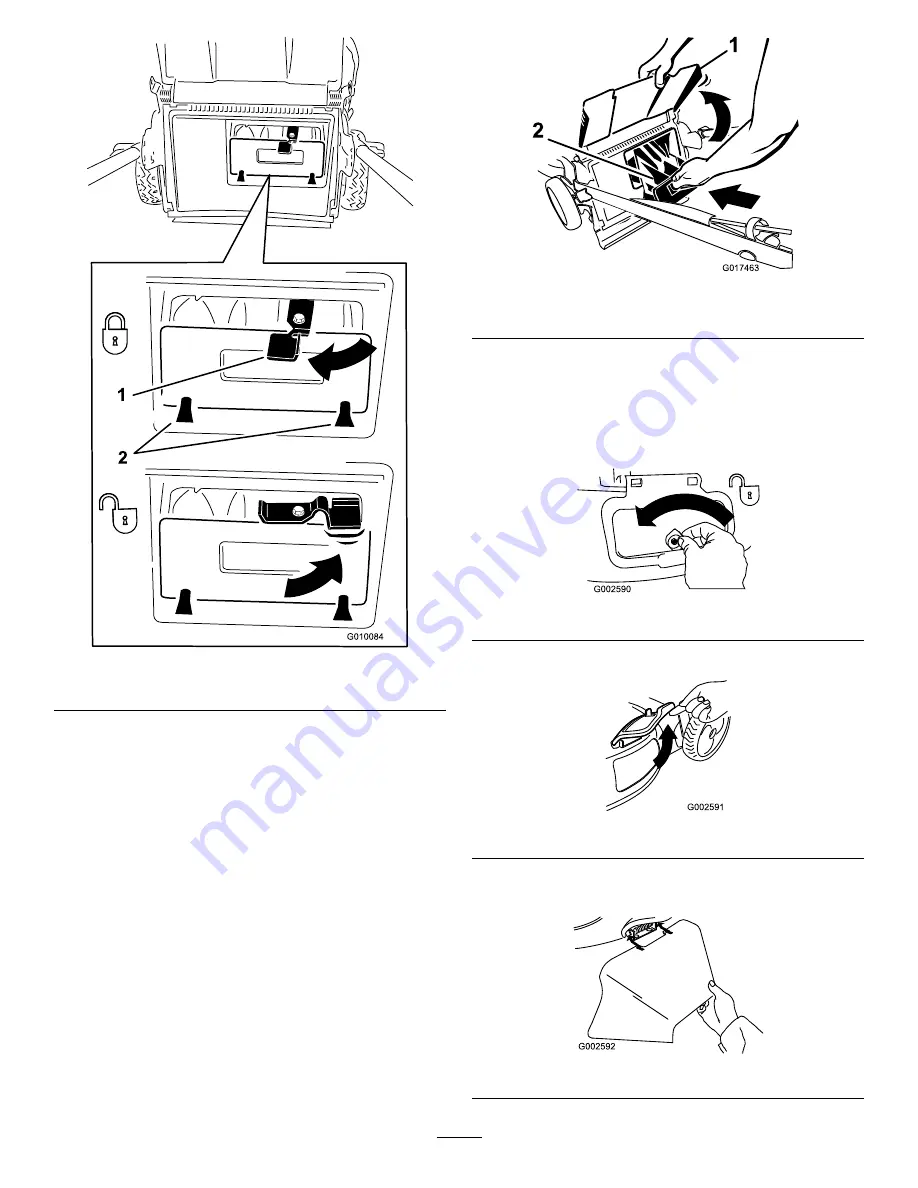
Figure 27

1.

Lever

2.

Tabs

Note:

To unlock the plug, rotate the lever on the plug

to the right (

Figure 27

).

5.

Lower the discharge deflector.

Side-Discharging the
Clippings

Use the side-discharge feature for cutting very tall grass.

If the bag is on the machine, remove it and insert the
rear-discharge plug; refer to

Removing the Grass Bag (page

14)

before side-discharging the clippings.

Important:

Ensure that the rear-discharge plug is

locked in place. To lock the plug: Raise the discharge
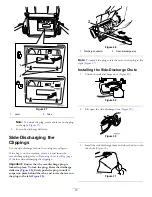
deflector (

Figure 28

), firmly push the plug in until it

snaps into place behind the tabs, and rotate the lever on
the plug to the left (

Figure 28

).

G017463

Figure 28

1.

Discharge deflector

2.

Rear-discharge plug

Note:

To unlock the plug, rotate the lever on the plug to the

right (

Figure 27

).

Installing the Side-Discharge Chute

1.

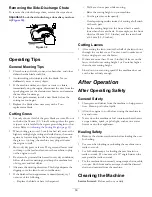
Unlock the side-discharge door (

Figure 29

).

Figure 29

2.

Lift open the side-discharge door (

Figure 30

).

Figure 30

3.

Install the side-discharge chute and close the door onto
the chute (

Figure 31

).

Figure 31

15
 

Summary of Contents for Super Recycler 20381

Page 1: ...calls attention to special mechanical information and Note emphasizes general information worthy of special attention WARNING CALIFORNIA Proposition 65 Warning This product contains a chemical or chemicals known to the State of California to cause cancer birth defects or other reproductive harm The engine exhaust from this product contains chemicals known to the State of California to cause cancer...

Page 2: ...esigned in accordance with ANSI B71 1 2012 General Safety This product is capable of amputating hands and feet and of throwing objects Always follow all safety instructions to avoid serious personal injury Using this product for purposes other than its intended use could prove dangerous to you and bystanders Read and understand the contents of this Operator s Manual before you start the engine Ens...

Page 3: ...ed decals Manufacturer s Mark 1 Indicates the blade is identified as a part from the original machine manufacturer 94 8072 104 7403 Electric start model only 104 7953 Electric start model only 1 Warning read the Operator s Manual for information on charging the battery contains lead do not discard 2 Read the Operator s Manual 3 ...

Page 4: ...112 8867 1 Lock 2 Unlock 115 2884 Handle Position Adjustment 115 2896 Electric start model only 115 8411 1 Unlocked 2 Locked 117 2718 4 ...

Page 5: ...tion or push the cable s toward the engine to increase the traction 3 Tighten the knob by turning it clockwise 131 4514 1 Warning read the Operator s Manual 2 Cutting dismemberment hazard of hand or foot mower blade stay away from moving parts keep all guards and shields in place 3 Cutting dismemberment hazard of hand or foot mower blade disconnect the spark plug wire and read the instructions bef...

Page 6: ...hat the cables are routed to the outside of the handle If a cable is damaged contact an Authorized Service Dealer 1 Raise the rear of the machine housing to its highest cutting height setting by moving the 2 rear cutting height levers all the way forward Refer to Adjusting the Cutting Height page 11 2 Attach the handle ends to the machine housing with 2 washers and 2 handle bolts Figure 3 but do n...

Page 7: ...gent oil with an API service classification of SF SG SH SJ SL or higher G017459 Figure 6 1 The oil level is at its maximum 3 The oil level is too low add oil to the crankcase 2 The oil level is too high remove oil from the crankcase 3 Wipe off the dipstick end with a clean cloth 4 Insert the dipstick into the oil fill tube but do not screw it in 5 Remove the dipstick and read the oil level on the ...

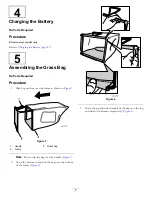
Page 8: ...rocedure 1 Slip the grass bag over the frame as shown in Figure 7 g027257 1 2 3 Figure 7 1 Handle 3 Grass bag 2 Frame Note Do not slip the bag over the handle Figure 7 2 Hook the bottom channel of the bag onto the bottom of the frame Figure 8 g027258 Figure 8 3 Hook the top and side channels of the bag onto the top and sides of the frame respectively Figure 8 8 ...

Page 9: ...l use the machine and remove all objects that the machine could throw Adjusting the cutting height may bring you into contact with the moving blade causing serious injury Shut off the engine remove the electric start button and wait for all moving parts to stop Do not put your fingers under the housing when adjusting the cutting height Fuel Safety DANGER Fuel is extremely flammable and highly expl...

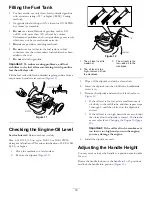
Page 10: ... 10W 30 detergent oil with an API service classification of SF SG SH SJ SL or higher 1 Move the machine to a level surface 2 Remove the dipstick Figure 12 G017459 Figure 12 1 The oil level is at its maximum 3 The oil level is too low add oil to the crankcase 2 The oil level is too high remove oil from the crankcase 3 Wipe off the dipstick end with a clean cloth 4 Insert the dipstick into the oil f...

Page 11: ...ove the electric start button and wait for all moving parts to stop before leaving the operating position When you release the blade control bar the engine should shut off and the blade should stop within 3 seconds If not stop using your machine immediately and contact an Authorized Service Dealer Operate the machine only in good visibility and appropriate weather conditions Do not operate the mac...

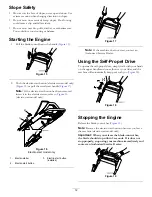
Page 12: ...start model only G020174 1 2 3 Figure 16 Electric start model only 1 Electric starter 3 Electric start button installed 2 Electric start button Figure 17 Note If the machine does not start contact an Authorized Service Dealer Using the Self Propel Drive To operate the self propel drive simply walk with your hands on the upper handle and your elbows at your sides and the machine will automatically ...

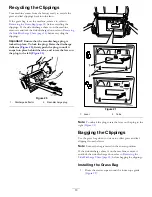
Page 13: ...lector Figure 20 firmly push the plug in until it snaps into place behind the tabs and rotate the lever on the plug to the left Figure 21 G017463 Figure 20 1 Discharge deflector 2 Rear discharge plug Figure 21 1 Lever 2 Tabs Note To unlock the plug rotate the lever on the plug to the right Figure 21 Bagging the Clippings Use the grass bag when you want to collect grass and leaf clippings from the ...

Page 14: ...nstalled onto the machine 5 Lower the discharge deflector Removing the Grass Bag 1 Route the starter rope around the lower rope guide Figure 25 G017473 Figure 25 1 Lower rope guide Note The lower rope guide releases the starter rope when you pull the recoil start handle 2 Raise and hold up the discharge deflector 3 Remove the grass bag 4 Install the rear discharge plug Figure 26 G017463 Figure 26 ...

Page 15: ...t the rear discharge plug is locked in place To lock the plug Raise the discharge deflector Figure 28 firmly push the plug in until it snaps into place behind the tabs and rotate the lever on the plug to the left Figure 28 G017463 Figure 28 1 Discharge deflector 2 Rear discharge plug Note To unlock the plug rotate the lever on the plug to the right Figure 27 Installing the Side Discharge Chute 1 U...

Page 16: ...e lawn for even fertilization If the finished lawn appearance is unsatisfactory try 1 or more of the following Replace the blade or have it sharpened Walk at a slower pace while mowing Raise the cutting height on your machine Cut the grass more frequently Overlap cutting swaths instead of cutting a full swath with each pass Set the cutting height on the front wheels a notch lower than the rear whe...

Page 17: ...e 33 G017477 1 Figure 33 1 Washout port 5 Turn the water on 6 Start the engine and run it until there are no more clippings that come out from under the machine 7 Stop the engine 8 Shut off the water and disconnect the garden hose from the machine 9 Start the engine and run it for a few minutes to dry the underside of the machine Folding the Handle WARNING Folding or unfolding the handle improperl...

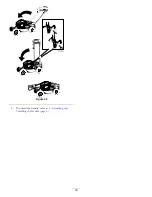
Page 18: ...G017467 Figure 35 3 To unfold the handle refer to 1 Assembling and Unfolding the Handle page 6 18 ...

Page 19: ...forming any maintenance procedure Wear gloves and eye protection when servicing the machine The blade is sharp contacting the blade can result in serious personal injury Wear gloves when servicing the blade Never tamper with safety devices Check their proper operation regularly Tipping the machine may cause the fuel to leak Fuel is flammable and explosive and can cause personal injury Run the engi...

Page 20: ... dirt into the air duct 7 Insert the foam pre filter and the paper air filter into the air cleaner 8 Install the cover Changing the Engine Oil Service Interval After the first 5 hours Yearly Run the engine a few minutes before changing the oil to warm it Warm oil flows better and carries more contaminants 1 Perform the pre maintenance procedures refer to Preparing for Maintenance page 19 2 Remove ...

Page 21: ...rature between 0 C 32 F and 41 C 105 F whenever possible 1 Connect the charger to the machine wiring harness located below the electric start button Figure 40 Figure 40 2 Plug the charger into a wall outlet Note When the battery no longer holds a charge recycle or dispose of the lead acid battery according to local codes Note Your battery charger may have a 2 color LED display that indicates the f...

Page 22: ...amine the blade whenever you run out of gasoline If the blade is damaged or cracked replace it immediately If the blade edge is dull or nicked have it sharpened or replace it WARNING The blade is sharp contacting the blade can result in serious personal injury Wear gloves when servicing the blade 1 Refer to Preparing for Maintenance page 19 2 Tip the machine onto its side with the air filter up 3 ...

Page 23: ...e engine to cool before storing it 1 On the last refueling of the year add fuel stabilizer to the fuel as directed by the engine manufacturer 2 Dispose of any unused fuel properly Recycle it according to local codes or use it in your automobile Note Old fuel in the fuel tank is the leading cause of hard starting Do not store fuel without stabilizer more than 30 days and do not store stabilized fue...

Page 24: ... the spark plug and tighten it with a torque wrench to 20 N m 15 ft lb 4 Perform any needed maintenance procedures refer to Maintenance page 19 5 Check the engine oil level refer to Checking the Engine Oil Level page 10 6 Fill the fuel tank with fresh gasoline refer to Filling the Fuel Tank page 10 7 Connect the wire to the spark plug 8 Charge the battery electric start model only 24 ...

Page 25: ...Notes 25 ...

Page 26: ...Notes 26 ...

Page 27: ...Notes 27 ...

Page 28: ...s Components failing due to normal wear Any product or part which has been altered or misused or neglected and requires replacement or repair due to accidents or lack of proper maintenance Pickup and delivery charges Repairs or attempted repairs by anyone other than an Authorized Toro Service Dealer Repairs necessary due to failure to follow recommended fuel procedure consult Operator s Manual for...

Reviews: