background image

TDC+ QUICK START GUIDE 

Page 17

 / 20


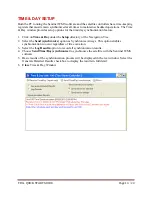
Watering Days (Schedule) 

Up to 16 unique watering day schedules can be defined. For identification, each schedule has a 
number assignment ranging from 1–16. To assign the program to one of the schedules, simply 
enter or scroll to the corresponding number in the “Selected Schedule” box. 
1.


In the 

Selected Schedule Box

, select 

Schedule 1.


2.


Click on the Days to Water

 in 6 Week schedule Displayed. Enter days individually in the 

check boxes, or complete Rows or Columns can be selected by clicking on the Week or Day 
label. 

3.


To name the schedule, enter a brief description in the text box above the schedule.  

4.


When finished editing the Schedule, choose 

Save


Note: To assign this schedule to another program (tab), simply select the number in the Select 
Schedule Box during program setup. 
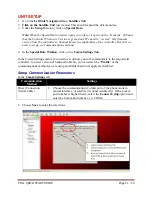
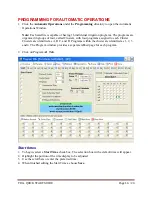
 

Station Run Times 

One of the most unique and powerful programming features of the Sentinel WMS software is the 
method used to organize and control satellite station outputs within each irrigation program. This 
method is referred to as “Program Slots.” 
 
Program Slots are organized in a sequential matrix at the bottom of a Program Window, defined 
by 4 rows of 12 Slots, for a total of 48 slot positions. The program cycle operating sequence 
begins at the first Slot in row 1, and ends at the last Slot in row 4.  
 
The station number is assigned to the label to the left of a slot and a run time duration ranging 
from 0 to 255 minutes is entered in the slot. Station numbers range from 0 (inactive) to 96. 
Stations can be assigned to slots in any order and as many times as preferred. If more than 48 
Slots are required; i.e., for a 96-station satellite, an additional program must be used to assign the 
remaining 48 stations. 
 
When an irrigation program is running, any slot with 0 (or blank) run time is ignored. A slot with 
an assigned run time duration 

1 minute, but without a station assignment, will create a pause in 

the watering cycle for the assigned duration. 

 
Note: 
A key to using the Slots programming method, is to remember that the number next to each 
slot is the assigned Station number, not the slot number. 

 
1.


Select a Slot

 by highlighting its label to the left.  

2.


Enter a Station Number. 

Multiple stations can be entered into a program using the Select 

stations option above the slots. 

3.


Enter a Run Time

 in the Slot 

4.


Repeat with additional Slots for all Stations in the  Program. 

5.


When finished entering Stations & Run Times, choose 

Save


Summary of Contents for TDC+

Page 1: ...TORO TDC 2 WIRE STARTUP GUIDE Version 6 4 2010...

Page 2: ...OVERVIEW Your TDC Controller Interface has three main elements to use throughout the programming process These are Display Navigation Keys Keypad Programming as covered in this User s Guide will be th...

Page 3: ...or navigating in Menus Submenus and Edit Modes as well an incrementing values in programming SCHEDULE PROGRAM GROUP Key Used for selecting Program Groups or Schedules run days when programming PROGRAM...

Page 4: ...W1 to W6 Week 1 one of Schedule up to Week 6 six of Schedule SENSOR 1 Sensor Activated Switch sensor is in alternate of its Normal condition E g If Normally Open then 1 Sensor Closed O Dry contact swi...

Page 5: ...ation Rain Off Days All Manuals Off All Autos Off Station Days Off UTILITY Time Day Day Change Hour Unit Code Station Count Program Clear N O Master Two Wire Irritrol Mode ALARMS Master Minimum Unexpe...

Page 6: ...y to view or change data in the submenu IMPORTANT When entering data into one of the submenus the controller is in the Edit Mode The controller will not begin any scheduled operation until you have ex...

Page 7: ...are Satellite Programming Directory Automatic Operations Setup Irrigation Program Software Satellite Programming Directory Unsent Changes Send Changes to Satellite SETTING CONTROLLER UNIT CODE IMPORTA...

Page 8: ...eft hand side of the upper tool bar 4 In the Software Setup Window that opens click on the Database Tab 5 Select Create new database 6 Name and save your database wherever you want your database files...

Page 9: ...ust enter the same unit code s as you entered in the field You may enter a unit description location etc at this time or do it later in the process 4 Click OK once Unit Code and Description are entere...

Page 10: ...grey serial cable included with TDC Controller to Serial Comm Port on the computer and the Serial Port on the back of the TDC Control Module CAUTION It is highly recommended to use an optical isolator...

Page 11: ...communications method 4 In the Special Data Window click on the Comm Settings Tab In the Comm Settings menu you need to set up how you will communicate to the target field controller In newer version...

Page 12: ...next to these fields to initiate the upload process from the satellite 3 Upon receiving the firmware data from the satellite choose Save to continue 4 Select the Max Stations On number based on the nu...

Page 13: ...e Gateway output boards On a TDC it is recommended that you designate and utilize the front serial port because computer programming occurs through the back port 8 Choose the Advanced tab 9 Under Stat...

Page 14: ...r the Setup directory of the Navigation Tree 2 Select the Send synchronize option as Synchronize Always This option enables synchronization to occur regardless of time variation 3 Select the Log Resul...

Page 15: ...Description for each station to aid identification but it is not required 2 On the Top of Zone Data Select Setup Toro 2 Wire This sets all stations as Toro 2 Wire stations For Each Two Wire Station 3...

Page 16: ...sters with four programs assigned to each Cluster Clusters are identified as A B C and D Programs within the cluster are identified as 1 2 3 and 4 The Program window provides a separate tabbed page fo...

Page 17: ...ottom of a Program Window defined by 4 rows of 12 Slots for a total of 48 slot positions The program cycle operating sequence begins at the first Slot in row 1 and ends at the last Slot in row 4 The s...

Page 18: ...of the Water Window is automatically terminated Continuous Run Selecting Continuous Run will automatically repeat the program cycle continuously for the defined Water Window duration Activate Auxilia...

Page 19: ...es from the keypad on the Sentinel CAUTION It is highly recommended to use an optical isolator in the serial connection between the laptop and the Sentinel If you are not using an isolator you should...

Page 20: ...START GUIDE Page 20 20 MIMINUM RECOMMENDED VERSIONS Sentinel WMS Software 3 1 0 9 and later TDC Control Module Firmware Version 2 46 Checksum ba47 or Version 2 46 Checksum 22D5 Version 2 47 any Checks...

Reviews: