31
2
3
m–5177
1
11-1/2 in.
(29.2 cm)
4
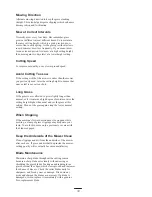
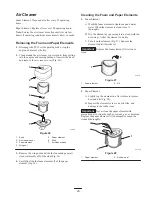
Figure 38
1.
Rear trunion rod
2.
Clevis pin and cotter pin
3.
Jam nut
4.
Yoke
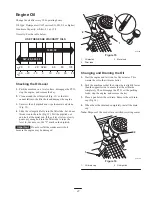
5. Set the height-of-cut at 3 in. (76 mm) and carefully
rotate the blades so they are facing front to rear
(Fig. 39).
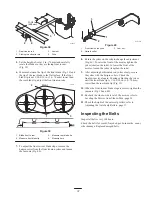
6. Measure between the tip of the front blade (Fig. 39) and
the tip of the rear blade to the flat surface. If the front
blade tip is not 1/16–5/16 in. (1.6–7.9 mm) lower than
the rear blade tip, adjust the front trunion rods.
Front
1078
1
2
3
4
4
Figure 39
1.
Blade front to rear
2.
Measure front blade tip
3.
Measure rear blade tip
4.
Measure here
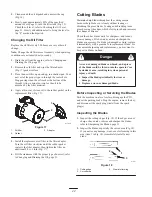
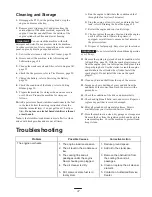
7. To adjust the front-to-rear blade slope, remove the
hairpin cotter from the front trunion yokes and loosen
the jam nuts (Fig. 40).
m–5178
1
2
3
Figure 40
1.
Front trunion rod yoke
2.
Hairpin cotter
3.
Jam nut
8. Rotate the yokes on the rods to change the adjustment
(Fig. 40). To raise the front of the mower, tighten the
yokes (shorten the rods). To lower the front of the
mower, loosen the yokes (lengthen the rods).
9. After adjusting both trunion rod yokes evenly, secure
the yokes with the hairpin cotters. Check the
front-to-rear level again. Continue adjusting the yokes
until the front blade tip is 1/16–5/16 in. (1.6–7.9 mm)
lower than the rear blade tip (Fig. 39).
10. When the front-to-rear blade slope is correct, tighten the
jam nuts (Fig. 38 and 40).
11. Recheck the side-to-side level of the mower; refer to
Leveling the Mower from Side-to-Side, page 30.
12. Check the height of the anti-scalp rollers; refer to
Adjusting the Anti-Scalp Rollers, page 17.
Inspecting the Belts
Inspect all belts every 100 hours.
Check the belts for cracks, frayed edges, burn marks, or any
other damage. Replace damaged belts.


