5-22
Digital Edition - TIMECUTTER® HD Service Manual
April 2017
CHASSIS
Fuel Tank (Cont.)
Installation
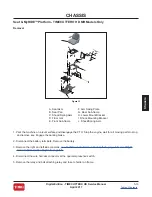
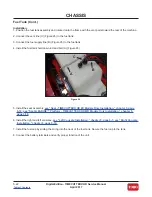
1. Position the fuel tank assembly and rotate it onto the frame with the vent ports toward the rear of the machine.
2. Connect the vent line (C) (Figure 26) to the fuel tank.
3. Connect the fuel supply line (B) (Figure 26) to the fuel tank.
4. Install the fuel tank hold down rod and bolt (A) (Figure 26).
5. Install the seat assembly,
see “Seat - TIMECUTTER® HD ZX Models Only Installation,” chapter 5, page
see “Seat & MyRIDE™ Platform - TIMECUTTER® HD MR Models Only Installation,” chapter 5,
6. Install the right and left consoles,
see “Left Console Installation,” chapter 5, page 5-7;
Installation,” chapter 5, page 5-10.
7. Install the fuel cap by sliding the d-ring into the neck of the fuel tank. Secure the fuel cap to the tank.
8. Connect the battery terminals and verify proper function of the unit.
A
B
C
Figure 26

