background image

TimeCutter

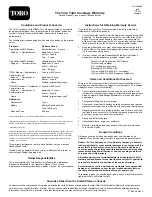
The Toro Total Coverage Warranty

and

TITAN

Mowers

Limited Warranty (see warranty periods below)

Conditions and Products Covered

The Toro Company and its affiliate, Toro Warranty Company, pursuant to
an agreement between them, jointly promise to the original purchaser
to repair the Toro Products listed below if defective in materials or
workmanship.

The following time periods apply from the date of purchase by the original
owner:

Products

Warranty Period

TimeCutter and MX Mowers

Residential use

2

– 3 years

Engines

1

— Residential use

Kawasaki – 3 years
Kohler – 3 years
Toro – 3 years

TimeCutter and MX Mowers

Commercial use 30 days

Engines

1

— Commercial use

Kawasaki – 3 years
Kohler – 90 days
Toro – 90 days

TITAN Mowers – Residential or
Commercial use

3 years or 240 hours

3

Engines

1

— Residential or

Commercial use

Kawasaki – 3 years
Kohler – 2 years

Frame

Lifetime (original owner only)

4

TITAN MX Mowers – Residential or
Commercial use

3 years or 400 hours

3

Engines

1

— Residential or

Commercial use

Kawasaki – 3 years
Kohler – 2 years

Frame

Lifetime (original owner only)

4

All Mowers

Attachments

1 year

Battery

90 days Parts and Labor
1 year Parts only

Belts and Tires

90 days

1

Some engines used on Toro Products are warranted by the engine manufacturer.

2

Residential use means use of the product on the same lot as your home. Use at more than one

location is considered commercial use and the commercial use warranty would apply.

3

Whichever occurs first.

4

Lifetime Frame Warranty - If the main frame, consisting of the parts welded together to form the

tractor structure that other components such as the engine are secured to, cracks or breaks in

normal use, it will be repaired or replaced, at Toro's option, under warranty at no cost for parts

and labor. Frame failure due to misuse or abuse and failure or repair required due to rust or

corrosion are not covered.

This warranty includes the cost of parts and labor, but you must pay
transportation costs.

Warranty may be denied if the hour meter is disconnected, altered, or
shows signs of being tampered with.

Owner Responsibilities

You must maintain your Toro Product by following the maintenance
procedures described in the

Operator's Manual

. Such routine

maintenance, whether performed by a dealer or by you, is at your expense.

Instructions for Obtaining Warranty Service

If you think that your Toro Product contains a defect in materials or
workmanship, follow this procedure:

1.

Contact any Authorized Toro Service Dealer to arrange service at their
dealership. To locate a dealer convenient to you, refer to the

Yellow

Pages

of your telephone directory (look under “Lawn Mowers”) or

access our web site at www.Toro.com. You may also call the numbers
listed in item #3 to use the 24-hour Toro Dealer locator system.

2.

Bring the product and your proof of purchase (sales receipt) to the
Service Dealer. The dealer will diagnose the problem and determine
if it is covered under warranty.

3.

If for any reason you are dissatisfied with the Service Dealer’s
analysis or with the assistance provided, contact us at:

Customer Care Department, RLC Division
Toro Warranty Company
8111 Lyndale Avenue South
Bloomington, MN 55420-1196
Toll free at 866-216-6029 (U.S. customers)
Toll free at 866-216-6030 (Canadian customers)

Items and Conditions Not Covered

There is no other express warranty except for special emission system
coverage and engine warranty coverage on some products. This express
warranty does not cover the following:

Cost of regular maintenance service or parts, such as filters, fuel,
lubricants, oil changes, spark plugs, air filters, blade sharpening/worn
blade on mowers, cable/linkage adjustments, or brake and clutch
adjustments

Components failing due to normal wear

Any product or part which has been altered or misused and requires
replacement or repair due to accidents or lack of proper maintenance

Repairs necessary due to improper battery care, failure to use fresh
fuel (less than one month old), or failure to properly prepare the unit
prior to any period of non-use over one month

Pickup and delivery charges

Operational misuse, neglect, or accidents

Repairs or attempted repairs by anyone other than an Authorized
Toro Service Dealer

General Conditions

All repairs covered by these warranties must be performed by an
Authorized Toro Service Dealer using Toro approved replacement parts.

Neither The Toro Company nor Toro Warranty Company is liable for
indirect, incidental or consequential damages in connection with the
use of the Toro Products covered by this warranty, including any
cost or expense of providing substitute equipment or service during
reasonable periods of malfunction or non-use pending completion
of repairs under this warranty.

All implied warranties of merchantability (that the product is fit for
ordinary use) and fitness for use (that the product is fit for a particular
purpose) are limited to the duration of the express warranty.

Some states do not allow exclusions of incidental or consequential
damages, or limitations on how long an implied warranty lasts, so
the above exclusions and limitations may not apply to you.

This warranty gives you specific legal rights, and you may also have other
rights which vary from state to state.

Countries Other than the United States or Canada

Customers who have purchased Toro products outside the United States or Canada should contact their Toro Distributor (Dealer) to obtain guarantee
policies for your country, province, or state. If for any reason you are dissatisfied with your Distributor's service or have difficulty obtaining guarantee
information, contact the Toro importer. If all other remedies fail, you may contact us at Toro Warranty Company.

374-0258 Rev C

Summary of Contents for TimeCutter MX 4260

Page 1: ...768 Rev A TimeCutter MX 4260 Riding Mower Model No 74640 Serial No 312000001 and Up To register your product or download an Operator s Manual or Parts Catalog at no charge go to www Toro com Original Instructions EN ...

Page 2: ...n Agency EPA and the California Emission Control Regulation of emission systems maintenance and warranty Replacements may be ordered through the engine manufacturer For models with stated engine horsepower the gross horsepower of the engine was laboratory tested by the engine manufacturer in accordance with SAE J1995 and rated to J2723 Introduction Read this information carefully to learn how to o...

Page 3: ...e by Hand 23 Grass Deflector 23 Operating Tips 24 Maintenance 26 Recommended Maintenance Schedule s 26 Premaintenance Procedures 27 Raising the Seat 27 Lubrication 27 Greasing the Bearings 27 Engine Maintenance 28 Servicing the Air Cleaner 28 Servicing the Engine Oil 29 Servicing the Spark Plug 31 Cleaning the Cooling System 32 Fuel System Maintenance 32 Replacing the In line Fuel Filter 32 Electr...

Page 4: ...y Always look down and behind before and while backing up Be aware of the mower discharge direction and do not point it at anyone Avoid discharging material against a wall or obstruction Material may ricochet back toward the operator Stop the blade s when crossing gravel surfaces Do not operate the machine without deflector discharge cover or entire grass collection system in place and working Be ...

Page 5: ...mall children Never carry children even with the blades off They may fall off and be seriously injured or interfere with safe machine operation Children who have been given rides in the past may suddenly appear in the mowing area for another ride and be run over or backed over by the mower Never allow children to operate the machine Use extra care when approaching blind corners shrubs trees the en...

Page 6: ...e s or wear gloves and use extra caution when servicing them Check for proper brake operation frequently Adjust and service as required Maintain or replace safety and instruction decals as necessary Use only genuine Toro replacement parts to ensure that original standards are maintained Toro Riding Mower Safety The following list contains safety information specific to Toro products or other safet...

Page 7: ... degrees Use the slope chart to determine the degree of slope of hills before operating Do not operate this machine on a slope greater than 15 degrees Fold along the appropriate line to match the recommended slope 2 Align this edge with a vertical surface a tree building fence pole etc 3 Example of how to compare slope with folded edge 7 ...

Page 8: ...ead the instructions before servicing or performing maintenance 2 Check tire pressure every 25 operating hours 3 Grease every 25 operating hours 4 Engine 110 6691 1 Thrown object hazard keep bystanders a safe distance from the machine 2 Thrown object hazard mower do not operate without the deflector discharge cover or grass collection system in place 3 Cutting dismemberment of hand or foot stay aw...

Page 9: ...ed as a part from the original machine manufacturer Battery Symbols Some or all of these symbols are on your battery 1 Explosion hazard 6 Keep bystandersa safe distance from the battery 2 No fire open flame or smoking 7 Wear eye protection explosive gases can cause blindness and other injuries 3 Caustic liquid chemical burn hazard 8 Battery acid can cause blindness or severe burns 4 Wear eye prote...

Page 10: ...119 8874 1 Low speed 2 High speed 10 ...

Page 11: ...121 0772 1 Fast 4 Choke 2 Continuous variable setting 5 Power take off PTO Blade control switch 3 Slow 11 ...

Page 12: ...isengage the blade control switch PTO proceed off the slope slowly 3 Cutting dismemberment hazard mower blade entanglement hazard belt stay away from moving parts keep all guards and shields in place 7 Crushing dismemberment hazard of bystanders reversing crushing dismemberment hazard of bystanders do not carry passengers look behind and down when reversing 4 Thrown object hazard keep bystanders a...

Page 13: ...8 6 11 12 Figure 4 1 Deflector 4 Height of cut lever 7 Footrest 10 Engine 2 Rear drive wheel 5 Operator seat 8 Fuel tank cap 11 Engine guard certain models only 3 Motion control levers 6 Smart Speed lever 9 Control panel 12 Front caster wheel 13 ...

Page 14: ...The blade control switch represented by a power take off PTO symbol engages and disengages power to the mower blades Figure 5 Motion Control Levers and Parking Brake Position The motion control levers are speed sensitive controls of independent wheel motors Moving a lever forward or backward turns the wheel on the same side forward or in reverse wheel speed is proportional to the amount the lever ...

Page 15: ...all of the safety instructions and decals in the safety section Knowing this information could help you your family pets or bystanders avoid injury DANGER Mowing on wet grass or steep slopes can cause sliding and loss of control Wheels dropping over edges can cause rollovers which may result in serious injury death or drowning A loss of traction is a loss of steering control To avoid loss of contr...

Page 16: ...ty Always place gasoline containers on the ground away from your vehicle before filling Do not fill gasoline containers inside a vehicle or on a truck or trailer bed because interior carpets or plastic truck bed liners may insulate the container and slow the loss of any static charge When practical remove gas powered equipment from the truck or trailer and refuel the equipment with its wheels on t...

Page 17: ...stabilizer conditioner to the gas Note A fuel stabilizer conditioner is most effective when mixed with fresh gasoline To minimize the chance of varnish deposits in the fuel system use fuel stabilizer at all times Filling the Fuel Tank Make sure the engine is shut off and the motion controls are in the park position Tank maximum capacity is 2 9 gallons Important Do Not overfill fuel tank Fill the f...

Page 18: ...control before starting a cold engine Figure 13 Note A warm or hot engine may not require choking g017699 4 5 Figure 13 1 Control panel 4 Slow 2 Throttle 5 Choke control 3 Fast 5 Turn the ignition key to Start to energize the starter When the engine starts release the key Figure 14 Important Do not engage the starter for more than 10 seconds at a time If the engine fails to start allow a 60 second...

Page 19: ...s Engaging the Blades Important Do not engage the blades when parked in tall grass Belt or clutch damage can occur 1 Release pressure on the motion control levers and place the machine in neutral 2 Move the throttle to the Fast position Note Always engage the blades with the throttle in the Fast position 3 Pull up on the blade control switch to move it to the On position and engage the blades Figu...

Page 20: ...ontrol switch to Off Figure 16 2 Move the throttle lever to between the Fast position Figure 13 3 Turn the ignition key to Off Figure 14 and remove the key Driving Driving the machine benefits from an understanding of what zero turn radius mower means The drive wheels turn independently powered by hydraulic motors on each axle hence one side can turn in reverse while the other turns forward causin...

Page 21: ... position Forward 1 Move the levers to the center unlocked position 2 To go forward slowly push the motion control levers forward Figure 17 G008952 Figure 19 To go straight apply equal pressure to both motion control levers Figure 19 To turn release pressure on the motion control lever toward the direction you want to turn Figure 19 The farther you move the motion control levers in either directio...

Page 22: ...ht of cut is controlled by the lever located to the right of the operating position Figure 21 G014476 1 2 3 Figure 21 1 Height of cut lever 3 4 5 inch 115 mm Transport position 2 Height of cut positions 1 Pull up and inward on the lever to move it to the desired cutting position 2 Once at the desired cutting position slowly lower the lever until it engages the position The transport position is th...

Page 23: ...he engine and wait for all moving parts to stop before leaving the operating position 3 Locate the bypass levers on the frame on both sides of the engine 4 Move the bypass levers forward through the key hole and down to lock them in place as shown in Figure 24 Ensure this is done for each lever 5 Move the motion control levers inward to the neutral position and turn the ignition key to the run pos...

Page 24: ... height used in the past is generally the best one to use When cutting grass longer than six inches tall you may want to cut the lawn twice to ensure an acceptable quality of cut Cut 1 3 of the Grass Blade It is best to cut only about 1 3 of the grass blade Cutting more than that is not recommended unless grass is sparse or it is late fall when grass grows more slowly Mowing Direction Alternate mo...

Page 25: ...es which slows growth and increases the chance of disease Check the cutter blades daily for sharpness and for any wear or damage File down any nicks and sharpen the blades as necessary If a blade is damaged or worn replace it immediately with a genuine Toro replacement blade 25 ...

Page 26: ...hange the engine oil more often in dusty dirty conditions Check the spark plug s Replace the in line fuel filter Every 200 hours Replace the paper element more often in dusty dirty conditions Change the oil filter more often in dusty dirty conditions Before storage Charge the battery and disconnect battery cables Perform all maintenance procedures listed above before storage Paint any chipped surf...

Page 27: ... Grease 1 Park the machine on a level surface and disengage the blade control switch 2 Move the motion control levers outward to the park position stop the engine remove the key and wait for all moving parts to stop before leaving the operating position 3 Clean the grease fittings Figure 25 and Figure 26 with a rag Make sure to scrape any paint off of the front of the fitting s 1 G014522 Figure 25...

Page 28: ...e position stop the engine remove the key and wait for all moving parts to stop before leaving the operating position 3 Clean around the air cleaner cover to prevent dirt from getting into the engine and causing damage Lift the cover and remove the hose clamp securing the air cleaner assembly to the engine Figure 27 4 Loosen the hose clamp and remove the paper element Figure 27 G014908 1 2 3 Figur...

Page 29: ...d WARNING Contact with hot surfaces may cause personal injury Keep hands feet face clothing and other body parts away the muffler and other hot surfaces Important Do not overfill the crankcase with oil because damage to the engine may result Do not run engine with oil below the low mark because the engine may be damaged 1 Park the machine on a level surface disengage the blade control switch stop ...

Page 30: ...ly pour approximately 80 of the specified oil into the filler tube and slowly add the additional oil to bring it to the Full mark Figure 31 G008796 2 3 4 5 6 1 Figure 31 Changing the Engine Oil Filter Service Interval Every 200 hours Change the oil filter more often in dusty dirty conditions Note Change the engine oil filter more frequently when operating conditions are extremely dusty or sandy 1 ...

Page 31: ... 76 mm Removing the Spark Plug 1 Disengage the PTO move the motion control levers to the neutral locked position and set the parking brake 2 Stop the engine remove the key and wait for all moving parts to stop before leaving the operating position Figure 33 Note Due to the deep recess around the spark plug blowing out the cavity with compressed air is usually the most effective method for cleaning...

Page 32: ...sion from gasoline can burn you and others and can damage property Perform any fuel related maintenance when the engine is cold Do this outdoors in an open area Wipe up any gasoline that spills Never smoke when draining gasoline and stay away from an open flame or where a spark may ignite the gasoline fumes Replacing the In line Fuel Filter Service Interval Every 100 hours Replace the in line fuel...

Page 33: ...Removing the Battery WARNING Battery terminals or metal tools could short against metal machine components causing sparks Sparks can cause the battery gasses to explode resulting in personal injury When removing or installing the battery do not allow the battery terminals to touch any metal parts of the machine Do not allow metal tools to short between the battery terminals and metal parts of the ...

Page 34: ...he battery is fully charged unplug the charger from the electrical outlet then disconnect the charger leads from the battery posts Figure 38 Figure 38 1 Positive battery post 3 Red charger lead 2 Negative battery post 4 Black charger lead Note Do not run the machine with the battery disconnected electrical damage may occur Installing the Battery 1 Position the battery in the tray Figure 37 2 Insta...

Page 35: ...sure can cause uneven cut Check the pressure at the valve stem Figure 40 Check the tires when they are cold to get the most accurate pressure reading Refer to the maximum pressure suggested by the tire manufacturer on the sidewall of the caster wheel tires Inflate the rear drive wheel tires to 12 psi Figure 40 1 Valve stem Releasing the Electric Brake The electric brake can be release by manually ...

Page 36: ... keep extra blades on hand WARNING A worn or damaged blade can break and a piece of the blade could be thrown into the operator s or bystander s area resulting in serious personal injury or death Inspect the blade periodically for wear or damage Replace a worn or damaged blade Before Inspecting or Servicing the Blades Park the machine on a level surface disengage the blade control switch and move ...

Page 37: ...ng edge and the level surface the machine is on G014972 1 2 3 Figure 43 1 Deck 3 Blade 2 Spindle housing 3 Measure from the tip of the blade to the flat surface here G014973 1 2 3 Figure 44 1 Blade in position for measuring 2 Level surface 3 Measured distance between blade and surface A 4 Rotate the same blade 180 degrees so that the opposing cutting edge is now in the same position G014974 1 2 3 ...

Page 38: ...ent blades made by other manufacturers may result in non conformance with safety standards Hold the blade end using a rag or thickly padded glove Remove the blade bolt curved washer blade stiffener and blade from the spindle shaft Figure 47 Figure 47 1 Sail area of blade 4 Blade bolt 2 Blade 5 Blade stiffener 3 Curved washer Sharpening the Blades 1 Use a file to sharpen the cutting edge at both en...

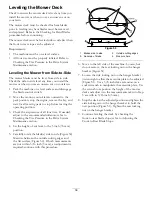
Page 39: ...t to the recommended inflation refer to Checking the Tire Pressure in the Drive System Maintenance section 4 Set the height of cut lever to the 3 inch 76 mm position 5 Carefully rotate the blade s side to side Figure 50 Measure between the outside cutting edges and the flat surface Figure 50 If both measurements are not within 3 16 inch 5 mm an adjustment is required continue with this procedure G...

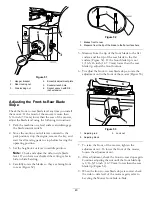
Page 40: ...eveling 4 Carefully rotate the blades so they are facing front to rear Figure 52 G009658 1 2 2 Figure 52 1 Blades front to rear 2 Measure from the tip of the blade to the flat surface here 5 Measure from the tip of the front blade to the flat surface and the tip of the rear blade to the flat surface Figure 52 If the front blade tip is not 1 16 5 16 inch 1 6 7 9 mm lower than the rear blade tip adj...

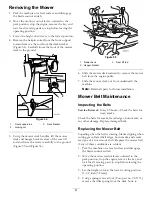
Page 41: ...ower deck rearward to remove the mower belt from the engine pulley 7 Slide the mower deck out from underneath the machine Note Retain all parts for future installation Mower Belt Maintenance Inspecting the Belts Service Interval Every 25 hours Check the belts for wear cracks Check the belts for cracks frayed edges burn marks or any other damage Replace damaged belts Replacing the Mower Belt Squeal...

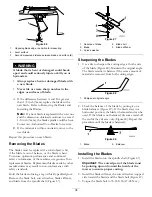
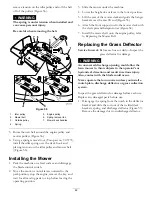
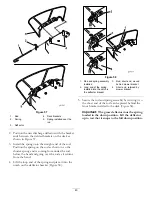
Page 42: ...er under the machine 4 Lower the height of cut lever to the lowest position 5 Lift the rear of the mower deck and guide the hanger brackets over the rear lift rod Figure 55 6 Attach the front support rod to the mower deck with the clevis pin and hairpin cotter Figure 54 7 Install the mower belt onto the engine pulley refer to Replacing the Mower Belt Replacing the Grass Deflector Service Interval ...

Page 43: ...urns from the bend 4 Lift the loop end of the spring and place it into the notch on the deflector bracket Figure 58 g017618 1 3 4 2 Figure 58 1 Rod and spring assembly installed 3 Rod short end moved behind mower bracket 2 Loop end of the spring installed into the notch in the deflector bracket 4 Short end retained by mower bracket 5 Secure the rod and spring assembly by twisting it so the short e...

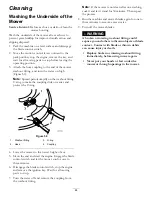
Page 44: ... ring 2 Hose 4 Coupling 4 Lower the mower to the lowest height of cut 5 Sit on the seat and start the engine Engage the blade control switch and let the mower run for one to three minutes 6 Disengage the blade control switch stop the engine and remove the ignition key Wait for all moving parts to stop 7 Turn the water off and remove the coupling from the washout fitting Note If the mower is not cl...

Page 45: ...as follows 10 Add a petroleum based stabilizer conditioner to the fuel in the tank Follow the mixing instructions from the stabilizer manufacturer Do not use an alcohol based stabilizer ethanol or methanol Note A fuel stabilizer conditioner is most effective when mixed with fresh gasoline and used at all times Run the engine to distribute the conditioned fuel through the fuel system 5 minutes Impo...

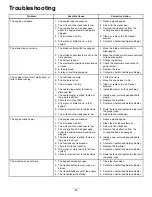
Page 46: ...l a new correctly gapped spark plug s 6 There is dirt in fuel filter 6 Replace the fuel filter 7 Dirt water or stale fuel is in fuel system 7 Contact an Authorized Service Dealer 8 There is incorrect fuel in the fuel tank 8 Drain the tank and replace the fuel with the proper type The engine will not start starts hard or fails to keep running 9 The oil level in the crankcase is low 9 Add oil to the...

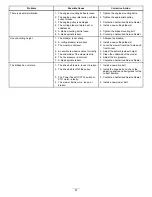
Page 47: ...nstall a new cutting blade s 3 The mower is not level 3 Level the mower from side to side and front to rear 4 An anti scalp wheel is not set correctly 4 Adjust the anti scalp wheel height 5 The underside of the mower is dirty 5 Clean the underside of the mower 6 The tire pressure is incorrect 6 Adjust the tire pressure Uneven cutting height 7 A blade spindle is bent 7 Contact an Authorized Service...

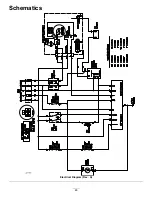
Page 48: ...Schematics g017655 Electrical Diagram Rev A 48 ...

Page 49: ...Notes 49 ...

Page 50: ...Notes 50 ...

Page 51: ...Notes 51 ...

Page 52: ...tor system 2 Bring the product and your proof of purchase sales receipt to the Service Dealer The dealer will diagnose the problem and determine if it is covered under warranty 3 If for any reason you are dissatisfied with the Service Dealer s analysis or with the assistance provided contact us at Customer Care Department RLC Division Toro Warranty Company 8111 Lyndale Avenue South Bloomington MN ...

Reviews: