background image

Safety

To reduce the potential for injury, comply with these
safety instructions and always pay attention to the safety
alert symbol, which means CAUTION, WARNING,
or DANGER-"personal safety instruction." Failure
to comply with the instruction may result in personal
injury or death.

Safe Operating Practices

This product is capable of amputating hands and feet and
throwing objects. Always follow all safety instructions to
avoid serious injury or death.

The following instructions are adapted from ANSI standard
B71.1-2012. All the language within this ANSI standard
applies to this machine; however, due to the application of
the standard across many different types of products some
statements can seem general or misleading. In these instances,
Toro has refined the statement to convey the meaning of the
standard while better matching the product this

Operator's

Manual

pertains. Safety information in addition to the

instructions found in the ANSI standard below can be found
in Toro Riding Mower Safety at the end of this section.

General Operation

Read, understand, and follow all instructions in the
operator's manual and on the machine before starting.

Do not place hands or feet near rotating parts or under
the machine. Keep clear of the discharge opening at all
times.

Allow only responsible adults who are familiar with the
instructions to operate the machine.

Clear the area of objects such as rocks, toys, wire, etc.,
which could be picked up and thrown by the blade.

Be sure the area is clear of other people before mowing.
Stop the machine if anyone enters the area.

Never carry passengers.

Do not mow in reverse unless absolutely necessary.
Always look down and behind before and while backing
up.

Be aware of the mower discharge direction and do not
point it at anyone. Avoid discharging material against a
wall or obstruction. Material may ricochet back toward
the operator. Stop the blade(s) when crossing gravel
surfaces.

Do not operate the machine without deflector, discharge
cover or entire grass collection system in place and
working.

Be alert, slow down and use caution when making turns.
Look behind and to the side before changing directions.

Never leave a running machine unattended. Always turn
off blades, set parking brake, stop engine, and remove key
before dismounting.

Turn off blades when not mowing. Stop the engine, wait
for all parts to come to a complete stop and remove the
key before cleaning the machine, removing the grass
catcher or unclogging the discharge chute.

Operate the machine only in daylight or good artificial
light.

Do not operate the machine while under the influence
of alcohol or drugs.

Watch for traffic when operating near or crossing
roadways.

Use extra care when loading or unloading the machine
into a trailer or truck.

Always wear eye protection when operating the mower.

Data indicates that operators, age 60 years and above, are
involved in a large percentage of riding mower-related
injuries. Operators should evaluate their ability to operate
the riding mower safely enough to protect themselves and
others from serious injury.

Always follow the recommendations for any application
of counterweights.

Lightning can cause severe injury or death. If lightning
is seen or thunder is heard in the area, do not operate
the machine; seek shelter.

Slope Operation

Slopes are a major factor related to loss of control and
tip-over accidents, which can result in severe injury or death.
Operation on all slopes requires extra caution. If you cannot
back up the slope or if you feel uneasy on it, do not mow it.

Do not mow slopes greater than 15 degrees.

Watch for ditches, holes, rocks, dips, and rises that change
the operating angle, as rough terrain could overturn the
machine.

Choose a low ground speed so you will not have to stop
while operating on a slope.

Do not mow slopes when grass is wet. Slippery
conditions reduce traction and could cause sliding and
loss of control.

Always keep the drive wheels engaged when going down
slopes. Do not shift to neutral and coast downhill.

Reduce speed and use extreme caution on slopes.

Do not make sudden turns or rapid speed changes.

Remove or mark obstacles such as rocks, tree limbs, etc.
from the mowing area. Tall grass can hide obstacles.

Avoid sudden starts when mowing uphill because the
mower may tip backwards.

Be aware that loss of traction may occur going downhill.
Weight transfer to the front wheels may cause drive
wheels to slip and cause loss of braking and steering.

4


Summary of Contents for TimeCutter SWX 5050

Page 1: ...Form No 3396 343 Rev A TimeCutter SWX 5050 Riding Mower Model No 74797 Serial No 315000001 and Up Register at www Toro com Original Instructions EN 3396 343 A ...

Page 2: ...E J1940 As configured to meet safety emission and operating requirements the actual engine torque on this class of mower will be significantly lower Go to www Toro com to view specifications on your mower model Introduction This machine is a ride on rotary blade lawn mower intended to be used by homeowners in residential applications It is primarily designed for cutting grass on well maintained la...

Page 3: ...Loading the Machine 23 Operating Tips 24 Maintenance 26 Recommended Maintenance Schedule s 26 Premaintenance Procedures 27 Raising the Seat 27 Raising the Front of the Machine 27 Lubrication 27 Greasing the Bearings 27 Engine Maintenance 28 Servicing the Air Cleaner 28 Servicing the Engine Oil 29 Servicing the Spark Plug 31 Cleaning the Cooling System 32 Fuel System Maintenance 32 Replacing the In...

Page 4: ...e before changing directions Never leave a running machine unattended Always turn off blades set parking brake stop engine and remove key before dismounting Turn off blades when not mowing Stop the engine wait for all parts to come to a complete stop and remove the key before cleaning the machine removing the grass catcher or unclogging the discharge chute Operate the machine only in daylight or g...

Page 5: ...h the weight of the towed load Travel slowly and allow extra distance to stop Make wide turns to keep the attachment clear of the machine Service Safe Handling of Gasoline To avoid personal injury or property damage use extra care when handling gasoline and other fuels They are flammable and the vapors are explosive Extinguish all cigarettes cigars pipes and other sources of ignition Use only an a...

Page 6: ...y service repairs maintenance or adjustments Keep hands feet hair and loose clothing away from attachment discharge area underside of mower and any moving parts while engine is running Do not touch equipment or attachment parts which may be hot from operation Allow to cool before attempting to maintain adjust or service Battery acid is poisonous and can cause burns Avoid contact with skin eyes and...

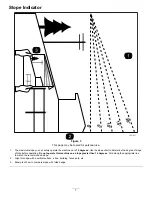
Page 7: ... degrees Use the slope chart to determine the degree of slope of hills before operating Do not operate this machine on a slope greater than 15 degrees Fold along the appropriate line to match the recommended slope 2 Align this edge with a vertical surface a tree building fence pole etc 3 Example of how to compare slope with folded edge 7 ...

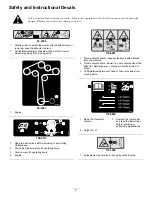
Page 8: ...tructions before servicing or performing maintenance 2 Check tire pressure every 25 operating hours 3 Grease every 25 operating hours 4 Engine 110 6691 1 Thrown object hazard keep bystanders a safe distance from the machine 2 Thrown object hazard mower do not operate without the deflector discharge cover or grass collection system in place 3 Cutting dismemberment of hand or foot stay away from mov...

Page 9: ...these symbols are on your battery 1 Explosion hazard 6 Keep bystanders a safe distance from the battery 2 No fire open flame or smoking 7 Wear eye protection explosive gases can cause blindness and other injuries 3 Caustic liquid chemical burn hazard 8 Battery acid can cause blindness or severe burns 4 Wear eye protection 9 Flush eyes immediately with water and get medical help fast 5 Read the Ope...

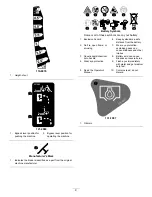
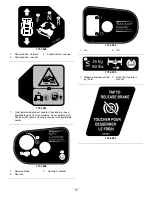
Page 10: ...mberment hazard of bystanders keep bystanders away from the machine do not activate Key Choice switch allows mowing in reverse with bystanders nearby 131 3664 1 Spinning blade 3 Operator s Manual 2 Reverse 131 3954 1 On 2 Off 131 4036 1 Maximum drawbar pull 36 kg 80 lb 2 Read the Operator s Manual 132 6863 10 ...

Page 11: ...121 0773 1 Fast 4 Choke 2 Continuous variable setting 5 Power take off PTO Blade control switch 3 Slow 11 ...

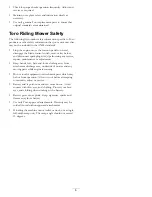
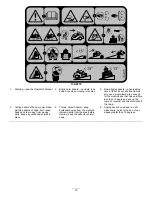
Page 12: ...e less than 15 degrees back up the ramp in reverse and drive forward off the ramp 2 Cutting hazard of hand mower blade pinching hazard of hand belt keep hands and feet away from moving parts keep all guards and shields in place 4 Thrown object hazard keep bystanders away from the machine remove debris from the area before mowing keep the deflector shield down 6 Tipping hazard on slopes do not make...

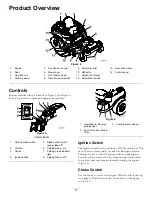
Page 13: ...ke off 2 Throttle 6 Parking brake On 3 Choke 7 Parking brake indicator light 4 Ignition switch 8 Parking brake Off Figure 6 1 Operating in Reverse warning light 3 Fuel presence window 2 Key Choice key blue in color Ignition Switch The ignition switch has 3 positions Off Run and Start The key will turn to Start and move back to Run upon release Turning the key to the Off position will stop the engi...

Page 14: ...age the power take off PTO Figure 6 Operating in Reverse Warning Light The Operating in Reverse warning light will illuminate whenever the KeyChoice key is used to deactivate the operating in reverse interlock It is a reminder that the interlock system is deactivated The light goes out whenever the PTO is disengaged or the engine is shut off When the light is on look behind and use extra caution w...

Page 15: ...not operate without entire exhaust system in place and in proper working condition DANGER In certain conditions during fueling static electricity can be released causing a spark which can ignite the gasoline vapors A fire or explosion from gasoline can burn you and others and can damage property Always place gasoline containers on the ground away from your vehicle before filling Do not fill gasoli...

Page 16: ...es to develop full power and best performance Think Safety First Operating Safety Please carefully read all of the safety instructions and decals in the safety section Knowing this information could help you your family pets or bystanders avoid injury DANGER Mowing on wet grass or steep slopes can cause sliding and loss of control Wheels dropping over edges can cause rollovers which may result in ...

Page 17: ...tarter should crank 3 Push the SmartPark switch to the Off position Note The brake should disengage and the brake light should turn off 4 With brake disengaged and traction pedal in neutral turn the ignition switch to the Start position Note The brake should automatically engage the engine should crank and the brake light will turn on 5 Engage the PTO by pulling up on the blade control switch 6 En...

Page 18: ...E A F Figure 11 Operating the Parking Brake SmartPark The parking brake is activated electronically Engage the parking brake by one of the following actions Pressing the SmartPark switch to the On position Figure 5 The parking brake engages automatically when the operator leaves the seat and the traction control pedal is in the neutral position The parking brake automatically engages 5 to 6 second...

Page 19: ...r most applications operating in the full throttle position is desirable Driving Forward or Backward 1 Move the throttle to the fast position 2 Release the parking brake Refer to Operating the Parking Brake SmartPark page 18 3 Place your foot onto the traction control pedal and slowly press the top of the pedal to go forward or press on the bottom of the pedal to move backward Figure 14 Note The f...

Page 20: ...on the console to serve as a reminder that the interlock has been deactivated 4 Perform the mowing 5 When finished mowing remove the KeyChoice key Figure 6 Note Once you deactivate the interlock it stays in this mode with your mower blade or PTO powered attachment operating whenever you back up and the console light stays on until you either disengage the PTO or turn off the engine Adjusting the H...

Page 21: ...machine and are most comfortable Figure 18 Pushing the Machine by Hand Important Always push the machine by hand Do not tow the machine because damage may occur This machine has an electric brake mechanism and to push the machine the ignition key needs to be in the Run position The battery needs to be charged and functioning for the electric brake to be disengage Pushing the Machine 1 Park the mac...

Page 22: ...deflector is ever damaged replace it immediately Never put your hands or feet under the mower Never try to clear discharge area or mower blades unless you move the blade control switch to Off and rotate the ignition key to Off Also remove the key and pull the wire off the spark plug s Transporting the Machine Use a heavy duty trailer or truck to transport the machine Ensure that the trailer or tru...

Page 23: ...e to tip or lose control If loading on or near a slope position the trailer or truck so that it is on the down side of the slope and the ramp extends up the slope This will minimize the ramp angle WARNING Loading a machine onto a trailer or truck increases the possibility of tip over and could cause serious injury or death Use extreme caution when operating a machine on a ramp Use only a full widt...

Page 24: ...nly about 1 3 of the grass blade Cutting more than that is not recommended unless grass is sparse or it is late fall when grass grows more slowly Mowing Direction Alternate the mowing direction to keep the grass standing straight This also helps disperse clippings which enhances decomposition and fertilization Mowing at Correct Intervals Normally mow every 4 days But remember grass grows at differ...

Page 25: ...me unsatisfactory Maintaining the Blade s Maintain a sharp blade throughout the cutting season because a sharp blade cuts cleanly without tearing or shredding the grass blades Tearing and shredding turns grass brown at the edges which slows growth and increases the chance of disease Check the mower blades after each use for sharpness and for any wear or damage File down any nicks and sharpen the b...

Page 26: ...foam element more often in dusty dirty conditions Service the air cleaner paper element more often in dusty dirty conditions Change the engine oil more often in dusty dirty conditions Change the oil filter more often in dusty dirty conditions Check the spark plug s Check the in line fuel filter Every 200 hours Replace the air cleaner paper element more often in dusty dirty conditions Replace the s...

Page 27: ...brication points Grease Type No 2 general purpose lithium based grease 1 Park the machine on a level surface and disengage the blade control switch 2 Ensure the parking brake is engaged stop the engine remove the key and wait for all moving parts to stop before leaving the operating position 3 Clean the grease fittings Figure 24 and Figure 25 with a rag Note Make sure to scrape any paint off of th...

Page 28: ... Every 25 hours Monthly whichever comes first Clean the air cleaner foam element more often in dusty dirty conditions Every 100 hours Yearly whichever comes first Replace the air cleaner foam element more often in dusty dirty conditions Wash the foam element with water and replace the foam element if it is damaged Servicing the Paper Element Service Interval Every 100 hours Yearly whichever comes ...

Page 29: ...rain into the sump 3 To keep dirt grass clippings etc out of the engine clean the area around the oil fill cap and dipstick before removing it Figure 29 4 Stop the engine remove the key and wait for all moving parts to stop before leaving the operating position B A C D E G029368 F G H I J K Figure 29 Changing the Engine Oil and Oil Filter Service Interval After the first 5 hours After the first mo...

Page 30: ...ter Figure 31 B A C D E F 3 4 g027477 Figure 31 Note Ensure that the oil filter gasket touches the engine and then an extra 3 4 turn is completed 6 Slowly pour approximately 80 of the specified oil into the filler tube and slowly add the additional oil to bring it to the Full mark Figure 32 30 ...

Page 31: ...engage the PTO and ensure the parking brake is engaged 2 Stop the engine remove the key and wait for all moving parts to stop before leaving the operating position B A g027478 Figure 33 Note Due to the deep recess around the spark plug blowing out the cavity with compressed air is usually the most effective method for cleaning The spark plug is most accessible when the blower housing is removed fo...

Page 32: ...l the engine shroud Fuel System Maintenance DANGER In certain conditions gasoline is extremely flammable and highly explosive A fire or explosion from gasoline can burn you and others and can damage property Perform any fuel related maintenance when the engine is cold Do this outdoors in an open area Wipe up any gasoline that spills Never smoke when draining gasoline and stay away from an open fla...

Page 33: ...he machine Do not allow metal tools to short between the battery terminals and metal parts of the machine 1 Park the machine on a level surface and disengage the blade control switch 2 Ensure the parking brake is engaged stop the engine remove the key and wait for all moving parts to stop before leaving the operating position 3 Raise the seat to access the battery 4 Disconnect the negative black g...

Page 34: ...ry 2 Charge the battery for a minimum of 1 hour at 6 to 10 amps Do not overcharge the battery 3 When the battery is fully charged unplug the charger from the electrical outlet then disconnect the charger leads from the battery posts Figure 38 Figure 38 1 Positive battery post 3 Red charger lead 2 Negative battery post 4 Black charger lead Installing the Battery 1 Position the battery in the tray F...

Page 35: ...king the Tire Pressure Service Interval Every 25 hours Check tire pressure Maintain the air pressure in the front and rear tires as specified Uneven tire pressure can cause uneven cut Check the pressure at the valve stem Figure 40 Check the tires when they are cold to get the most accurate pressure reading Refer to the maximum pressure suggested by the tire manufacturer on the sidewall of the cast...

Page 36: ...Oil Specification Oil Type Toro HYPR OIL 500 or 20w 50 motor oil System Capacity approximately 4 495 L 152 oz with a filter change Checking the Hydraulic Oil Level Service Interval Every 25 hours Check expansion reservoir and if necessary add the specified oil to the Full Cold line Figure 42 1 Expansion reservoir 3 Engine 2 Full cold line 36 ...

Page 37: ...y and engage the parking brake 2 Raise the rear of machine up and support with jack stands or equivalent support just high enough to allow drive wheels to turn freely Figure 43 1 Jacking points 3 Locate the filter and filter guards on each transaxle drive system Figure 44 Remove three screws securing the filter guard and guard Figure 44 Right side shown 1 Transaxle drive 4 Screws 2 Oil filter 5 Ve...

Page 38: ... the Bleeding the Hydraulic System procedure after changing hydraulic filters and oil can result in irreparable damage to the transaxle drive system Bleeding the Hydraulic System 1 Enter the operator s position Start engine and move throttle control ahead to 1 2 throttle position Disengage parking brake A Move the bypass levers into the pushing the machine position refer to Pushing the Machine by ...

Page 39: ... on a level surface disengage the blade control switch and ensure the parking brake is engaged Stop the engine and remove the key Inspecting the Blades Service Interval Before each use or daily Check the cutting blades 1 Inspect the cutting edges Figure 46 If the edges are not sharp or have nicks remove and sharpen the blades refer to Sharpening the Blades 2 Inspect the blades especially the curve...

Page 40: ...ent or damaged blade with a new blade Never file or create sharp notches in the edges or surfaces of blade A If the difference between A and B is greater than 1 8 inch 3mm replace the blade with a new blade Refer to Removing the Blades and Installing the Blades Note If a bent blade is replaced with a new one and the dimension obtained continues to exceed 1 8 inch 3mm the blade spindle could be ben...

Page 41: ...y time you install the mower or when you see an uneven cut on your lawn The mower deck must be checked for bent blades prior to leveling any bent blades must be removed and replaced Refer to the Checking for Bent Blades page 39 before continuing The mower deck must be leveled side to side first then the front to rear slope can be adjusted Requirements The machine must be on a level surface All fou...

Page 42: ...er to middle position Note Check and adjust the side to side blade level If you have not checked the setting refer to Leveling from Side to Side page 41 4 Carefully rotate the blades so they are facing front to rear Figure 56 G009659 1 2 3 2 3 Figure 56 Mower Decks with 3 Blades 1 Blades front to rear 3 Measure from the tip of the blade to the flat surface here 2 Outside cutting edges 5 Measure fr...

Page 43: ...lt from the engine pulley 7 Slide the mower deck out from underneath the machine Note Retain all parts for future installation Mower Belt Maintenance Inspecting the Belts Service Interval Every 25 hours Check the belts for wear cracks Check the belts for cracks frayed edges burn marks or any other damage Replace damaged belts Replacing the Mower Belt Squealing when the belt is rotating blades slip...

Page 44: ...he lowest position 5 Lift the rear of the mower deck and guide the hanger brackets over the rear lift rod Figure 59 6 Attach the front support rod to the mower deck with the clevis pin and hairpin cotter Figure 58 7 Install the mower belt onto the engine pulley refer to Replacing the Mower Belt page 43 Replacing the Grass Deflector Service Interval Before each use or daily Inspect the grass deflec...

Page 45: ...urns from the bend 4 Lift the loop end of the spring and place it into the notch on the deflector bracket Figure 62 g017618 1 3 4 2 Figure 62 1 Rod and spring assembly installed 3 Rod short end moved behind mower bracket 2 Loop end of the spring installed into the notch in the deflector bracket 4 Short end retained by mower bracket 5 Secure the rod and spring assembly by twisting it so the short e...

Page 46: ...the hose coupling to the end of the mower washout fitting and turn the water on high Figure 64 Note Spread petroleum jelly on the washout fitting O ring to make the coupling slide on easier and protect the O ring G020098 2 4 1 2 3 4 Figure 64 1 Washout fitting 3 O ring 2 Hose 4 Coupling 4 Lower the mower to the lowest height of cut 5 Sit on the seat and start the engine Engage the blade control sw...

Page 47: ...e fuel in the tank Follow the mixing instructions from the stabilizer manufacturer Do not use an alcohol based stabilizer ethanol or methanol Note A fuel stabilizer conditioner is most effective when mixed with fresh gasoline and used at all times Run the engine to distribute the conditioned fuel through the fuel system 5 minutes Important Do not store stabilizer conditioned gasoline over 90 days ...

Page 48: ...el filter 6 Replace the fuel filter 7 Dirt water or stale fuel is in fuel system 7 Contact an Authorized Service Dealer 8 There is incorrect fuel in the fuel tank 8 Drain the tank and replace the fuel with the proper type The engine does not start starts hard or fails to keep running 9 The oil level in the crankcase is low 9 Add oil to the crankcase 1 The engine load is excessive 1 Reduce ground s...

Page 49: ...all a new cutting blade s 3 The mower is not level 3 Level the mower from side to side and front to rear 4 An anti scalp wheel is not set correctly 4 Adjust the anti scalp wheel height 5 The underside of the mower is dirty 5 Clean the underside of the mower 6 The tire pressure is incorrect 6 Adjust the tire pressure The cutting height is uneven 7 A blade spindle is bent 7 Contact an Authorized Ser...

Page 50: ...Schematics Electrical Diagram Rev A 50 ...

Page 51: ...Notes 51 ...

Page 52: ...u are dissatisfied with the Service Dealer s analysis or with the assistance provided contact us at Customer Care Department RLC Division Toro Warranty Company 8111 Lyndale Avenue South Bloomington MN 55420 1196 Toll free at 866 216 6029 U S customers Toll free at 866 216 6030 Canadian customers Items and Conditions Not Covered There is no other express warranty except for special emission system ...

Reviews: