background image

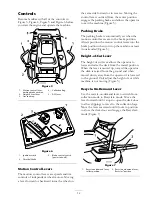
Figure 9

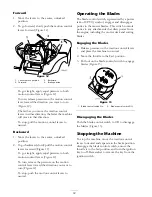
1. Blade control switch—On

2. Blade control switch—Off

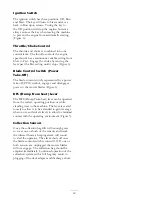
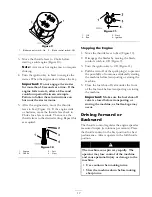
3. Move the throttle lever to Choke before

starting a cold engine (Figure 10).

Note:

A warm or hot engine may not require

choking.

4. Turn the ignition key to Start to energize the

starter. When the engine starts, release the key.

Important:

Do not engage the starter

for more than 10 seconds at a time. If the
engine fails to start, allow a 60 second
cool-down period between attempts.
Failure to follow these instructions can
burn out the starter motor.

5. After the engine starts, move the throttle

lever to Fast (Figure 10). If the engine stalls
or hesitates, move the throttle lever back to
Choke for a few seconds. Then move the
throttle lever to the desired setting. Repeat this
as required.

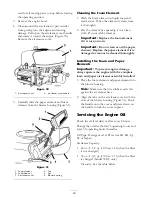
Figure 10

1. Engine

3. Fast

2. Choke

4. Slow

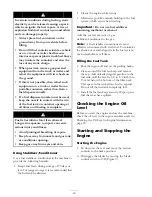
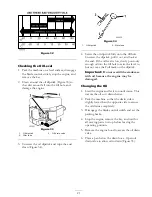
Figure 11

1. Off

3. Start

2. Run

4. Ignition

Stopping the Engine

1. Move the throttle lever to Fast (Figure 10).

2. Disengage the blades by moving the blade

control switch to Off (Figure 9).

3. Turn the ignition key to Off (Figure 11).

4. Pull the wire off of the spark plug(s) to prevent

the possibility of someone accidentally starting
the machine before transporting or storing the
machine.

5. Close the fuel shut-off valve under the front

of the fuel tank before transporting or storing
the machine.

Important:

Make sure the fuel shut-off

valve is closed before transporting or
storing the machine, as fuel leakage may
occur.

Driving Forward or

Backward

The throttle control regulates the engine speed as
measured in rpm (revolutions per minute). Place
the throttle control in the Fast position for best
performance. Always operate in the full throttle
position.

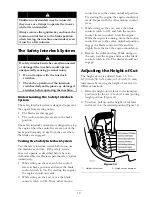
The machine can spin very rapidly. The
operator may lose control of the machine
and cause personal injury or damage to the
machine.

Use caution when making turns.

Slow the machine down before making
sharp turns.

17

Summary of Contents for TimeCutter ZD420

Page 1: ... No 3354 742 Rev A TimeCutter ZD380 and ZD420 Riding Mowers Model No 74432 Serial No 260000001 and Up Model No 74433 Serial No 260000001 and Up Register your product at www Toro com Original Instructions EN ...

Page 2: ...ow the recommended precautions Figure 2 1 Safety alert symbol This manual uses two other words to highlight information Important calls attention to special mechanical information and Note emphasizes general information worthy of special attention Contents Introduction 2 Safety 4 Safe Operation Practices for Ride on riding Rotary Lawnmower Machines 4 Safe Operating Practices 4 Toro Riding Mower Sa...

Page 3: ...he Fuel Filter 34 Electrical System Maintenance 34 Servicing the Battery 34 Servicing the Fuses 36 Drive System Maintenance 37 Checking the Tire Pressure 37 Mower Maintenance 37 Servicing the Cutting Blades 37 Leveling the Mower from Side to Side 39 Adjusting the Front to Rear Blade Slope 40 Removing the Mower 41 Mower Belt Maintenance 41 Installing the Mower 42 Cleaning 43 Cleaning the Collection...

Page 4: ...achines control of a ride on machine sliding on a slope will not be regained by the application of the brake The main reasons for loss of control are insufficient wheel grip being driven too fast inadequate braking the type of machine is unsuitable for its task lack of awareness of the effect of ground conditions especially slopes incorrect hitching and load distribution Preparation While mowing al...

Page 5: ...ove the key Disengage drive to attachments stop the engine and disconnect the spark plug wire s or remove the ignition key before clearing blockages or unclogging chute before checking cleaning or working on the lawnmower after striking a foreign object Inspect the lawnmower for damage and make repairs before restarting and operating the equipment if the machine starts to vibrate abnormally check ...

Page 6: ... grass can hide obstacles Watch for ditches holes rocks dips and rises that change the operating angle as rough terrain could overturn the machine Avoid sudden starts when mowing uphill because the mower may tip backwards Be aware that loss of traction may occur going downhill Weight transfer to the front wheels may cause drive wheels to slip and cause loss of braking and steering Always avoid sud...

Page 7: ...l machines per EN 1032 Model 74433 This unit has an equivalent continuous A weighted hand arm vibration level of 4 66 m s2 based on measurements of identical machines per EN 1033 This unit has an equivalent continuous A weighted whole body vibration level of 14 m s2 based on measurements of identical machines per EN 1032 7 ...

Page 8: ...Slope Chart 8 ...

Page 9: ... Manufacturer s Mark 1 Indicates the blade is identi ed as a part from the original machine manufacturer 106 2223 106 2224 1 Throttle 7 Headlights 2 Choke 8 Engine stop 3 Fast 9 Engine run 4 Continuous variable setting10 Engine start 5 Slow 11 Ignition 6 Power take off PTO Blade control switch on some models 106 7043 1 Do not tow the machine pull the lever out to ride on the machine or push the le...

Page 10: ... hazard 6 Keep bystanders a safe distance from the battery 2 No re open ame or smoking 7 Wear eye protection explosive gases can cause blindness and other injuries 3 Caustic liquid chemical burn hazard 8 Battery acid can cause blindness or severe burns 4 Wear eye protection 9 Flush eyes immediately with water and get medical help fast 5 Read the Operator s Manual 10 Contains lead do not discard 10...

Page 11: ...oss of traction control hazard slopes loss of traction control on a slope disengage the blade control switch PTO proceed off the slope slowly 5 Crushing dismemberment hazard of bystanders reversing crushing dismemberment hazard of bystanders do not carry passengers look behind and down when reversing 6 Tipping hazard do not mow up and down slopes only mow across slopes less than 15 degrees avoid s...

Page 12: ...ever 11 Footrest 3 Control panel 6 Operator s position seat 9 Rear drive wheel 12 Front caster wheel Figure 4 Collection bag removed 1 Motion control lever 4 Collection sensors 7 Engine cover 10 Mower deck 2 Height of cut lever 5 Rear access panel 8 Discharge chute 11 Collection bag presence sensor 3 Gas tank cap 6 Rear drive wheel 9 Rear frame 12 ...

Page 13: ... the motion control levers are in the brake position Always position the motion control levers into the brake position when you stop the machine or leave it unattended Figure 5 Height of Cut Lever The height of cut lever allows the operator to lower and raise the deck from the seated position When the lever is moved up toward the operator the deck is raised from the ground and when moved down away...

Page 14: ...mbol engages and disengages power to the mower blades Figure 6 DFS Dump From Seat Lever The DFS Dump From Seat lever can be operated from the seated operating position or while standing next to the machine The lever is seated loosely to allow it to be extended to gain leverage when in use and swivels freely to allow for minimal contact with the operating environment Figure 5 Collection Sensors Onc...

Page 15: ...ve use 87 pump octane minimum Leaded regular gasoline may be used if unleaded regular is not available Important Never use methanol fuel containing methanol or gasohol containing more than 10 ethanol because the fuel system could be damaged Do not mix oil with fuel In certain conditions fuel is extremely flammable and highly explosive A fire or explosion from fuel can burn you and others and can dam...

Page 16: ...ner in the machine to provide the following benefits Keeps fuel fresh during storage of 90 days or less For longer storage it is recommended that the fuel tank be drained Cleans the engine while it runs Eliminates gum like varnish buildup in the fuel system which causes hard starting Important Do not use fuel additives containing methanol or ethanol Add the correct amount of gas stabilizer conditio...

Page 17: ...nition Stopping the Engine 1 Move the throttle lever to Fast Figure 10 2 Disengage the blades by moving the blade control switch to Off Figure 9 3 Turn the ignition key to Off Figure 11 4 Pull the wire off of the spark plug s to prevent the possibility of someone accidentally starting the machine before transporting or storing the machine 5 Close the fuel shut off valve under the front of the fuel...

Page 18: ...er toward the direction you want to turn Figure 12 To stop push the motion control levers to neutral Operating the Blades The blade control switch represented by a power take off PTO symbol engages and disengages power to the mower blades This switch controls power to any attachments that draw power from the engine including the mower deck and cutting blades Engaging the Blades 1 Release pressure ...

Page 19: ... Dealer repair the safety system immediately 1 While sitting on the seat with the control levers in brake position and move the blade control switch to On Try starting the engine the engine should not crank 2 While sitting on the seat move the blade control switch to Off Move either motion control lever to the center unlocked position Try starting the engine the engine should not crank Repeat with...

Page 20: ...denly when going uphill or downhill Avoid uphill starts If you do stop the machine when going uphill disengage the blade control switch Then back down the hill using a slow speed Do not change speeds or stop on slopes The collection mode uses air flow created by the cutting blades to direct clippings up through an internal chute and deposit them in the collection bag Shorter dry clippings require l...

Page 21: ... that the collection bag alarm goes off and the bag is less than full the sensors should be cleared of any clippings or debris that be blocking the beam Raise the collection bag and wipe off the faces of the sensors with a soft cloth Important You can wash the machine with mild detergent and water Do not pressure wash the machine Avoid excessive use of water especially near the control panel engin...

Page 22: ...engine remove the key and wait for all moving parts to stop before leaving the operating position Raise the operator s seat 4 Move to the rear of the machine and remove the collection bag 5 Grasp the discharge chute and remove as follows Important Use caution and do not use excessive force when removing installing the chute Forcing the chute can damage it or other internal components A Pull the ch...

Page 23: ... your normal cutting height and repeat the collection process Remove the collection chute and tap it on the ground to remove any plugged clippings or debris At this time visually inspect the chute to verify it is clear and for any damage If necessary manually remove any obstructions from the chute Installing the Collection Chute 1 Line the key in the chute with the keyway in the frame A Gently mov...

Page 24: ...r grass Use sharp blades Travel at slower speeds when mowing taller grass Positioning the Seat The seat can move forward and backward Position the seat where you have the best control of the machine and are most comfortable 1 Raise the seat and loosen the adjustment knobs enough to move the seat Figure 20 Important Make sure that the spacers stay in place when loosening the knobs to move the seat ...

Page 25: ...l not drive unless the bypass levers are disengaged Adjusting the Footrest The footrest can be adjusted forward or backward for maximum operator comfort Lift up the footrest and place the rods in the same hole positions Figure 23 Figure 23 1 Footrest 3 Hole positions 2 Rod Operating Tips Fast Throttle Setting For best mowing and maximum air circulation operate the engine at the Fast position Air i...

Page 26: ...ump of grass clippings may drop onto your lawn To avoid this move onto a previously cut area with the blades engaged Keep the Underside of the Mower Clean Clean clippings and dirt from the underside of the mower after each use If grass and dirt build up inside the mower cutting quality will eventually become unsatisfactory Blade Maintenance Maintain a sharp blade throughout the cutting season beca...

Page 27: ...the belts for wear cracks Every 50 hours Change the engine oil Check the battery electrolyte level Every 100 hours Replace the paper air lter element more often in dirty or dusty conditions Change the oil lter model 74433 only Replace spark plug Replace fuel lter Before storage Drain the fuel tank Charge the battery and disconnect battery cables Perform all maintenance procedures listed above befo...

Page 28: ...hood Refer to Operation page 15 for additional information Note The rear access panel can be opened when the collection bag is off the machine 5 Remove the fasteners retaining the engine hood to the machine frame Figure 24 Retain all parts Figure 24 1 Engine hood 2 Fasteners 6 Grasp the engine hood front and rear Press down on the front of the hood to release the front retaining clasp and lift the...

Page 29: ... scrape any paint off of the front of the fitting s Figure 28 1 Front caster tire Figure 29 4 Connect a grease gun to each fitting Figure 28 and Figure 29 Pump grease into the fittings until grease begins to ooze out of the bearings 5 Wipe up any excess grease Engine Maintenance Servicing the Air Cleaner Foam Element Clean after every 25 operating hours or yearly whichever occurs first Paper Element R...

Page 30: ...ortant Do not clean or oil the paper element Replace the paper element if it is damaged or cannot be cleaned thoroughly Installing the Foam and Paper Elements Important To prevent engine damage always operate the engine with the complete foam and paper air cleaner assembly installed 1 Place the foam element and paper element into the blower housing Note Make sure that the rubber seal is flat agains...

Page 31: ...slowly pour only enough oil into the fill hole to raise the level to but not over the Full mark on the dipstick Important Do not overfill the crankcase with oil because the engine may be damaged Changing the Oil 1 Start the engine and let it run until warm This warms the oil so it drains better 2 Park the machine so that the drain side is slightly lower than the opposite side to assure the oil drain...

Page 32: ...n the replacement filter Figure 36 Figure 36 1 Oil lter 3 Adapter 2 Gasket 4 Install the replacement oil filter to the filter adapter Turn the oil filter clockwise until the rubber gasket contacts the filter adapter then tighten the filter an additional 1 2 to 3 4 turn Figure 36 5 Fill the crankcase with the proper type of new oil refer to Changing and Draining the Oil in Engine Maintenance page 29 Serv...

Page 33: ...anel and tighten the fasteners to secure it shut Important Always make sure the panel is replaced and secured with the fasteners before operating the machine Operating the machine with the access panel open would allow clippings and other debris entering the engine compartment possibly damaging the machine Fuel System Maintenance Draining the Fuel Tank In certain conditions fuel is extremely flamma...

Page 34: ...m the fuel line 1 Park the machine on a level surface and disengage the blade control switch 2 Move the motion control levers to the brake position stop the engine remove the key and wait for all moving parts to stop before leaving the operating position 3 Close the fuel shut off valve located under the front of the fuel tank 4 Squeeze the ends of the hose clamps together and slide them away from ...

Page 35: ...le before disconnecting the positive red cable Always connect the positive red battery cable before connecting the negative black cable 5 Slide the rubber cover up the positive red cable Disconnect the positive red cable from the battery post Figure 41 6 Remove the battery hold down Figure 41 and lift the battery from the battery tray Figure 41 1 Battery 4 Negative battery cable 2 Terminal boot 5 ...

Page 36: ...32 F 0 C 1 Remove the battery from the chassis refer to Removing the Battery 2 Check the electrolyte level refer to Checking the Electrolyte Level 3 Make sure that the vent caps are installed in the battery Charge the battery for 1 hour at 25 to 30 amps or 6 hours at 4 6 amps Do not overcharge the battery 4 When the battery is fully charged unplug the charger from the electrical outlet then discon...

Page 37: ...ng the grass blades Tearing and shredding turns grass brown at the edges which slows growth and increases the chance of disease Check the cutter blades daily for sharpness and for any wear or damage File down any nicks and sharpen the blades as necessary If a blade is damaged or worn replace it immediately with a genuine Toro replacement blade For convenient sharpening and replacement you may want...

Page 38: ...s A blade that is bent or damaged could break apart and could seriously injure or kill you or bystanders Always replace bent or damaged blade with a new blade Never file or create sharp notches in the edges or surfaces of blade Removing the Blades The blades must be replaced if a solid object is hit if the blade is out of balance or the blade is bent To ensure optimum performance and continued safe...

Page 39: ... from side to side Check the side to side level any time you install the mower or when you see an uneven cut on your lawn 1 Park the machine on a level surface and disengage the blade control switch 2 Move the motion control levers to the brake position stop the engine remove the key and wait for all moving parts to stop before leaving the operating position 3 Check the air pressure of all four ti...

Page 40: ...Side 5 Measure the length of the rod extending out of the adjusting block on the sides of the chassis Figure 53 6 If the rod length is not a 3 4 inch 19 mm remove the hairpin cotter and washer from the end of the adjusting rod Figure 53 and turn the rod until the 3 4 inch 19 mm dimension is obtained 7 Install the end of the rod into the hole in the mower mount and secure it with the washer and hai...

Page 41: ...nd disengage the blade control switch 2 Move the motion control levers to the brake position stop the engine remove the key and wait for all moving parts to stop before leaving the operating position 3 Lower the height of cut lever to the lowest position 4 Remove the hairpin cotter and clevis pin from the front support rod on each side of the mower Figure 56 Figure 56 1 Hairpin cotter and clevis p...

Page 42: ...reful when moving the idler arm 7 Route the new belt around the engine pulley and mower pulleys Figure 58 Install the new belt under the belt guide and around the rear pulley 8 Pull the idler pulley in the direction shown in Figure 58 and route the belt onto the idler arm pulley and spindle pulleys Figure 58 9 Tighten the belt guide fastener on the rear pulley Figure 58 10 Install the belt covers ...

Page 43: ...to the end of the mower washout fitting and turn the water on high Figure 59 Note Spread petroleum jelly on the washout fitting O ring to make the hose slide on easier and protect the O ring Figure 59 1 Washout tting 3 Hose 2 Mower deck 4 Lower the mower to the lowest height of cut 5 Sit on the seat and start the engine Engage the blade control switch and let the mower run for one to three minutes 6...

Page 44: ...onditioner is most effective when mixed with fresh fuel and used at all times Run the engine to distribute the conditioned fuel through the fuel system 5 minutes Stop the engine allow it to cool and drain the fuel tank refer to Draining the Fuel Tank in Fuel System Maintenance page 33 Restart the engine and run it until it stops Choke or prime the engine Start and run the engine until it will not ...

Page 45: ...5 Dirt water or stale fuel is in fuel system 5 Contact an Authorized Service Dealer 1 The blade control switch is engaged 1 Move the blade control switch to Disengaged 2 The motion control levers are not in the brake position 2 Move the motion control levers to the brake position 3 The operator is not seated 3 Sit on the seat 4 The battery is dead 4 Charge the battery 5 The electrical connections ...

Page 46: ...low 10 Add oil to the crankcase 1 The engine load is excessive 1 Reduce ground speed 2 The air cleaner is dirty 2 Clean the air cleaner element 3 The oil level in the crankcase is low 3 Add oil to the crankcase 4 The cooling ns and air passages under the engine blower housing are plugged 4 Remove the obstruction from the cooling ns and air passages 5 The spark plug s is pitted fouled or the gap is...

Page 47: ...collection mode at Fast throttle 2 Plugged chute deck door 2 Remove debris leaves or grass clippings from the chute system Reduced bagging performance 3 Collection bag is full 3 Empty the collection bag 1 Collection bag is full 1 Empty the collection bag 2 Low engine speed 2 Always operate the collection mode at Fast throttle 3 Grass is too wet 3 Cut grass when dry 4 Grass is too long 4 Cut 1 3 of...

Page 48: ... wheel height 5 The underside of the mower is dirty 5 Clean the underside of the mower 6 The tire pressure is incorrect 6 Adjust the tire pressure Uneven cutting height 7 A blade spindle is bent 7 Contact an Authorized Service Dealer 1 The drive belt is worn loose or broken 1 Install a new drive belt 2 The drive belt is off of the pulley 2 Install the drive belt and check the adjusting shafts and ...

Page 49: ...Schematics Electrical Diagram Rev A 49 ...

Page 50: ......

Page 51: ......

Page 52: ......

Reviews: