background image

27

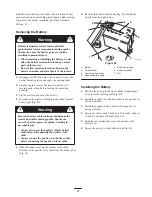
terminals are corroded, clean them with a solution of four

parts water and one part baking soda. Apply a light coating

of grease to the battery terminals to prevent corrosion.

Voltage: 12 v

Removing the Battery

Battery terminals or metal tools could short
against metal tractor components causing sparks.
Sparks can cause the battery gasses to explode,
resulting in personal injury.

When removing or installing the battery, do not

allow the battery terminals to touch any metal

parts of the tractor.

Do not allow metal tools to short between the

battery terminals and metal parts of the tractor.

Warning

1.

Disengage the PTO and move the control levers to the

neutral locked position and apply the parking brake.

2.

Stop the engine, remove the key, and wait for all

moving parts to stop before leaving the operating

position.

3.

Tip the seat forward to see the battery.

4.

Disconnect the negative (black) ground cable from the

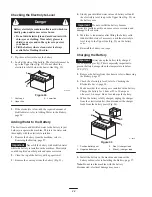
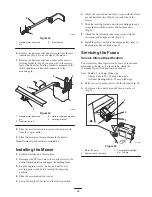
battery post (Fig. 32).

Incorrect battery cable routing could damage the
tractor and cables causing sparks. Sparks can
cause the battery gasses to explode, resulting in
personal injury.

Always 

disconnect 

the negative (black) battery

cable before disconnecting the positive (red)

cable.

Always 

connect 

the positive (red) battery cable

before connecting the negative (black) cable.

Warning

5.

Slide the rubber cover up the positive (red) cable.

Disconnect the positive (red) cable from the battery post

(Fig. 32).

6.

Remove the battery hold-down (Fig. 32) and lift the

battery from the battery tray.

m–5143

1

2

3

4

5

6

7

Figure 32

1. Battery
2. Terminal boot
3. Positive battery cable
4. Negative battery cable

5. Battery hold-down
6. Bolt and washer
7. Nut

Installing the Battery

1.

Position the battery in the tray with the terminal posts

away from the control panel (Fig. 32).

2.

Install the positive (red) battery cable to the positive (+)

battery terminal.

3.

Install the negative battery cable to the negative (–)

battery terminal.

4.

Secure the cables with 2 bolts (1/4 x 3/4 inch), washers

(1/4 inch), and nuts (1/4 inch) (Fig. 32).

5.

Slide the red terminal boot onto the positive (red)

battery post.

6.

Secure the battery with the hold-down (Fig. 32).

Summary of Contents for TimeCutter ZX480

Page 1: ...Operator s Manual Original Instructions EN Register your product at www Toro com Form No 3353 203 Rev C ZX480 TimeCutter ZX Riding Mower Model No 74704 Serial No 250000001 and Up ...

Page 2: ...king Brake 14 Starting and Stopping the Engine 14 Operating the Power Take Off PTO 15 The Safety Interlock System 15 Testing the Safety Interlock System 15 Page Driving Forward or Backward 16 Stopping the Machine 16 Adjusting the Height of Cut 16 Adjusting the Anti Scalp Rollers 17 Positioning the Seat 17 Adjusting the Motion Control Levers 18 Pushing the Machine by Hand 18 Side Discharge 18 Tips ...

Page 3: ...y alert symbol which means CAUTION WARNING or DANGER personal safety instruction Failure to comply with the instruction may result in personal injury or death Safe Operating Practices The following instructions are from ANSI standard B71 1 2003 This product is capable of amputating hands and feet and throwing objects Always follow all safety instructions to avoid serious injury or death General Op...

Page 4: ...s Avoid sudden starts when mowing uphill because the mower may tip backwards Be aware that loss of traction may occur going downhill Weight transfer to the front wheels may cause drive wheels to slip and cause loss of braking and steering Always avoid sudden starting or stopping on a slope If tires lose traction disengage the blades and proceed slowly off the slope Use extreme care with grass catc...

Page 5: ...e to cool before storing Stop and inspect the equipment if you strike an object Repair if necessary before restarting Never make any adjustments or repairs with the engine running Grass catcher components are subject to wear damage and deterioration which could expose moving parts or allow objects to be thrown Frequently check components and replace with manufacturer s recommended parts when neces...

Page 6: ...6 ...

Page 7: ...7 Slope Chart ...

Page 8: ...8 ...

Page 9: ...everse 92 7108 92 7109 104 8061 1 To ride the machine pull the lever out 2 Do not tow the machine 3 To push the machine push the lever in Battery Symbols Some or all of these symbols are on your battery 1 Explosion hazard 2 No fire open flames or smoking 3 Caustic liquid chemical burn hazard 4 Wear eye protection explosive gases can cause blindness and other injuries 5 Wear eye protection 6 Read t...

Page 10: ...e setting 5 Slow 6 On 7 Off 8 Headlights 9 Engine stop 10 Engine run 11 Engine start 12 Ignition 99 3943 1 Engine 104 3641 1 Height of cut 104 8032 1 Height of cut Manufacturers Mark 1 Indicates the blade is identified as a part from the original machine manufacturer ...

Page 11: ...11 107 2473 107 7399 ...

Page 12: ...t on a truck or trailer from a portable container rather than from a gasoline dispenser nozzle If a gasoline dispenser nozzle must be used keep the nozzle in contact with the rim of the fuel tank or container opening at all times until fueling is complete Gasoline is harmful or fatal if swallowed Long term exposure to vapors can cause serious injury and illness Avoid prolonged breathing of vapors ...

Page 13: ...ng To avoid loss of control and possibility of rollover Do not mow near drop offs or near water Do not mow slopes greater than 15 degrees Reduce speed and use extreme caution on slopes Avoid sudden turns or rapid speed changes 2 3 1 m 6491 Figure 2 1 Safe Zone use the Timecutter here 2 Use walk behind mower and or hand trimmer near drop offs and water 3 Water Controls Become familiar with all of t...

Page 14: ...osition 3 Set the parking brake refer to Setting the Parking Brake page 14 4 Move the PTO power take off to Off Fig 6 1 m 4201 2 Figure 6 1 PTO On 2 PTO Off 5 Move the throttle lever to the Fast position 6 Move the choke lever to the on position Fig 7 before starting a cold engine Note A warm or hot engine may require choking After the engine starts move the choke lever to off 7 Turn the ignition ...

Page 15: ...fety Interlock System The safety interlock system is designed to prevent the engine from starting unless The parking brake is engaged The PTO is disengaged The motion control levers are in the neutral locked position The safety interlock system also is designed to stop the engine when the traction controls are moved with the parking brake on or if you rise from the seat when the PTO is engaged Tes...

Page 16: ...otion control levers rearward Fig 10 To go straight apply equal pressure to both motion control levers Fig 10 To turn release the pressure on the motion control lever toward the direction you want to turn Fig 10 To stop push the motion control levers to neutral Stopping the Machine To stop the machine move the traction control levers to neutral and separate to lock disengage the PTO and turn the i...

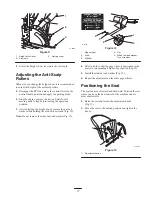
Page 17: ...ove the nut and washer while holding the stud with a wrench Fig 12 Note Do not remove the wheel nut and washer Fig 12 m 4167 1 2 3 4 5 Figure 12 1 Gage wheel 2 Stud 3 Washer 4 Nut 5 Wheel nut and washer Do not remove 4 Select a hole so that the gage wheel is positioned to the nearest corresponding height of cut desired Fig 12 5 Install the stud nut and washer Fig 12 6 Repeat the adjustment on the ...

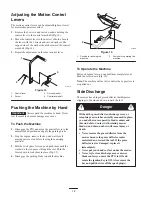
Page 18: ... the rod passes through the slot Push the levers down to lock them in place Fig 15 4 Disengage the parking brake to push the machine m 5139 1 2 Figure 15 1 Position for pushing the machine 2 Position for operating the machine To Operate the Machine Pull each bypass lever up and pull them completely out Push the levers down Fig 15 Note The machine will not drive unless the bypass levers are pulled ...

Page 19: ...e mower is wider than the mower you previously used raise the cutting height to ensure that uneven turf is not cut too short Long Grass If the grass is ever allowed to grow slightly longer than normal or if it contains a high degree of moisture raise the cutting height higher than usual and cut the grass at this setting Then cut the grass again using the lower normal setting When Stopping If the m...

Page 20: ... Every 100 hours Clean the cooling system 1 Change the oil filter 2 Before storage Perform all maintenance procedures listed above before storage Replace the fuel filter Replace the spark plug Drain the fuel tank Charge the battery and disconnect the battery cables Paint any chipped surfaces 1More often in dusty dirty conditions 2More often when operating the engine under heavy load or in high tem...

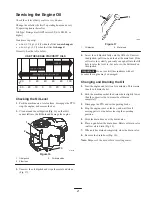
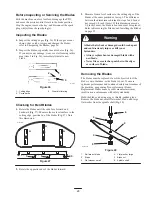
Page 21: ...7 1 Oil dipstick 2 Metal end 4 Screw the oil dipstick fully onto the fill hole Unscrew the dipstick pull it out and look at the metal end If the oil level is low slowly pour only enough oil into the fill hole to raise the level to but not over the Full mark on the dipstick Important Do not overfill the crankcase with oil because the engine may be damaged Changing and Draining the Oil 1 Start the e...

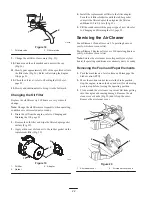
Page 22: ...nt oil filter to the filter adapter Turn the oil filter clockwise until the rubber gasket contacts the filter adapter then tighten the filter an additional 1 2 to 3 4 turn Fig 19 5 Fill the crankcase with the proper type of new oil refer to Changing and Draining the Oil page 21 Servicing the Air Cleaner Foam Element Clean after every 25 operating hours or yearly whichever occurs first Paper Elemen...

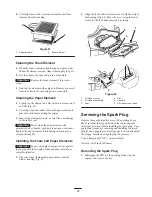
Page 23: ...t if it is damaged or cannot be cleaned thoroughly Installing the Foam and Paper Elements Important To prevent engine damage always operate the engine with the complete foam and paper air cleaner assembly installed 1 Place the foam element and paper element into the blower housing Fig 21 2 Align the tabs on the air cleaner cover with the slots of the housing Fig 22 Move the cover into place and se...

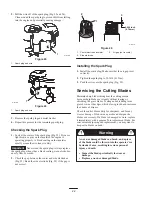
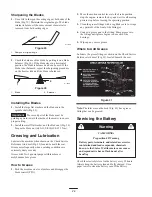
Page 24: ...electrode insulator 2 Side electrode 3 Air gap not to scale Installing the Spark Plug 1 Install the spark plug Make sure that the air gap is set correctly 2 Tighten the spark plug to 30 ft lb 41 N m 3 Push the wire onto the spark plug Fig 23 Servicing the Cutting Blades Maintain sharp blades throughout the cutting season because sharp blades cut cleanly without tearing or shredding the grass blade...

Page 25: ...o the cutting edge of the blades at the same position as in step 1 The difference between the dimensions obtained in steps 1 and 2 must not exceed 1 8 inch 3 mm If this dimension exceeds 1 8 inch 3 mm the blade is bent and must be replaced Refer to Removing the Blades and Installing the Blades on page 25 A blade that is bent or damaged could break apart and could seriously injure or kill you or by...

Page 26: ...n operating conditions are extremely dusty or sandy Grease with No 2 general purpose lithium base or molybdenum base grease How to Grease 1 Park the machine on a level surface and disengage the blade control PTO 2 Move the motion control levers to the brake position stop the engine remove the key and wait for all moving parts to stop before leaving the operating position 3 Clean the grease fitting...

Page 27: ...ery cable routing could damage the tractor and cables causing sparks Sparks can cause the battery gasses to explode resulting in personal injury Always disconnect the negative black battery cable before disconnecting the positive red cable Always connect the positive red battery cable before connecting the negative black cable Warning 5 Slide the rubber cover up the positive red cable Disconnect t...

Page 28: ...the battery Fig 33 4 Slowly pour distilled water into each battery cell until the electrolyte level is up to the Upper line Fig 33 on the battery case Important Do not overfill the battery because electrolyte sulfuric acid can cause severe corrosion and damage to the chassis 5 Wait five to ten minutes after filling the battery cells Add distilled water if necessary until the electrolyte level is u...

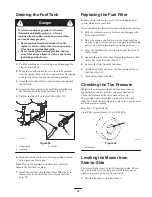
Page 29: ...lter to secure the fuel line Fig 35 Replacing the Fuel Filter Replace the fuel filter after every 100 operating hours or yearly whichever occurs first Never install a dirty filter if it is removed from the fuel line 1 Park the machine on a level surface and disengage the blade control PTO 2 Move the motion control levers to the brake position stop the engine remove the key and wait for all moving ...

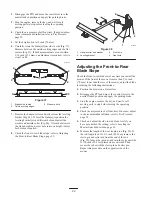
Page 30: ...ront to Rear Blade Slope page 30 1 4 3 2 m 5177 Figure 38 1 Hairpin cotter and washer 2 Leveling bracket 3 Front hole 4 Rear hole Adjusting the Front to Rear Blade Slope Check the front to rear blade level any time you install the mower If the front of the mower is more than 5 16 inch 7 9 mm lower than the rear of the mower adjust the blade level using the following instructions 1 Position the mow...

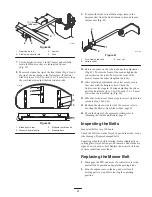
Page 31: ...kes lengthen the rods 11 After adjusting both trunion rod yokes evenly secure the yokes with the hairpin cotters Check the front to rear level again Continue adjusting the yokes until the front blade tip is 1 16 5 16 inch 1 6 7 9 mm lower than the rear blade tip Fig 40 12 When the front to rear blade slope is correct tighten the jam nuts Fig 39 and 41 13 Recheck the side to side level of the mower...

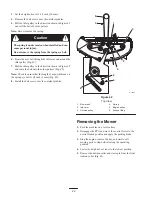
Page 32: ...o the other pulleys Fig 42 Note Check to ensure that the length of exposed thread on the spring eye bolt is 1 8 inch 3 mm Fig 42 8 Install the belt covers over the outside spindles m 8122 1 4 2 1 3 3 5 2 4 6 Figure 42 Top View 1 Mower belt 2 Idler arm 3 Outside pulley 4 Spring 5 Engine pulley 6 Grease fitting Removing the Mower 1 Park the machine on a level surface 2 Disengage the PTO and move the...

Page 33: ... for all moving parts to stop before leaving the operating position 4 Slide the mower under the tractor 5 Lower the height of cut lever to the lowest position 6 Attach the rear trunion rod to the tractor with the clevis pin and hairpin cotter Fig 44 on each side of the mower 7 Slide the leveling brackets onto the mounting pins and secure them with the washers and hairpin cotters Fig 44 8 Attach th...

Page 34: ...ving parts to stop 8 Turn the water off and remove the coupling from the washout fitting Note If the mower is not clean after one washing soak it and let it stand for 30 minutes Then repeat the process 9 Run the mower again for one to three minutes to remove excess water A broken or missing washout fitting could expose you and others to thrown objects or blade contact Contact with blade or thrown ...

Page 35: ...the other over the deflector Fig 47 4 Secure the deflector to the mower bracket with the bolt The bolt should pass through the grass deflector spring spacer and brackets Secure with the locknut Note It may be helpful to press down near the end of the bolt with a 9 16 inch open end wrench to align the bolt with the second hole on the mower bracket and grass deflector 5 Lift the grass deflector and ...

Page 36: ...5 4 1 K1 KILL RELAY 1 Y A I VIOLET TAN START B SHOWN WITH LEVER IN NEUTRAL POSITION SHOWN WITH LEVER IN NEUTRAL POSITION 7 4 WHITE YELLOW PINK RED S B X GREEN BLUE KEY SWITCH PN 88 9830 MAGNETO SHOWN WITH PARK BRAKE DISENGAGED GREY ORANGE BROWN BLACK KEY SW OFF NO CONNECTION ON B I A AND X Y START B I S SW1 TO HEADLIGHT HARNESS SHOWN IN OFF POSITION WIRE COLOR CODES IGNITION FUEL SOLENOID SHOWN WI...

Page 37: ...h gasoline and used at all times A Run the engine to distribute the conditioned fuel through the fuel system 5 minutes B Stop the engine allow it to cool and drain the fuel tank refer to Draining the Fuel Tank page 29 C Restart the engine and run it until it stops D Choke or prime the engine Start and run the engine until it will not start Operate the primer if equipped several times to ensure no ...

Page 38: ...lectrical connections are corroded or loose 5 Check the electrical connections for good contact 6 A fuse is blown 6 Replace the fuse 7 A relay or switch is damaged 7 Contact an Authorized Service Dealer The engine will not start starts h d f il t k i 1 The fuel tank is empty 1 Fill the fuel tank g hard or fails to keep running 2 The fuel valve turned off 2 Open the fuel valve 3 The choke is not on...

Page 39: ...n 1 Contact an Authorized Service Dealer 2 The traction belts are off of the pulleys 2 Contact an Authorized Service Dealer There is abnormal vibration 1 The engine mounting bolts are loose 1 Tighten the engine mounting bolts 2 The engine pulley idler pulley or blade pulley is loose 2 Tighten the appropriate pulley 3 The engine pulley is damaged 3 Contact an Authorized Service Dealer 4 The cutting...

Page 40: ... 1 The drive belt is worn loose or broken 1 Install a new drive belt 2 The drive belt is off of the pulley 2 Install the drive belt and check the adjusting shafts and belt guides for the correct position 3 The mower belt is worn loose or broken 3 Install a new mower belt ...

Page 41: ...41 ...

Page 42: ...42 ...

Page 43: ...43 ...

Page 44: ...he maintenance procedures described in the Operator s Manual Such routine maintenance whether performed by a dealer or by you is at your expense Items and Conditions Not Covered There is no other express warranty except for special emission system coverage on some products This express warranty does not cover Cost of regular maintenance service or parts such as filters fuel lubricants tune up part...

Reviews: