ELECTRICAL
7-12
Toro TITAN 2014 Service Manual
7
PTO Clutch Continuity to Ground Check
1. Disengage PTO switch, turn ignition off and remove
key.
2. Disconnect clutch wire connector.
3. Set the multimeter to check resistance (ohms).
4. Connect one meter lead to the engine, chassis or
battery ground. Connect the other meter lead to
each of the PTO clutch terminals.
5. The two PTO terminals should never have continuity
to ground and should be OPEN at all times.
If continuity is found between the clutch wires
and ground, the clutch and PTO switch must be
replaced.
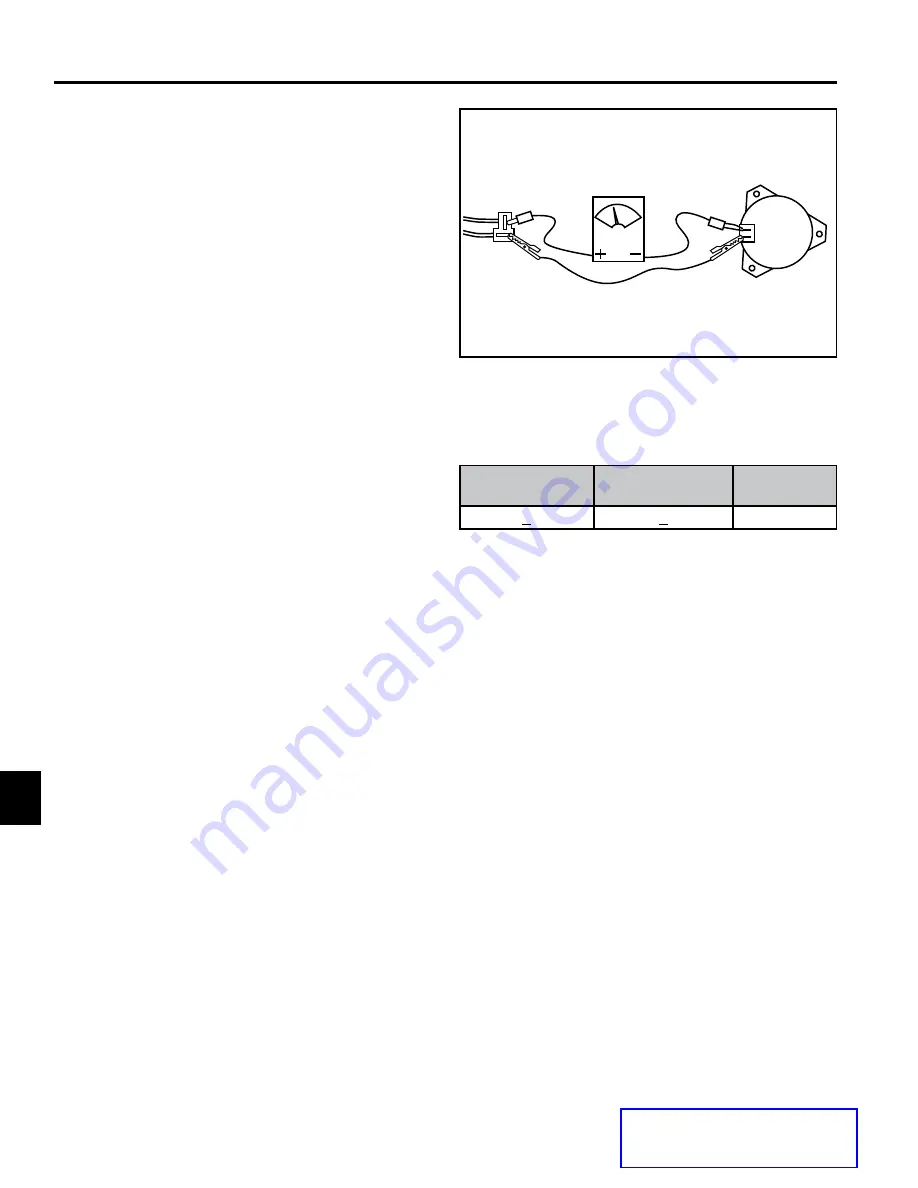
Measuring Clutch Current Draw
Note: Do not measure current draw if clutch
has shorted to ground or if the resistance
measurement is out of specification.
1. Disengage PTO switch, turn ignition off and remove
key.
2. Disconnect clutch wire connector.
3. Set the multimeter to check amps (10 amp scale).
4. Connect the positive meter lead to the chassis
harness terminal A (brown wire) (Fig. 130).
5. Connect the negative meter lead to the correspond-
ing wire terminal B (Fig. 130).
6. Connect a short jumper lead from terminal C to
terminal D (Fig. 130).
7. Turn the ignition key in the switch to “RUN” position
and the PTO switch to the “ON” position.
8. See the PTO Clutch Electrical Specifications chart.
PTO Clutch Electrical Specifications
Ohms
Specification
Amp Draw
Specification
Continuity
to Ground
3.05 + 10%
3.93 + 10%
OPEN
PTO Circuit & Operation
The The PTO clutch is powered by the PTO Switch and
grounded through the kill relay.
The PTO Clutch will only ground and engage when:
- The ignition switch is in the ON position.
- The PTO switch is in the ON position.
- Proper battery voltage is present at the key switch
kill relay.
- Proper ground is present at the battery, chassis
and kill relay.
- An operator is in the seat.
- The parking brake is ON and the handles are in
the outward neutral position.
- The parking brake is OFF and the handles in any
position.
Note: The engine will not crank over to start when
the PTO switch is ON.
(Fig. 131, next page)
A
B
D
C
Fig. 130
clutch current msmt_v2
Summary of Contents for titan mx
Page 1: ...2014 TITAN ZX MX Service Manual Residential Products ...
Page 2: ......
Page 4: ...ABOUT THIS MANUAL THIS PAGE INTENTIONALLY LEFT BLANK ...
Page 10: ...SAFETY INFORMATION 1 2 Toro TITAN 2014 Service Manual 1 THIS PAGE INTENTIONALLY LEFT BLANK ...
Page 46: ...CHASSIS 3 26 Toro TITAN 2014 Service Manual 3 THIS PAGE INTENTIONALLY LEFT BLANK ...
Page 52: ...ENGINE 4 6 Toro TITAN 2014 Service Manual 4 THIS PAGE INTENTIONALLY LEFT BLANK ...
Page 84: ...MOWER DECK 6 18 Toro TITAN 2014 Service Manual 6 THIS PAGE INTENTIONALLY LEFT BLANK ...
Page 97: ...ELECTRICAL 7 13 Toro TITAN 2014 Service Manual 7 PTO Circuit Schematic Fig 131 PICT 2015 ...
Page 103: ...ELECTRICAL 7 19 Toro TITAN 2014 Service Manual 7 Fig 143 PICT 3020 Wire Harness View 1 of 3 ...
Page 104: ...ELECTRICAL 7 20 Toro TITAN 2014 Service Manual 7 Wire Harness View 2 of 3 Fig 144 PICT 3021 ...
Page 105: ...ELECTRICAL 7 21 Toro TITAN 2014 Service Manual 7 Fig 145 PICT 3022 Wire Harness View 3 of 3 ...
Page 106: ...ELECTRICAL 7 22 Toro TITAN 2014 Service Manual 7 THIS PAGE INTENTIONALLY LEFT BLANK ...
Page 107: ......
Page 108: ...2014 TITAN ZX MX Service Manual Form Number 492 9339 ...


