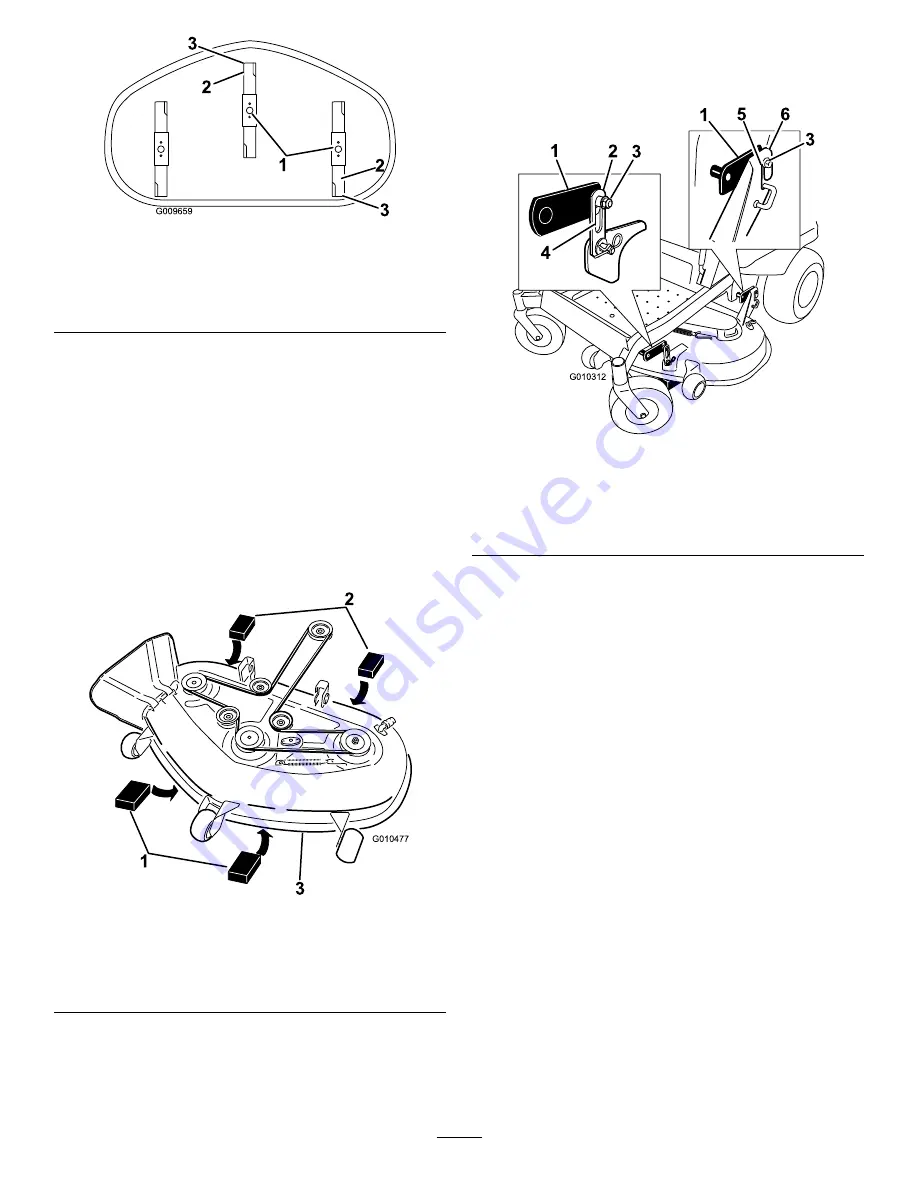
G009659
1
2
3
2
3
Figure 62
1.
Blades front to rear
3.
Measure from the tip of the
blade to the flat surface
here
2.
Outside cutting edges
Leveling the Mower Deck
1. Set anti-scalp rollers to top holes or remove
completely for this procedure.
2. Set the height-of-cut lever to the 3 inch (76 mm)
position.
3. Place two 2-5/8 inch (6.66 cm) blocks under each
side of the front edge of the deck, but not under the
anti-scalp roller brackets. Place two 2-7/8 inch (7.30
cm) thick blocks under the rear edge of the cutting
deck skirt; one on each side of the cutting deck.
G010477
1
2
3
Figure 63
1.
Wood block, 2-5/8 inch
(6.66 cm) thick
3.
Front edge
2.
Wood block, 2-7/8 inch
(7.30 cm) thick
4. Loosen the leveling adjust locking nuts (item 3) on
all four corners so that the deck is sitting securely
on all four blocks. Make sure that the deck hangers
are all the way down (at the top of the slot) and the
deck lift foot lever is pushed back against the stop,
then tighten the four leveling adjust locking nuts
(Figure 64).
G010312
1
2 3
4
1
6
5
3
Figure 64
1.
Deck lift arm
4.
Slot in deck hanger
2.
Deck hanger
5.
Slot in rear deck hanger
bracket
3.
Leveling adjust locking nut
6.
Rear deck hanger bracket
5. Recheck that blocks fit just snugly under the deck
skirt. Make sure all attachment bolts are tight
6. Verify the deck is level by checking the side-to-side
level and front-to-rear blade slope; repeat deck
leveling procedure if necessary.
Inspecting the Belts
Service Interval:
Every 50 hours
Check the belts for squealing when the belt is rotating,
blades slipping when cutting grass, frayed belt edges,
burn marks and cracks are signs of a worn mower belt.
Replace the mower belt if any of these conditions are
evident.
Replacing the Mower Belt
Squealing when the belt is rotating, blades slipping when
cutting grass, frayed belt edges, burn marks and cracks
are signs of a worn mower belt. Replace the mower belt
if any of these conditions are evident.
1. Park the machine on a level surface and disengage
the blade control switch.
2. Move the motion control levers outward to the
neutral lock position, set the parking brake, stop the
47
Summary of Contents for TITAN ZX5020
Page 54: ...Schematics G010474 Wire Diagram Rev A 54 ...
Page 55: ...Notes 55 ...


