background image

20

Maintenance

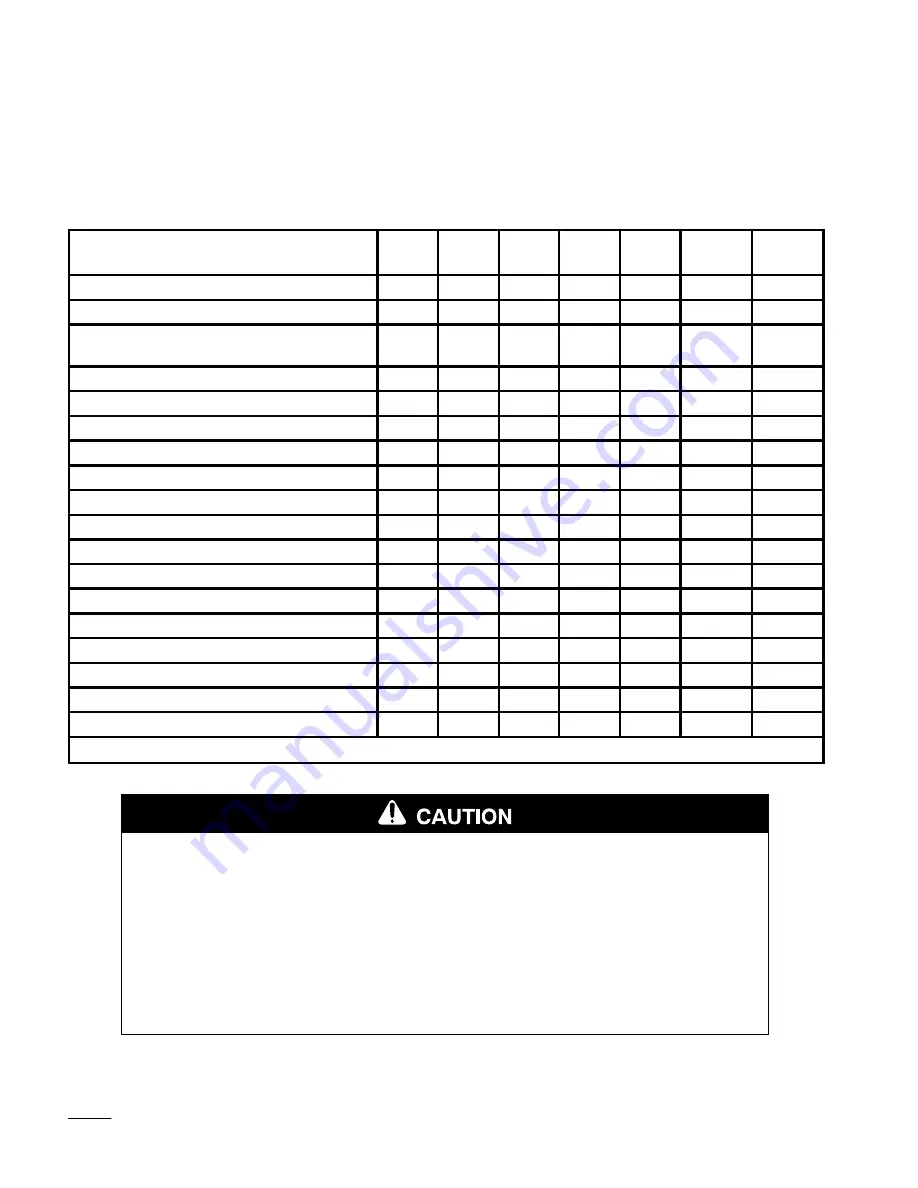
Service Interval Chart

Service Operation

Each

Use

5

Hours

25

Hours

50

Hours

100

Hours

Storage

Service

Spring

Service

Oil—check level

X

Oil—change*

Initial

X

Oil Filter—change* (200 hours, every
other oil change or yearly)

X

X

Safety System—check

X

X

Brake—check

X

X

X

X

Chassis—grease*

X

X

Foam Air Cleaner—service*

X

X

Paper Air Cleaner—replace*

X

X

Spark Plug(s)—check

X

X

X

Belts—check for wear/cracks

X

X

Gasoline—drain

X

Engine—clean outside

X

X

X

Chipped Surfaces—paint

X

Battery—check electrolyte

X

X

X

Battery—charge, disconnect cables

X

Fuel Filter—replace

X

X

Tires—check pressure

X

X

X

Front Wheels–check toe-in

X

X

* More often in dusty, dirty conditions

POTENTIAL HAZARD

If you leave the key in the ignition switch, someone could start the engine.

WHAT CAN HAPPEN

Accidental starting of the engine could seriously injure you or other bystanders.

HOW TO AVOID THE HAZARD

Remove the key from the ignition switch and pull the wire(s) off the spark plug(s)
before you do any maintenance. Also push the wire(s) aside so it does not
accidentally contact the spark plug(s).

Summary of Contents for Wheel Horse 265-6

Page 1: ...efully It contains information about your safety and the safety of others Also become familiar with the controls and their proper use before you operate the product FORM NO 3321 837 Wheel Horse 265 6 Lawn and Garden Tractor Model No 72047 9900001 Up ...

Page 2: ... safe operation The warning system in this manual identifies potential hazards and has special safety messages that help you and others avoid personal injury even death DANGER WARNING and CAUTION are signal words used to identify the level of hazard However regardless of the hazard be extremely careful DANGER signals an extreme hazard that will cause serious injury or death if the recommended prec...

Page 3: ...ting in Reverse 13 Indicator Control Module 16 Hourmeter 16 Driving Forward or Backward 16 Selecting Ground Speeds 17 Stopping the Machine 17 Attachment Lift Lever 18 Page Adjusting Dial A Height 18 Positioning the Seat 19 Headlights 19 Positioning the Tilt Steering Wheel 19 Maintenance 20 Service Interval Chart 20 Air Cleaner 21 Engine Oil 23 Spark Plug 25 Greasing and Lubrication 26 Tire Pressur...

Page 4: ...ion 1 Read understand and follow all instructions in the operator s manual and on the machine before starting 2 Allow only responsible adults who are familiar with the instructions to operate the machine 3 Clear the area of objects such as rocks toys wire etc which could be picked up and thrown by the blade 4 Be sure the area is clear of other people before mowing Stop the machine if anyone enters...

Page 5: ...ruts or bumps as uneven terrain could overturn the machine Tall grass can hide obstacles Use slow speed Choose a low gear so that you will not have to stop or shift while on the slope Follow the manufacturer s recommendations for wheel weight or counterweights to improve stability Use extra care with grass catchers or other attachments These can change the stability of the machine Keep all movemen...

Page 6: ...ueling Do not smoke C Never refuel the machine indoors D Never store the machine or fuel container inside where there is an open flame such as near a water heater or furnace 3 Never run a machine inside a closed area 4 Keep nuts and bolts tight especially the blade attachment bolts Keep equipment in good condition 5 Never tamper with safety devices Check safety systems for proper operation before ...

Page 7: ...Safety 5 Slope Chart Read all safety instructions on pages 2 4 ...

Page 8: ...6 ...

Page 9: ...No 92 6725 ON DASH LEFT SIDE Part No 92 6720 ON DASH RIGHT SIDE Part No 92 6721 ON FRAME CENTER REAR Part No 92 6727 ON LIFT LEVER Part No 112168 ON DIAL A HEIGHT KNOB Part No 78 9740 ON SPEED CONTROL LEVER Part No 93 3141 ON DASH RIGHT SIDE Part No 92 6722 ON STEERING TOWER Part No 83 6620 ON FRAME STEP Part No 92 8946 DASH INDICATOR PANEL Part No 99 8038 ON SEAT BRACKET Part No 99 5339 ON SEAT B...

Page 10: ...e and stay away from an open flame or where gasoline fumes may be ignited by a spark Store gasoline in an approved container and keep it out of the reach of children Never buy more than a 30 day supply of gasoline POTENTIAL HAZARD In certain conditions gasoline is extremely flammable and highly explosive WHAT CAN HAPPEN A fire or explosion from gasoline can burn you others and cause property damag...

Page 11: ...ol or ethanol Filling the Fuel Tank 1 Shut the engine off and set the parking brake 2 Clean around each fuel tank cap and remove the cap Add unleaded regular gasoline to both fuel tanks until the level is 1 4 to 1 2 inch 6 mm to 13 mm below the bottom of the filler neck This space in the tank allows gasoline to expand Do not fill the fuel tanks completely full 3 Install fuel tank caps securely Wip...

Page 12: ...ilt wheel lever 13 Hood opening 14 Dial a height knob Key Choice Switch A turn and release switch used for deactivating the Operating In Reverse interlock feature Located on the seat bracket on the right hand just below the seat Fig 2 m 4220 1 Figure 2 1 Key Choice switch Parking Brake Always set the parking brake when you stop the machine or leave it unattended While the ignition key is in the RU...

Page 13: ...ration 11 Releasing the Parking Brake 1 Push down on the brake pedal Fig 3 The parking brake lever should release 2 Gradually release the brake pedal 1 2 1244a Figure 3 1 Brake pedal 2 Parking brake lever ...

Page 14: ...gnition key to OFF and let the starter motor cool refer to Troubleshooting page 39 8 After the engine starts move the choke lever to OFF and slowly move the throttle lever to FAST Fig 4 If the engine stalls or hesitates move the choke lever back to ON for a few seconds Then move the throttle lever to FAST Repeat this as required Figure 4 1 PTO Off 2 Choke On 3 Choke Off Figure 5 1 Fast 2 Slow 1 3 ...

Page 15: ... designed to stop the engine if you rise from the seat when the brake pedal is released or the power take off PTO is ON Operating in Reverse An interlock feature is provided that prevents the Power Take Off PTO from operating while the tractor is traveling in reverse If the unit is shifted into reverse while the mower blade or other PTO driven attachment is engaged the PTO will stop Do not mow whi...

Page 16: ...e or other PTO attachment engaged Always remove both the ignition and the Key Choice keys and put them in a safe place out of the reach of children when leaving the unit unattended POTENTIAL HAZARD A child or bystander could be backed over by a riding mower with its blade s engaged WHAT CAN HAPPEN Blade contact will cause serious personal injury or death HOW TO AVOID THE HAZARD Do not mow in rever...

Page 17: ...and the PTO light will illuminate Move the foot pedal to reverse You should hear an audible click indicating the PTO is deactivated and the PTO light should turn off 5 With the parking brake released turn the ignition key to RUN without starting the engine Pull the PTO switch to ON You should hear an audible click indicating the PTO is activated and the PTO light will illuminate Move the foot peda...

Page 18: ...rated Fig 10 It is turned on when the ignition switch is in the RUN or LIGHTS positions Use the times for scheduling regular maintenance Driving Forward or Backward The throttle control regulates the engine speed as measured in rpm revolutions per minute Place the throttle control in the FAST position for best performance Note For reverse motion with the PTO engaged the operating in reverse interl...

Page 19: ... a lower speed i e 2 1239 1 2 3 Figure 11 1 Ground speeds 1 6 2 Neutral 3 Push in and pull down for Reverse Stopping the Machine To stop the machine depress the clutch and brake pedals disengage the power take off PTO and turn the ignition key to OFF to stop the engine Also set the parking brake if you leave the machine unattended refer to Setting the Parking Brake page 10 Remember to remove the k...

Page 20: ...latch Move lift lever foreword to lower attachment 1205 3 2 4 5 6 1 Figure 12 1 Lift lever 2 Button 3 Dial A Height 4 Indicator 5 High 6 Mounting position Adjusting Dial A Height The Dial A Height control Fig 12 is used to limit the downward travel of the attachment The Dial A Height knob is rotated to change the location of this stop up or down 1 Raise the attachment lift lever Refer to Raising A...

Page 21: ...on switch Fig 14 The lights are on while the ignition switch is in the LIGHTS position even with the engine off Remove the key when the machine is left unattended so lights can not be turned on discharging the battery 1208 1 Figure 14 1 Lights Positioning the Tilt Steering Wheel The steering wheel has four tilt locations Position the steering wheel where you have the best control of the machine an...

Page 22: ...ine clean outside X X X Chipped Surfaces paint X Battery check electrolyte X X X Battery charge disconnect cables X Fuel Filter replace X X Tires check pressure X X X Front Wheels check toe in X X More often in dusty dirty conditions POTENTIAL HAZARD If you leave the key in the ignition switch someone could start the engine WHAT CAN HAPPEN Accidental starting of the engine could seriously injure y...

Page 23: ...nt dirt from getting into the engine and causing damage Remove knob and the air cleaner cover Fig 16 1 2 1214 3 4 5 6 8 7 Figure 16 1 Air cleaner cover 2 Knob 3 Cover nut 4 Cover 5 Foam element 6 Paper element 7 Rubber seal 8 Air cleaner base 4 Carefully slide the foam element off the paper element Fig 16 5 Unscrew the cover nut and remove the cover and paper element Fig 16 Cleaning the Foam and P...

Page 24: ...d thoroughly 1 1213 2 Figure 18 1 Paper element 2 Rubber seal Installing the Foam and Paper Elements IMPORTANT To prevent engine damage always operate the engine with the complete foam and paper air cleaner assembly installed 1 Carefully slide the foam element onto the paper air cleaner element Fig 16 2 Slide the air cleaner assembly and cover onto the long rod Now screw the cover nut finger tight...

Page 25: ...engage the power take off PTO set the parking brake and turn the ignition key to OFF to stop the engine Remove the key 2 Open the hood 3 Clean around the oil dipstick Fig 19 so dirt cannot fall into the filler hole and damage the engine 4 Unscrew the oil dipstick and wipe the metal end clean Fig 19 5 Slide the oil dipstick fully onto the filler tube do not thread onto tube Fig 19 Pull the dipstick...

Page 26: ...mately 80 of the specified amount of oil into the filler tube Fig 19 Now check the oil level refer to Checking Oil Level page 23 Slowly add additional oil to bring to FULL mark on dipstick Change Oil Filter Service Interval Specification Replace the oil filter every 200 hours or every other oil change Note Change oil filter more frequently when operating conditions are extremely dusty or sandy 1 D...

Page 27: ...lly causing damage 4 Remove the spark plug s and metal washer 2 1 1218 Figure 22 1 Spark plug wire 2 Spark plug Checking the Spark Plug 1 Look at the center of the spark plug s Fig 23 If you see light brown or gray on the insulator the engine is operating properly A black coating on the insulator usually means the air cleaner is dirty IMPORTANT Never clean the spark plug s Always replace the spark...

Page 28: ...move the key 2 Clean the grease fittings with a rag Make sure to scrape any paint off the front of the fitting s 3 Connect a grease gun to the fitting Pump grease into the fittings until grease begins to ooze out of the bearings 4 Wipe up any excess grease Where to Add Grease 1 Lubricate the front wheels and spindles until grease begins to ooze out of the bearings Fig 24 2 Lubricate the front axle...

Page 29: ...he front and rear tires as specified Check the pressure at the valve stem after every 25 operating hours or monthly whichever occurs first Fig 26 Check the tires when they are cold to get the most accurate pressure reading Pressure 20 psi 138 kPa front and rear 1 2323 Figure 26 1 Valve stem ...

Page 30: ... wheels turn and do not lock refer to Adjusting the Brake page 28 Adjusting the Brake 1 Check the brake before you adjust it refer to Checking the Brake page 28 2 To increase braking resistance tighten the brake adjusting nut Fig 27 1 8 turn clockwise then check the brake again Continue this adjusting and checking process until the brake is set properly 3 Push down on the brake pedal to release th...

Page 31: ...drains completely Then disengage the power take off PTO set the parking brake and turn the ignition key to OFF to stop the engine Remove the key 2 Close fuel shut off valve at fuel tank Fig 28 1263 1 Figure 28 1 Fuel shut off valve 3 Open the hood 4 Squeeze the ends of the hose clamp together and slide it up the fuel line toward the fuel tank Fig 29 5 Pull the fuel line off the filter Fig 29 Open ...

Page 32: ...TO set the parking brake and turn the ignition key to OFF to stop the engine Remove the key 2 Close fuel shut off valve at fuel tank Fig 28 3 Open the hood 4 Squeeze the ends of the hose clamps together and slide them away from the filter Fig 30 5 Remove the filter from the fuel lines 1 2 3 1217 Figure 30 1 Hose clamp 2 Fuel line 3 Filter 6 Install a new filter and move the hose clamps close to th...

Page 33: ...the front and rear of the wheels Fig 31 4 The front measurement should be less than the rear as specified 1 4 2 3 1261 Figure 31 1 Measure here 2 Ball joint flats 3 Jam nut 4 Steering lever Adjusting Toe In 1 Check the toe in before you adjust it refer to Measuring Toe In Page 31 2 Remove ball joint from one steering lever Fig 31 3 Loosen jam nut securing ball joint to steering rod Rotate ball joi...

Page 34: ...component circuit for malfunction or short To replace fuses pull up on the fuse Fig 32 to remove or replace it Fuse Main Starter F1 30 amp blade type Alternator F2 25 amp blade type Dash Hour meter F3 10 amp blade type Head lights F4 10 amp blade type 2344 1 2 3 4 Figure 32 1 Main 30 amp 2 Alternator 25 amp 3 Dash Hour meter 10 Amp 4 Head lights 10 amp ...

Page 35: ...urn and remove bulb from the bulb holder Fig 34 1 2 3 4 4 5 5 Figure 33 1 Bulb holder 2 Reflector 3 Tabs 4 Slots 5 Terminals Installing the Bulb 1 The bulb has metal pins on the side of its base Align the pins with the slots in the bulb holder and insert the base into the holder Fig 34 Push and rotate the bulb clockwise until it stops 1 2 3 4 2 4 Figure 34 1 Bulb 2 Metal pins 3 Bulb holder 4 Slots...

Page 36: ... clear pin and slide panel tabs out from steering tower 4 Disconnect the negative black ground cable from the battery post Fig 35 5 Lift the rubber cover up on the positive red cable Disconnect the positive red cable from the battery post Fig 35 6 Remove the battery hold down rods Fig 35 1 2 3 5 4 1219 Figure 35 1 Negative cable black 2 Rubber cover 3 Positive cable red 4 Bolt and wing nut 5 Hold ...

Page 37: ...o the Battery page 35 1 2 3 1262 Figure 37 1 Filler caps 2 Lower part of tube 3 Plates Adding Water to the Battery The best time to add distilled water to the battery is just before you operate the machine This lets the water mix thoroughly with the electrolyte solution 1 Clean the top of the battery with a paper towel 2 Lift off the filler caps Fig 37 3 Slowly pour distilled water into each batte...

Page 38: ... Level page 35 steps 1 3 3 Remove the filler caps from the battery and connect a 3 to 4 amp battery charger to the battery posts Charge the battery at a rate of 4 amperes or less for 4 hours 12 volts Do not overcharge the battery Install the filler caps after the battery is fully charged POTENTIAL HAZARD Charging the battery produces gasses WHAT CAN HAPPEN Battery gasses can explode HOW TO AVOID T...

Page 39: ...Maintenance 37 Wiring Diagram ...

Page 40: ...refer to Battery page Do not connect the battery cables to the battery posts during storage IMPORTANT The battery must be fully charged to prevent it from freezing and being damaged at temperatures below 32 F 0 C A fully charged battery maintains its charge for about 50 days at temperatures lower than 40 F 4 C If the temperatures will be above 40 F 4 C check the water level in the battery and char...

Page 41: ...not ON 2 Move choke lever to ON 3 Air cleaner is dirty 3 Clean or replace air cleaner element 4 Spark plug wire is loose or disconnected 4 Install wire on spark plug 5 Spark plug is pitted fouled or gap is incorrect 5 Install new correctly gapped spark plug 6 Dirt in fuel filter 7 Dirt water or stale fuel is in fuel system 6 Replace fuel filter 7 Contact Authorized Service Dealer Engine loses powe...

Page 42: ... and air passages under engine blower housing are plugged 3 Remove obstruction from cooling fins and air passages Abnormal vibration 1 Engine mounting bolts are loose 1 Tighten engine mounting bolts 2 Loose engine pulley idler pulley or blade pulley 2 Tighten the appropriate pulley 3 Engine pulley is damaged 3 Contact Authorized Service Dealer Machine does not drive 1 Traction belt is worn loose o...

Page 43: ......

Page 44: ...ty Not Cover and How Does Your State Law Relate To This Warranty 7 8 34 49 7 57 88 77 39 59 47 85 1 2 88 43 8 89 2 4 7 43 842 574 98 8 57 88 77 39 4 8 349 4 7 489 4 7 1 7 2 39 3 3 8 7 47 5 798 8 8 19 78 1 1 7 398 9 3 5 5 798 1 8 75 3 3 7 0 3 1 9 892 398 3 574 9 47 5 79 8 3 19 7 47 2 8 8 47 7 6 7 7 51 2 39 47 7 5 7 94 3472 1 7 398 47 1 0 4 5745 7 2 39 3 3 5 78 3 88 7 94 25745 7 1 439 2 3 398 3 9 1 ...

Reviews: