background image

Check Before Operating

12

Adding Fuel

The engine runs on clean, fresh diesel fuel with a
minimum cetane rating of 40.  Purchase fuel in
quantities that can be used within 30 days to assure
fuel freshness.

Use summer grade diesel fuel (No. 2–D) at
temperatures above 20

 F (–7

 C) and winter grade

diesel fuel (No. 1–D or No. 1–D/2–D blend) below
20

 F (–7

 C).  Use of winter grade diesel fuel at

lower temperatures provides lower flash point and
pour point characteristics, therefore easing startability
and lessening chances of chemical separation of the
fuel due to lower temperatures (wax appearance,
which may plug filters).

Use of summer grade diesel fuel above 20

 F (–7

 C)

will contribute toward longer life of the pump
components.

IMPORTANT: Do not use kerosene or
gasoline instead of diesel fuel.  Failure to
observe this caution will damage the engine.

POTENTIAL HAZARD

Under certain conditions, fuel is extremely
flammable and highly explosive.

WHAT CAN HAPPEN

A fire or explosion from fuel can burn you,
others, and cause property damage.

HOW TO AVOID THE HAZARD

Use a funnel and fill the fuel tank outdoors,
in an open area, when the engine is cold.
Wipe up any fuel that spills.

Do not fill the fuel tank completely full.
Add fuel to the fuel tank until the level is
1/4” to 1/2” (6 mm to 13 mm) below the
bottom of the filler neck. This empty space
in the tank allows fuel to expand.

Never smoke when handling fuel, and stay
away from an open flame or where fuel
fumes may be ignited by a spark.

Store fuel in an approved container and
keep it out of the reach of children. Never
buy more than a 30-day supply.

1.

Park the machine on a level surface, disengage
the power take off (PTO), set the parking brake,
lower the attachment lift, and turn the ignition
key to “STOP” to stop the engine.  Remove the
ignition key.

2.

Clean around the fuel tank cap and remove the
cap.  Use a funnel and add fuel until the fuel
level is 1/4 to 1/2 inch (6 mm to 13 mm) below
the bottom of the filler neck.  This space in the
tank allows for expansion of the fuel. When
filling the tank, make sure that the machine is on
a level surface so that adequate air space is
allowed.  Do not fill the fuel tank completely.

3.

Install the fuel cap securely.  Wipe up any fuel
that may have spilled.

4.

If possible, fill the fuel tank after each use.  This
will minimize possible buildup of condensation
inside the fuel tank.

Summary of Contents for Wheel Horse 523Dxi

Page 1: ...ual carefully It contains information about your safety and the safety of others Also become familiar with the controls and their proper use before you operate the product FORM NO 3321 969 Wheel Horse...

Page 2: ...ration The warning system in this manual identifies potential hazards and has special safety messages that help you and others avoid personal injury even death DANGER WARNING and CAUTION are signal wo...

Page 3: ...Off PTO 19 The Safety Interlock System 20 Operating in Reverse 20 Gauges and Indicator Lights 22 Driving Forward or Backward 24 Stopping the Machine 24 Re centering the Steering Wheel 25 Attachment Po...

Page 4: ...Contents 2 Keep this engine Owner s Manual with your unit Should this engine Owner s Manual become damaged or illegible replace immediately Replacements may be ordered through the engine manufacturer...

Page 5: ...r with the instructions to operate the machine 3 Clear the area of objects such as rocks toys wire etc which could be picked up and thrown by the blade 4 Be sure the area is clear of other people befo...

Page 6: ...low speed Choose a low gear so that you will not have to stop or shift while on the slope Follow the manufacturer s recommendations for wheel weight or counterweights to improve stability Use extra ca...

Page 7: ...eling Do not smoke C Never refuel the machine indoors D Never store the machine or fuel container inside where there is an open flame such as near a water heater or furnace 3 Never run a machine insid...

Page 8: ...Safety 6...

Page 9: ...Safety 7 Slope Chart Read all safety instructions on pages 3 5...

Page 10: ...8...

Page 11: ...danger Replace any decal that is damaged or lost ON DRIVE SHAFT TUNNEL Part No 80 8760 ON RADIATOR FAN SHROUD Part No 95 4143 2 UNDER SIDE SHIELD Part No 98 5014 ON REAR FENDER Part No 98 3088 2 INSID...

Page 12: ...g the Hood To open the hood 1 Park the machine on a level surface disengage the power take off PTO set the parking brake lower the attachment lift and turn the ignition key to STOP to stop the engine...

Page 13: ...d 3 To remove a side panel A Lift up and twist each of the two side panel latches 90 or until they line up with the open slot Fig 3 B Pull the top of the side panel toward you until the side panel lat...

Page 14: ...tank outdoors in an open area when the engine is cold Wipe up any fuel that spills Do not fill the fuel tank completely full Add fuel to the fuel tank until the level is 1 4 to 1 2 6 mm to 13 mm belo...

Page 15: ...off PTO set the parking brake lower the attachment lift and turn the ignition key to STOP to stop the engine Remove the ignition key 2 Open the hood 3 Clean around the oil dipstick Fig 5 so dirt cann...

Page 16: ...HOW TO AVOID THE HAZARD Do not remove the radiator cap to check coolant Follow the directions below for checking coolant Do not remove the radiator cap when the engine is hot Always allow the engine...

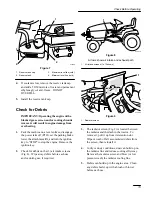
Page 17: ...n key to STOP to stop the engine Remove the ignition key 2 Check for debris on the 3 air intake screens Fig 8 Wipe away debris before each use and or during use if required 1 m 3412 Figure 8 Arrows sh...

Page 18: ...r deplete grease 6 The rear transaxle cover is an air intake area for cooling the transaxle Clean debris from the rear transaxle cover before operating the tractor Fig 11 1 m 3436 Figure 11 1 Rear tra...

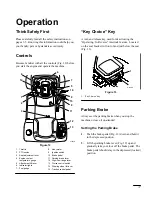
Page 19: ...switch 10 Brake pedal 11 Parking brake lever 12 High Low range lever 13 Cruise control switch 14 Steering wheel tilt lever 15 Traction control pedal Key Choice Key A turn and release key used for deac...

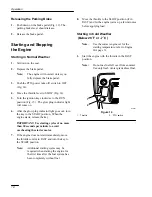
Page 20: ...rts release the key IMPORTANT Use starting cycles of no more than 30 seconds per minute to avoid overheating the starter motor 7 If the engine does not start immediately move the throttle control to F...

Page 21: ...key is in the RUN or LIGHTS position and the power take off PTO is engaged the PTO indicator light will be on When this light is on it is a reminder the implement is being powered and the starter wil...

Page 22: ...e are likely to appear while you are mowing or operating an attachment Be extra observant after you have chosen to deactivate the interlock feature because the sound of the tractor s engine might prev...

Page 23: ...erlock system each time before you use the machine Do not operate the machine if the safety system is not functioning properly If the safety system does not operate as described below have an Authoriz...

Page 24: ...light should turn off Gauges and Indicator Lights The indicator lights Fig 19 illuminate when certain controls are activated and when major malfunctions occur that need immediate attention 1 2 3 4 5 6...

Page 25: ...l light indicates that the cruise control system is activated Coolant Temperature Light The coolant temperature light shows when the engine cooling system is overheated The light indicates to check th...

Page 26: ...tand and follow all instructions in the operator s manual and on the machine before starting 3 Place the throttle control in the FAST position for best performance The throttle control regulates engin...

Page 27: ...ree to which the steering wheel is out of center then turn the steering wheel all the way in the opposite direction until the front wheels no longer turn 2 Continue turning the steering wheel by the d...

Page 28: ...ock seat Fig 23 2 Slide the seat to the desired position and release the lever to lock the seat into position IMPORTANT Be sure that the seat is locked in position before operating 1 m 3320 Figure 23...

Page 29: ...page 24 While holding your foot steady on the traction control pedal push the cruise control switch Fig 26 to the SET position This locks the traction control in position and your foot can then be re...

Page 30: ...e does not affect engine speed This system was set at the factory and should not need adjustment POTENTIAL HAZARD Excessive speed when turning can result in rollover accidents WHAT CAN HAPPEN Rollover...

Page 31: ...X X Engine Oil change Initial X X Engine Oil Filter change Initial X X Tires check pressure X X Battery check electrolyte level X X Transaxle check oil level X Transaxle change oil Initial X X Transa...

Page 32: ...r sandy Replace the cartridge after every 100 operating hours or yearly Removing the Air Cleaner Cartridge 1 Disengage the power take off PTO set the parking brake lower the attachment lift and turn t...

Page 33: ...drains completely Then disengage the power take off PTO set the parking brake and turn the ignition key to STOP to stop the engine Remove the ignition key 3 Open the hood POTENTIAL HAZARD Components...

Page 34: ...e 31 2 Place a drip pan beneath the oil drip tray to receive oil from the oil filter and oil passages in the engine 3 Turn the filter counterclockwise to remove it Note Dispose of oil filter properly...

Page 35: ...attach a 3 8 ID hose to each of the two drain valves 3 Open both coolant drain valves at the bottom of the radiator and allow coolant to flow into a drain pan When coolant stops flowing close the drai...

Page 36: ...fitting Pump grease into the fittings until grease begins to ooze out of the bearings 4 Wipe up any excess grease Where to Add Grease 1 Lubricate the left hand and right hand spindles until grease beg...

Page 37: ...4 Tire Pressure Service Interval Specification Maintain the air pressure in the front and rear tires as specified Check the pressure at the valve stem after every 25 operating hours or monthly whichev...

Page 38: ...usting the Brake Adjusting the Brake The brake adjustment is behind the left side cover Fig 37 If the parking brake does not hold securely an adjustment is required 1 Check the brake before you adjust...

Page 39: ...attachment lift and turn the ignition key to STOP to stop the engine Remove the ignition key 2 Close the fuel shut off valve at the fuel tank Fig 38 39 IMPORTANT Do NOT run the engine until it uses up...

Page 40: ...lower the attachment lift and turn the ignition key to STOP to stop the engine Remove the ignition key 2 Close the fuel shut off valve at the fuel tank Fig 38 39 3 Open the hood 4 Drain the fuel from...

Page 41: ...looseness in the linkage 4 Measure the distance between both of the front tires at spindle level at the front and rear of the wheels Fig 41 5 The front measurement should be 1 8 to 1 4 3 to 6 mm less...

Page 42: ...dipstick 5 Pull out the transmission dipstick and wipe the metal end clean Fig 44 6 Slide the dipstick fully into the filler tube Fig 6 Pull the dipstick out and look at the metal end When the transa...

Page 43: ...l refer to Checking Transaxle Fluid Level page 40 Slowly add additional oil to bring the oil level to the FULL mark on the dipstick Changing the Transaxle Filter Service Interval Specification Replace...

Page 44: ...he hood Pull the wire connectors off both bulb holder terminals 3 Rotate the bulb holder 1 4 turn counterclockwise and remove it from the reflector Fig 49 4 Push and rotate the bulb counterclockwise u...

Page 45: ...part baking soda Apply a light coating of grease to the battery terminals to prevent corrosion Battery size 12 v 495 Cold Cranking Amps at 0 F Group size 45 Checking the Electrolyte Level 1 Park the...

Page 46: ...PORTANT Do not overfill the battery because electrolyte sulfuric acid can cause severe corrosion and damage to the chassis 4 Press the cell cover onto the battery Removing the Battery 1 Disengage the...

Page 47: ...tive black cable Do not allow metal tools to short between the battery terminals and metal parts of the tractor Always keep the battery hold down brackets in place to secure the battery Always route b...

Page 48: ...battery charger to the battery posts Charge the battery at a rate of 4 amperes or less for 4 hours 12 volts Do not overcharge the battery Install the cell cover after the battery is fully charged POTE...

Page 49: ...K6 1 2 4 5 3 K5 E A PK WARNING LIGHT HARNESS BK PK BK PK GN GND TEMP GAUGE 194 LAMP L S G I TEMP SENDER PK T BK HOUR METER BK GN OIL PRESS GND BK VIO BN Cruise Module 4 6 2 1 47uF C1 D2 1N4004 2 3 5 6...

Page 50: ...T T SW1 SEAT SWITCH GN PK BU BK GN BU 2 3 5 4 1 K1 START RELAY VIO BU OR R 5 L I 4 3 1 2 IGNITION SWITCH TERMINAL LOCATIONS VEIWED FROM BACK 15A F2 10A F3 PK SW4 IGNITION SWITCH S L R I B B R S PINK R...

Page 51: ...ge 43 Do not connect the battery cables to the battery posts during storage IMPORTANT The battery must be fully charged to prevent it from freezing and being damaged at temperatures below 32 F 0 C A f...

Page 52: ...starter or starter solenoid 9 Contact your Authorized Service Dealer 10 Seized internal engine components 10 Contact your Authorized Service Dealer The engine cranks but will not start 1 Incorrect sta...

Page 53: ...filter Add fresh fuel of proper grade for ambient temperature conditions The engine starts but does not keep running 1 The fuel tank vent is restricted 1 Contact your Authorized Service Dealer eep u g...

Page 54: ...ervice Dealer 2 Dirt water stale fuel or incorrect fuel is in the fuel system 2 Drain and flush the fuel system add fresh fuel 3 The idle speed adjusting screw is incorrectly set 3 Contact your Author...

Page 55: ...loses power 1 The crankcase oil level is incorrect 1 Fill or drain to the full mark 2 The air cleaner element is dirty 2 Clean or replace 3 Dirt water stale fuel or incorrect fuel is in the fuel syst...

Page 56: ...e inoperative 2 Check the fuse glow plugs and wiring 3 The fuel injection nozzles are faulty 3 Contact your Authorized Service Dealer 4 The injection pump timing is incorrect 4 Contact your Authorized...

Page 57: ...inkage needs adjustment or replacement 2 Contact your Authorized Service Dealer 3 The transmission is faulty 3 Contact your Authorized Service Dealer The tractor operates in both directions but with a...

Page 58: ...l throttle 8 PTO is being engaged when cutter deck is in tall uncut grass or weeds 9 Cutter deck is overloaded because mulching or bagging requires more power 10 Cutter deck is overloaded because too...

Page 59: ...57...
Page 60: ...rator s manual Such routine maintenance whether performed by a dealer or by you is at your expense What Does This Warranty Not Cover and How Does Your State Law Relate To This Warranty There is no oth...

Reviews: