background image

This machine is a utility vehicle intended to be used by
professional, hired operators in commercial applications. It
is primarily designed for the transport of implements used in
such applications. This vehicle allows for the safe transport
of an operator and one passenger in the identified seats. The
bed of this vehicle is not suitable for any riders.

WARNING

CALIFORNIA

Proposition 65 Warning

This product contains a chemical or chemicals

known to the State of California to cause cancer,

birth defects, or reproductive harm.

The engine exhaust from this product

contains chemicals known to the State of

California to cause cancer, birth defects,

or other reproductive harm.

It is a violation of California Public Resource Code
Section 4442 or 4443 to use or operate the engine on any
forest-covered, brush-covered, or grass-covered land unless
the engine is equipped with a spark arrester, as defined in
Section 4442, maintained in effective working order or the
engine is constructed, equipped, and maintained for the
prevention of fire.

Introduction

Read this information carefully to learn how to operate and
maintain your product properly and to avoid injury and
product damage. You are responsible for operating the
product properly and safely.

You may contact Toro directly at www.Toro.com for product
and accessory information, help finding a dealer, or to register
your product.

Whenever you need service, genuine Toro parts, or additional
information, contact an Authorized Service Dealer or Toro
Customer Service and have the model and serial numbers of
your product ready.

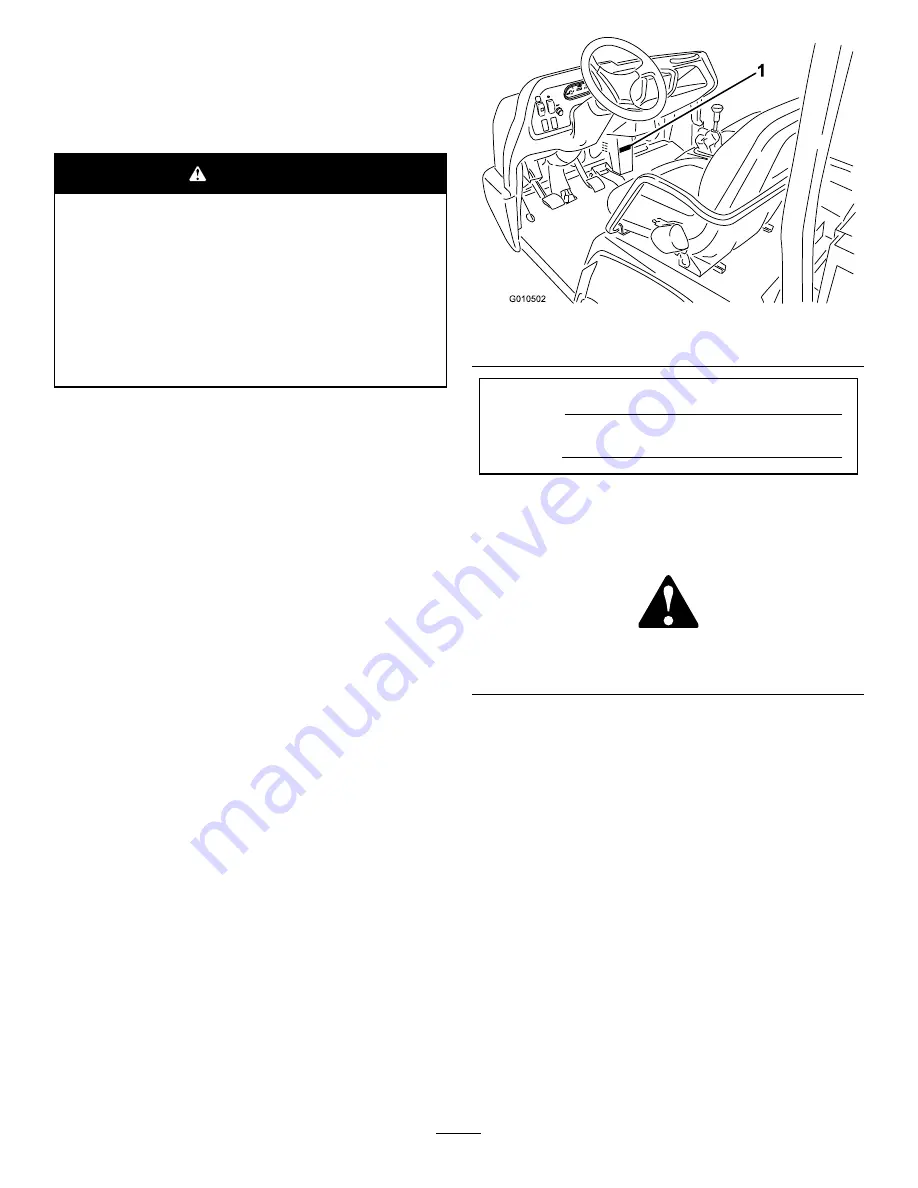
Figure 1

identifies the location of the

model and serial numbers on the product. Write the numbers
in the space provided.

Figure 1

1.

Model and serial number location

Model No.

Serial No.

This manual identifies potential hazards and has safety
messages identified by the safety-alert symbol (

Figure 2

),

which signals a hazard that may cause serious injury or death
if you do not follow the recommended precautions.

Figure 2

1.

Safety-alert symbol

This manual uses 2 other words to highlight information.

Important

calls attention to special mechanical information

and

Note

emphasizes general information worthy of special

attention.

© 2015—The Toro® Company
8111 Lyndale Avenue South
Bloomington, MN 55420

2

Contact us at www.Toro.com.

Printed in the USA

All Rights Reserved


Summary of Contents for Workman HD 07369

Page 1: ...Form No 3401 134 Rev A Workman HD Utility Vehicle with Bed Model No 07369 Serial No 316000001 and Up Register at www Toro com Original Instructions EN 3401 134 A...

Page 2: ...n carefully to learn how to operate and maintain your product properly and to avoid injury and product damage You are responsible for operating the product properly and safely You may contact Toro dir...

Page 3: ...moving the Full Bed 35 Installing the Full Bed 35 Raising the Machine 36 Removing the Hood 37 Installing the Hood 37 Lubrication 38 Greasing Bearings and Bushings 38 Engine Maintenance 39 Inspecting t...

Page 4: ...nd know how to stop the engine quickly Never operate the machine when tired ill or under the influence of drugs or alcohol Always wear substantial shoes Do not wear loose fitting clothing tie back lon...

Page 5: ...bed distribute the load evenly Use extra caution if the load exceeds the dimensions of the machine bed Operate the vehicle with extra caution when handling off center loads that cannot be centered Ke...

Page 6: ...be dangerous If you have to turn while on a hill do it slowly and cautiously Never make sharp or fast turns Heavy loads affect stability Reduce the weight of the load and your ground speed when opera...

Page 7: ...e Never work under a raised bed without placing the bed safety support on the fully extended cylinder rod Make sure that all hydraulic line connectors are tight and that all hydraulic hoses and lines...

Page 8: ...ir or revise read the Operator s Manual 93 9852 1 Warning read the Operator s Manual 2 Crushing hazard install the cylinder lock 93 9868 1 Crushing hazard of hand read the Operator s Manual 93 9879 1...

Page 9: ...gue weight with trailer brakes is 273 kg 600 lb 115 7741 1 Read the Operator s Manual before servicing transmission fluid Battery Symbols Some or all of these symbols are on your battery 1 Explosion h...

Page 10: ...read the Operator s Manual avoid tipping the machine wear the seat belt lean away from the direction the machine is tipping 115 7723 1 Warning the hydraulic oil pressure is 124 bar 1 800 psi 2 Couple...

Page 11: ...e from the vehicle do not carry passengers in the cargo bed keep arms and legs inside of the vehicle at all times and use seat belts and handholds 115 2281 1 Headlights 4 Engine run 2 Horn 5 Engine st...

Page 12: ...engine and remove the key from the ignition before walking away from the machine 2 Warning wear hearing protection 5 Tipping hazard take turns slowly drive slowly up and across cliffs with no load do...

Page 13: ...lock 9 Entanglement hazard shaft keep bystander s a safe distance from the vehicle 3 Unlocked 10 Retract hydraulics 4 Hydraulic lock 11 Extend hydraulics 5 Engage 12 Transmission high speed 6 Power t...

Page 14: ...ng the Fluid Levels No Parts Required Procedure 1 Check the engine oil level before and after the engine is first started refer to Checking the Engine Oil Level page 20 2 Check the transaxle hydraulic...

Page 15: ...machine Figure 4 1 Accelerator pedal 3 Brake pedal 2 Clutch pedal Clutch Pedal You must fully press the clutch pedal Figure 4 to disengage the clutch when starting the engine or shifting transmission...

Page 16: ...lift lock 2 Parking brake 5 Differential lock 3 Hydraulic bed lift 6 High low range shifter Parking Brake Whenever the engine is shut off the parking brake Figure 6 in order to prevent the machine fr...

Page 17: ...8 Oil pressure warning light 4 Fuel gauge 9 Charge indicator 5 Ignition switch Hour Meter The hour meter indicates the total hours of machine operation The hour meter Figure 7 starts to function whene...

Page 18: ...does not function either a bulb is burned out or there is a malfunction in the system which must be repaired Fuel Gauge The fuel gauge shows the amount of fuel in the tank It operates only when igniti...

Page 19: ...material without the proper safety support rod may lower unexpectedly Working under an unsupported raised bed may cause injury to you or others Before servicing or making adjustments to the machine s...

Page 20: ...gine Oil Level Service Interval Before each use or daily Engine oil type Detergent engine oil API SJ or higher Engine oil viscosity 10W 30 Choose an engine oil viscosity according to the ambient air t...

Page 21: ...hown in Figure 14 This clearance is necessary to permit venting when filling which prevents oil from overrunning into the breather Figure 14 1 Note clearance 6 Install the dipstick firmly in place Add...

Page 22: ...harge When practical remove gas powered equipment from the truck or trailer and refuel the equipment with its wheels on the ground If this is not possible then fuel such equipment on a truck or traile...

Page 23: ...e level is low add enough of the specified fluid to achieve the proper level Checking the Torque of the Wheel Nuts Service Interval After the first 2 hours After the first 10 hours Every 200 hours WAR...

Page 24: ...not overfill the reservoir with brake fluid Note You can remove the hood access to the reservoir from the front of the machine Figure 20 Figure 20 1 Brake fluid reservoir Starting the Engine 1 Sit on...

Page 25: ...engine let it warm up for about 15 seconds before shifting into gear Avoid racing the engine To ensure optimum performance of the brake system burnish break in the brakes before use To burnish the bra...

Page 26: ...rs in the cargo box or on any attachments The vehicle is meant to have 1 driver and only 1 passenger Ensuring Proper Speed Speed is an important variable leading to accidents Driving too fast for the...

Page 27: ...the proper operation of the utility vehicle to stay alert and to avoid actions or conditions which could result in a accident In the event of a tip over the risk of serious injury or death will be re...

Page 28: ...can even come off of the ground when going over bumps or up a hill This will result in a loss of steering and may lead to the machine tipping over As a general rule position the weight of the load ev...

Page 29: ...not function making it difficult to steer Towing a Trailer with the Machine The machine is capable of pulling trailers and attachments of greater weight than the machine itself Several types of tow hi...

Page 30: ...center off position Momentarily holding and then releasing the control lever in this position will provide hydraulic fluid flow to quick coupler B which provides power down on the rear hitch When rele...

Page 31: ...couplers The pressure not relieved the quick coupler is under pressure The power steering is turning with great difficulty or it is not turning at all The hydraulic fluid level is low The hydraulic fl...

Page 32: ...parking brake Check the condition and tension of the pump drive belt Replace the hydraulic filter After the first 50 hours Inspect opening on filter Change the engine oil and filter Before each use o...

Page 33: ...400 hours Inspect or replace the spark plugs Replace the fuel filter Check the fuel lines and connections Check the front wheel alignment Visually inspect the brakes for worn brake shoes Every 800 hou...

Page 34: ...g brake and remove the key from the ignition switch Remove any load material from the bed or other attachment and insert the safety support on a fully extended cylinder rod before working under a rais...

Page 35: ...nstall or remove it by yourself Use an overhead hoist or get the help of 2 or 3 other people 7 Store the cylinders in the storage clips 8 Engage the hydraulic lift lock lever on the machine to prevent...

Page 36: ...owering of the bed refer to Using the Bed Support page 34 8 Install the lynch pins to the inside ends of the clevis pins Note If the automatic tailgate release has been installed on the bed ensure tha...

Page 37: ...hood upward until the top mounting tabs can be pulled from the frame slots Figure 34 3 Pivot the top of the hood forward and unplug the wire connectors from the head lights Figure 34 4 Remove the hoo...

Page 38: ...nts 2 and steering cylinder 2 as shown in Figure 35 Spring tower 2 as shown in Figure 36 Clutch 1 accelerator 1 brake 1 as shown in Figure 37 U joint 18 as shown in Figure 38 Important When greasing t...

Page 39: ...eaner cover 6 Foam pre cleaner 3 Wing nut 7 Paper element 4 Inner cover 2 Remove the foam pre cleaner by sliding it off the paper element and clean it as follows A Wash the foam pre cleaner in deterge...

Page 40: ...400 hours The spark plugs usually lasts a long time however the plugs should be removed and checked whenever the engine malfunctions or every 400 hours Replace the spark plugs to ensure proper engine...

Page 41: ...rrow points toward the carburetor 6 Tighten the R clamp securing the filter to the frame 7 Wipe up and spilled fuel Inspecting the Fuel Lines and Connections Service Interval Every 400 hours Yearly wh...

Page 42: ...d remove the battery cover from the battery base Figure 47 Figure 47 1 Battery cover 2 Connect a jumper cable between the positive posts of the 2 batteries Figure 48 Note The positive post may be iden...

Page 43: ...e the clamps and terminals separately Connect the cables positive cable first and coat the terminals with petroleum jelly Maintain cell electrolyte level with distilled or demineralized water Do not f...

Page 44: ...ent so inspect the tire condition after an accident Important Check the tire pressure frequently to ensure proper inflation If the tires are not inflated to the correct pressure the tires will wear pr...

Page 45: ...D Check to ensure that the tires turn an equal amount to the right and to the left Note If the tires do not turn equally refer to the Service Manual for the adjustment procedure Cooling System Mainten...

Page 46: ...ll the rubber grip onto the parking brake lever Adjusting the Brake Pedal Service Interval Every 200 hours Note Remove the font hood to make the adjustment procedure easier 1 Remove the cotter pin and...

Page 47: ...ng effort or may damage the pump engine if the belt is overtightened Adjusting the Pump Drive Belt 1 Raise the bed if equipped and position the safety support on the extended lift cylinder to hold up...

Page 48: ...ch pedal 2 9 2 to 9 8 cm 3 63 to 3 87 inches 4 Tighten the jam nuts after you have attained the adjustment 5 Check the 9 2 to 9 8 cm 3 5 8 to 3 7 8 inches dimension after the jam nuts have been tighte...

Page 49: ...e diamond tread floor plate when you apply a 11 3 kg 25 lb force to the center of the pedal Figure 64 Tighten the locknut Figure 64 1 2 54 to 6 35 mm 0 100 to 0 250 inch clearance Note The engine must...

Page 50: ...lling Figure 66 1 Hydraulic strainer 6 Install the strainer 7 Install the hydraulic hose and 90 fitting to the strainer in the same orientation 8 Install and tighten the drain plug 9 Fill the reservoi...

Page 51: ...ut the proper safety support rod may lower unexpectedly Working under an unsupported raised bed may cause injury to you or others Before servicing or making adjustments to the machine shut off the eng...

Page 52: ...the system pressure and ease the disconnection of the quick couplers 11 After completing the operation remove the jumper hoses and connect the hydraulic hoses to both machines Important Check the hydr...

Page 53: ...drain the fuel tank D Start the engine and run it until it stops E Choke the engine F Start and run the engine until it does not start again G Dispose of fuel properly Recycle as per local codes Impor...

Page 54: ...rt starts hard or fails to keep running 9 The spark plug wire is not connected 9 Check the spark plug wire connection 1 Connecting or disconnecting quick couplers is difficult 1 Releive the pressure o...

Page 55: ...Notes 55...

Page 56: ...o damage to seats due to wear or abrasion worn painted surfaces scratched decals or windows etc Parts Parts scheduled for replacement as required maintenance are warranted for the period of time up to...

Reviews: