32
m–1256
1
2
3
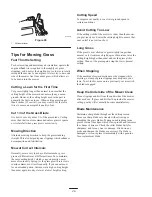
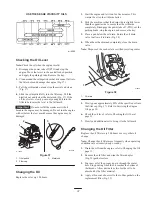
Figure 39
1.
Oil filter
2.
Gasket
3.
Adapter
5. Install the replacement oil filter to the filter adapter.
Turn the oil filter clockwise until the rubber gasket
contacts the filter adapter; then tighten the filter an
additional 1/2 turn (Fig. 39).
6. Fill the crankcase with the proper type of new oil; refer
to Servicing the Engine Oil, page 30.
Servicing the Cooling System
Checking the Radiator Coolant
Danger
Discharge of hot pressurized coolant or touching
hot radiator and surrounding parts can cause
severe burns.
•
Do not remove the radiator cap when the engine
is hot. Always allow the engine to cool at least 15
minutes or until the radiator cap is cool enough
to touch without burning your hand before
removing the radiator cap.
•
Do not touch radiator and surrounding parts
that are hot.
Check the cooling system level daily.
Fluid Type: 50/50 mix of permanent antifreeze (ethylene
glycol) and water
Cooling System Capacity: 128 oz. (3.8 l)
Danger
Rotating shaft and fan can cause personal injury.
•
Do not operate the machine without the covers
in place.
•
Keep fingers, hands and clothing clear of
rotating fan and drive shaft.
•
Shut off the engine and remove the ignition key
before performing maintenance.
Swallowing engine coolant can cause poisoning.
•
Do not swallow engine coolant.
•
Keep out of reach from children and pets.
Caution
1. Position the machine on a level surface, stop the engine,
and set the parking brake.
2. Tilt the seat up and tilt the engine hood forward.
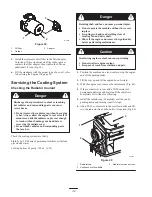
3. With the engine cool, remove the radiator cap (Fig. 40).
4. If the coolant level is low, add a 50/50 mixture of
permanent antifreeze and water until the radiator is
completely full without overflowing.
5. Install the radiator cap. Completely seat the cap by
pushing down and turning it until it stops.
6. Add a 50/50 coolant mix to the overflow bottle and fill
it to the indicator line on the bottle, if required (Fig. 40).
1
2
3
m–5031
Figure 40
1.
Radiator cap
2.
Antifreeze overflow bottle
3.
Radiator core and screen
Summary of Contents for Z287L Z Master
Page 6: ...6 Slope Chart ...
Page 7: ...7 ...
Page 12: ...12 103 2433 106 6571 106 6570 ...
Page 55: ...55 ...

