background image

14-EN

TOOLS AND MATERIALS

Personal protective equipment (ppe)

BEFORE STARTING

PREPARING THE SITE

3

3

4

5

•   Rule

•   Pencil

•   Spirit level

•   Sealer

•   Square

•   Cutter

•   Belts

•   Woodworking tools and materials

•   Rags

•   Wooden spacers

•   Observe all local hydraulic and construction regulations.

•   The following instructions are for qualified personnel with sufficient technical know-how and experience 

to handle the product in total safety.

•   This is a bathtub and must only be used for this purpose. Improper use of the tub shall relieve the produ-

cer from all liability and invalidate the warranty.

•   Unpack the tub and inspect it for damage. Put the tub back in its pack until it is required for installation.

•   Before installing the tub, check access to the final hydraulic connections.

•   Check the type of connection and assembly for the tap.

•   Do not install the tap over the overflow.

•   Make sure the floor and the platform (if mounted) offer a support of at least 800 kg (approximately 1800 

lb) under the tub. Make sure the floor and supporting surface are flat and even�

•   This tub can be installed on the floor or on a raised or recessed platform.

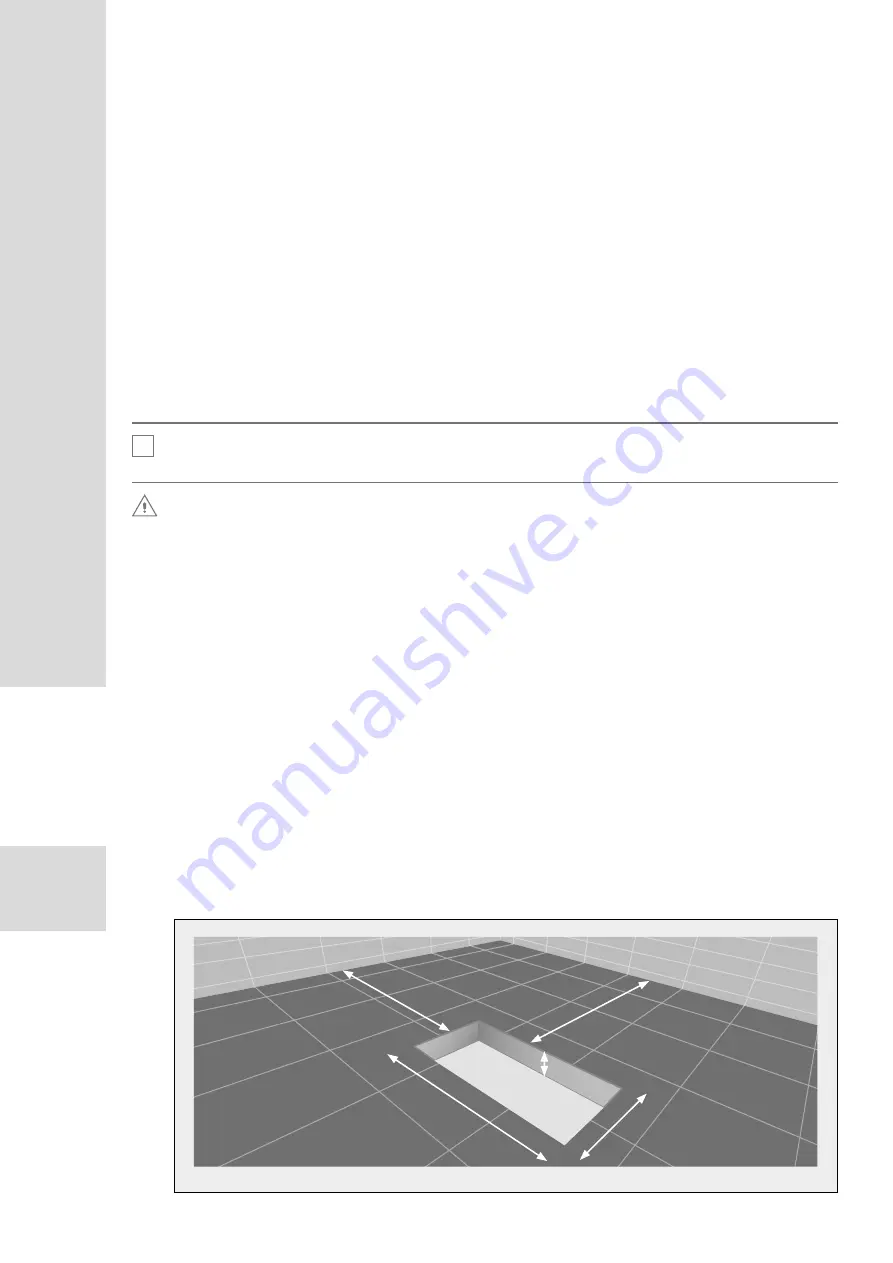
•   If the tub is placed on the floor, drill a hole of the size indicated in the figure below; the trap must be sui-

tably positioned bearing in mind the dimensions of the tub (see Fig. 2).

•   Safety goggles

The tub must be installed by at least two people.

Damage risk� Do not lift the tub using its edge.

N�B�:

CAUTION:

i

Fig. 2

Dimensions in centimetres and inches

min. 69 (27’

’)

min. 30 (12’

’)

30 (12’

’)

40 (16’

’)

12 (5’

’)

Summary of Contents for nauru

Page 1: ...ISTRUZIONI PER L INSTALLAZIONE INSTALLATION INSTRUCTIONS INSTRUCTIONS D INSTALLATION INSTRUCCIONES PARA LA INSTALACI N ANLEITUNGEN F R DEN EINBAU...

Page 2: ......

Page 3: ...ITALIANO 5 ENGLISH 11 FRAN AIS 17 ESPA OL 23 DEUTSCH 29...

Page 4: ......

Page 5: ...ENSIONI DI INGOMBRO 7 UTENSILI E MATERIALI 8 Dispositivi di protezione individuale dpi 8 CONSIGLI PRIMA DI COMINCIARE 8 PREPARAZIONE DEL SITO 8 PREPARAZIONE DELLA VASCA 9 INSTALLAZIONE DELLE TUBAZIONI...

Page 6: ...6 IT...

Page 7: ...pubblica zione Ci riserviamo il diritto di apportare modifiche alle caratteristiche del prodotto imballaggio o disponibilit in qualsiasi momento senza preavviso L illustrazione potrebbe non corrispond...

Page 8: ...no al momento dell installazione Prima dell installazione verificare l accessibilit ai collegamenti idraulici finali Verificare il tipo di collegamento e montaggio adeguato per il rubinetto Non instal...

Page 9: ...care eventuali perdite da tutti i collegamenti Fare scorrere l acqua nella vasca e controllare i collegamenti di scarico per accertare eventuali perdite Riempire la vasca fino al troppopieno e verific...

Page 10: ...ione materiali o lavorazioni Il produttore provveder a sua discrezione a riparare sostituire o ad effettuare gli interventi adeguati nei casi in cui l ispezione evidenziasse un qualunque difetto verif...

Page 11: ...L INFORMATION 13 OVERALL DIMENSIONS 13 TOOLS AND MATERIALS 14 Personal protective equipment ppe 14 BEFORE STARTING 14 PREPARING THE SITE 14 PREPARING THE TUB 15 INSTALLING THE PIPING 15 WARNINGS 16 LI...

Page 12: ...12 EN...

Page 13: ...printed We reserve the right to modify product specifications packaging or availability at any time without prior notice The illustration may not correspond to the product you purchased Please spend a...

Page 14: ...t is required for installation Before installing the tub check access to the final hydraulic connections Check the type of connection and assembly for the tap Do not install the tap over the overflow...

Page 15: ...er s instructions Open the hot and cold water taps and check all the connections for leaks Fill the tub with water and check the drain connections for leaks Fill the tub to the overflow and check for...

Page 16: ...any production material or processing faults The producer shall at its discretion repair replace or perform other appropriate operations if the inspection reveals any faults occurring in normal condi...

Page 17: ...D ENCOMBREMENT 13 OUTILS ET MAT RIELS 14 quipements de protection individuelle EPI 14 RECOMMANDATIONS PR LIMINAIRES 14 PR PARATION DU SITE 14 PR PARATION DE LA BAIGNOIRE 15 INSTALLATION DES TUYAUTERIE...

Page 18: ...18 FR...

Page 19: ...a publication Nous nous r servons le droit d apporter des modifications aux caract ristiques du produit de son emballa ge ou de sa disponibilit tout moment sans pr avis aucun L illustration pr sente d...

Page 20: ...ger ensuite la baignoire dans son emballage en carton jusqu au moment de l installation Avant l installation v rifier l accessibilit aux raccordements hydrauliques finals V rifier le type de raccordem...

Page 21: ...veau de tous les branchements Faire couler l eau dans la baignoire et contr ler les raccordements d coulement afin de constater la pr s ence ou non de fuites ventuelles Remplir la baignoire jusqu au t...

Page 22: ...fauts de fabrication des mat riaux ou des usinages Le constructeur pourra sa discr tion r parer remplacer ou proc der aux interventions appropri s d s lors que le contr le effectu tablirait un quelcon...

Page 23: ...SIONES M XIMAS 7 HERRAMIENTAS Y MATERIALES 8 Dispositivos de protecci n individual dpi 8 CONSEJOS ANTES DE EMPEZAR 8 PREPARACI N DEL SITIO 8 PREPARACI N DE LA BA ERA 9 INSTALACI N DE LAS TUBER AS 9 AD...

Page 24: ...24 ES...

Page 25: ...disponible en el mo mento de la publicaci n Nos reservamos el derecho de modificar las caracter sticas del producto el embalaje o la disponibilidad en cualquier momento sin aviso previo La figura podr...

Page 26: ...art n hasta el momento de la instalaci n Antes de la instalaci n comprobar la accesibilidad a las conexiones hidr ulicas finales Asegurarse de que el tipo de conexi n y montaje sea adecuado para el gr...

Page 27: ...hay p rdidas en todas las conexiones Hacer correr el agua en la ba era y controlar las conexiones de descarga para verificar si hay p rdidas Llenar la ba era hasta el rebosadero y controlar si hay p...

Page 28: ...ta garant a cubre los eventuales defectos de producci n materiales o elaboraciones El fabricante a su criterio reparar sustituir o realizar las intervenciones apropiadas en un plazo de 2 a os Europa o...

Page 29: ...31 ABMESSUNGEN 31 WERKZEUGE UND MATERIAL 32 Pers nliche Schutzausru stung PSA 32 VOR DEM EINBAU 32 VORBEREITUNG DES EINBAUORTES 32 VORBEREITUNG DER BADEWANNE 33 INSTALLATION DER ROHRLEITUNGEN 33 HINW...

Page 30: ...30 DE...

Page 31: ...erzeit und ohne Voranku ndigung nderungen am Produkt an der Ver packung bzw an der Produktverfu gbarkeit vorzunehmen Die Abbildungen k nnten eventuell nicht dem von Ihnen gekauften Produkt entsprechen...

Page 32: ...llung im Karton aufbewahren Vor dem Einbau die Verfu gbarkeit der endgu ltigen hydraulischen Anschlu sse sicherstellen Die Art der Verbindung und den geeigneten Anschluss des Hahnes kontrollieren Den...

Page 33: ...allf llige Leckagen kontrollieren Wasser in die Wanne laufen lassen und die Abflussanschlu sse auf allf llige Leckagen kontrollieren Die Wanne bis zum berlauf anfu llen und allf llige Leckagen kontro...

Page 34: ...nach ihrem Gutdu nken reparieren die Wanne ersetzen oder geeignete Eingriffe veranlassen sofern durch die entsprechende Kontrolle festgestellt wird dass genannte M ngel bei normalen Verwendungsbeding...

Page 35: ......

Page 36: ...rodotto The label code is indispensable for the warranty and for product traceability L tiquette avec le code est n cessaire pour la garantie et la tra abilit du produit La etiqueta con el c digo es i...

Reviews: