background image

58

Connecting TV to other equipment

1

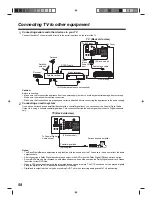
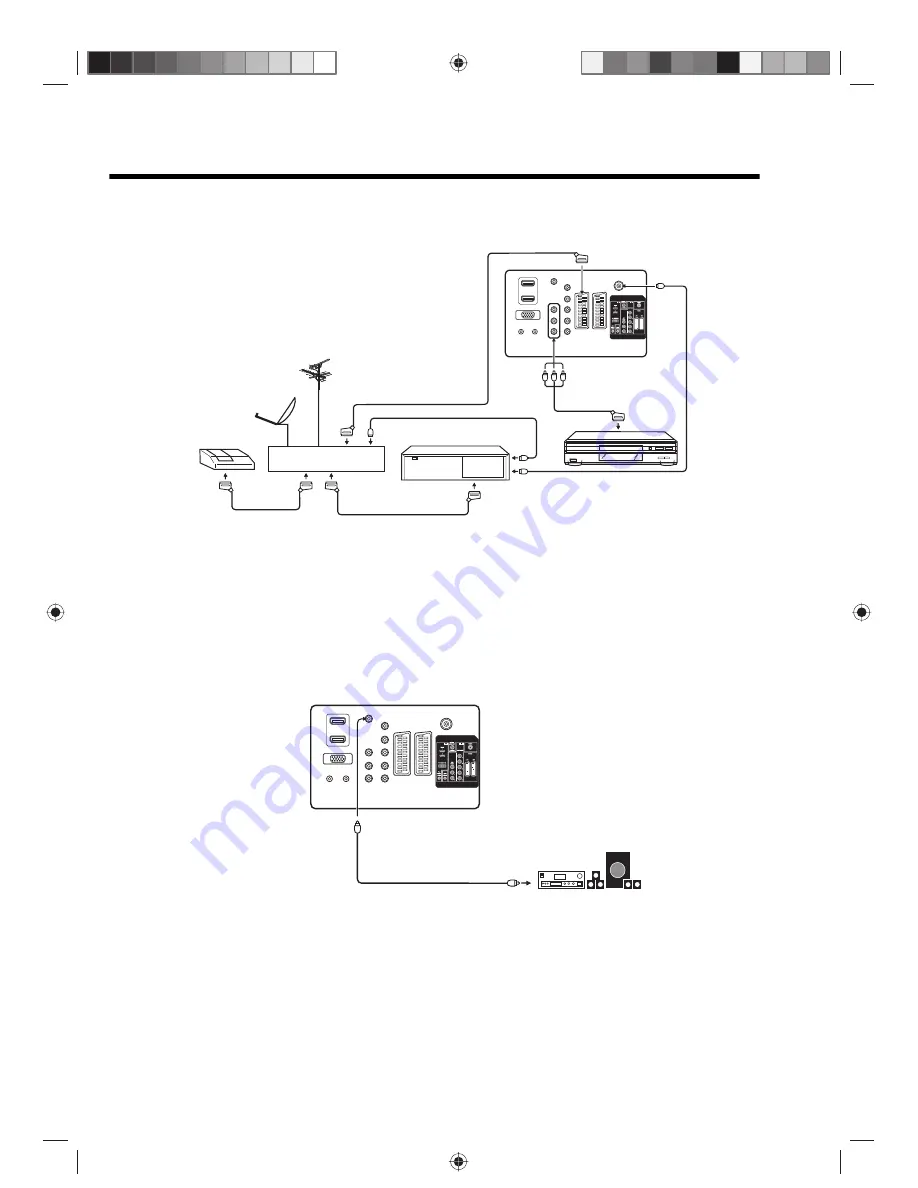
Connecting aerials and other devices to your TV

Connect the cable TV coaxial cable directly to the aerial input jack on the rear of the TV.

Caution: 

Before connecting:
• Make sure to disconnect the appliance from the power supply in order to avoid any potential damage from occurring.
• Make sure to establish the required connection.
• Make sure that connections are properly and correctly attached before connecting the appliances to the power supply.

2

Connecting an audio system 

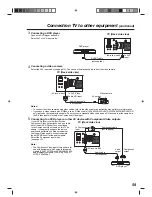
If you have a surround sound amplifier/decoder with a coaxial digital input, you can connect the Coaxial Digital Audio 

Output to it, using a suitable coaxial digital lead. This connection carries the audio signal from the set’s Digital channels 

only.

Notes:

• The Bass/Treble/Balance adjustments only function with the sound from the TV speakers - it does not affect the audio 

output sockets.

• After connecting a Dolby Digital decoder please select in the DVD menu the Dolby Digital (DD) sound track option.
• Several DVDs may be pre-recorded on both sides however only one side contains the Dolby Digital sound track. Please 

insert the correct DVD side.

• When a DTS sound track is played the integrated loudspeakers are mute. The DTS sound can only be played digitally 

using the digital outlet. DTS decoder is necessary for hearing.

• Digital audio output is active only when receiving DVB-T, not when receiving analogue cable TV broadcasting.

(All illustrated cables are not supplied.)

TV  (Back side view)

To Tuner

Antenna

Video recorder

DVD player

Satellite receiver

Decoder

Satellite 

antenna

SCART cable

Audio/video cable

To AV1 input

To AV3 

(Video, 
Audio L/R) 

input

(26-inch model)

Coaxial digital lead 
(not supplied)

TV (Back side view)

Surround sound amplifier

To Coaxial Digital 

Audio  output

(26-inch model)

Summary of Contents for 19DV665DB

Page 1: ...The model number and serial number are on the back of your TV DVD Record these numbers in the spaces below Refer to these numbers whenever you communicate with your Toshiba dealer about this TV DVD Model number _________________ Serial number _________________ OWNER S MANUAL 19DV665DB 19DV667DB 22DV665DB 22DV667DB 26DV665DB ...

Page 2: ...en for long periods of time the image can become permanently engrained in the LCD TV panel and cause subtle but permanent ghost images This type of damage is NOT COVERED BY YOUR WARRANTY Never leave your TV on for long periods of time while it is displaying the following formats or images Fixed Images such as stock tickers video game patterns TV station logos and websites Special Formats that do n...

Page 3: ...de only 27 Common interface DTV mode only 28 Multi audio DTV mode only 29 DVB Subtitle Using the Digital Service DTV mode only 30 EPG Electronic Program Guide DTV mode only 31 EPG Timer DTV mode only 32 Disc 33 Playing a disc 34 Zooming Locating desired scene 37 Marking desired scenes 38 Repeat playback A B playback 39 Changing angles Title selection DVD menu 40 Changing soundtrack language Subtit...

Page 4: ...e unit can fall and you could be injured Contact the shop where you purchased the unit to obtain full details of the measures When a TV stand is used Ensure the unit is fully on the stand and placed in the centre Do not leave the stand doors open You could be hurt as a result of the unit falling or breaking or your fingers being caught or jammed Take extra precautions if you have children Avoid pl...

Page 5: ...sfer of the unit is carried out by two or more people 2 Put the LCD TV on a large level area in a recumbent posture 3 Grab the pedestal stand and lift the display up Confirm the pivot is locked 4 Place the TV on a sturdy level surface that can support the weight of the TV 5 Be sure to secure the TV to a wall stud pillar surface or other immovable structure To secure the TV in this manner 1 attach ...

Page 6: ...utton Preparation Connect the power cable to 230V 50Hz AC outlet a If standby LED is red you may turn off To turn off press TV button 1x and release For confirmation standby LED will turn off b If standby LED is off you may turn on To turn on press TV button 1x and release For confirmation standby LED will change to red and about 1 second later to green c If the TV is currently working press TV bu...

Page 7: ... the DVD Setup menu Activate the Analogue Main Menu 49 11 Exit the Analogue or Digital Main Menu screen Cancel marking 10 38 Exit the DVD Setup Menu screen 49 Play 34 Stop 34 Hold the text page Skip chapter to reverse direction 19 36 Reveal quiz page answers Review playback 19 36 Subpage selection Forward playback 19 36 Teletext enlargement Skip chapter to forward direction 19 36 Fastext TOPtext b...

Page 8: ...ion Dispose of batteries in a designated disposal area Warnings Never throw batteries into a fire Never expose batteries to excessive heat such as sunshine fire or the like Distance of remote control operation The remote control handset will not work properly in the following cases 1 Open the battery compartment cover in the direction of the arrow 2 Install the batteries as shown below ensuring th...

Page 9: ...put Digital output for CD DVD DVB T see page 58 C HDMI input 19 22 inch See page 56 57 HDMI1 HDMI2 input 26 inch See page 56 57 D PC MONITOR input PC See page 56 E PC HDMI AUDIO input See page 56 57 F HEADPHONE jack Plug headphones with a mini plug 3 5 mm into this jack G AV2 S VIDEO VIDEO Audio L R input 19 22 inch Input for analogue A V Signal Composite S Video See page 59 AV3 VIDEO Audio L R in...

Page 10: ...e you turn on the TV DVD However you can restart this process using the Main Menu see page 14 Preparation 1 Press on the unit The Auto Installation menu will appear 2 Press to select Menu Language then press ENTER CH LIST Press to select desired language 3 Press to select Country then press ENTER CH LIST Press to select your country 4 Press to select Auto Tuning then press ENTER CH LIST 5 Press EN...

Page 11: ...de Notes If no buttons are pressed after approximately 60 seconds the Main Menu screen disappears Press EXIT CANCEL to exit the Main Menu screen Quick guide for menu operation Launch the Main Menu screen For example Select Auto Tuning 1 Press INPUT Select ATV then press ENTER CH LIST 2 Press MENU SETUP in ATV analogue TV mode or press DIGITAL MENU in DTV digital TV mode to display the Main Menu sc...

Page 12: ... menu operation continued The Auto Scan process will now begin A progress bar appears to indicate scanning progress Note on the following pages the Main Menu screen can be called in the same way as here Analogue Digital ...

Page 13: ...arriers and the services stored before EXIT CANCEL is pressed will be stored Selecting the video input source 1 Press INPUT to view a signal from another device connected to your TV such as a VCR or DVD player You can select each input source depending on the input jack used to connect your devices 2 Press or the corresponding number on the screen to select a video input source then press ENTER CH...

Page 14: ...put see page 9 Select ATV or DTV see page 11 then press MENU SETUP or DIGITAL MENU 1 Press to select Channel then press ENTER CH LIST 2 Select Auto Tuning then press ENTER CH LIST 3 Select Country then press to select your country 4 Select Start then press ENTER CH LIST The automatic tuning will search for available broadcasts and should store the channels in the correct order During the search th...

Page 15: ...lect the channel that you want to move then press ENTER CH LIST Press to select the position that you want to move the channel to then press ENTER CH LIST Erase Program Press to select the channel that you want to erase then press ENTER CH LIST Lock This feature enables you to lock any channel you choose by pressing ENTER CH LIST then enter the parental lock password If you have not set the parent...

Page 16: ... Press to select the Channel menu then press ENTER CH LIST 3 Press to select the Manual Tuning menu then press ENTER CH LIST 4 In ATV mode 1 Press to select Search then press to start tuning Tuning will stop automatically at next received station 2 If you like to use fine tuning select Fine Press to fine tune See the note on this page 3 To select a colour system for your TV select Colour System Pr...

Page 17: ...st 3 Press to select the desired channel then press ENTER CH LIST to display the selected channel 4 Press EXIT CANCEL to exit Toggle between the list of TV Radio and Data services DTV mode only 1 Press TV RADIO to switch between the TV Radio and Data mode 2 If you press ENTER CH LIST when you are in Radio mode the channel list menu will display the list of Radio services If you wish to view the li...

Page 18: ...4 for details 2 Press again to display the Basic Service Information screen You can verify the signal strength and quality of the selected service here If necessary adjust the direction of the antenna to obtain the maximum signal strength A short event description of an event can also be viewed here For an extended description of an event you can view it in the EPG menu see page 31 3 Press to remo...

Page 19: ...r channel Select Page Press CH until the page you desire appears Or use the 10 Number Buttons to enter the page number If you mistyped something just enter the complete 3 digit wrong page number then enter the desired number again Or press one of the coloured teletext buttons so the page from Fastext TOPtext will be shown Hold Pages Some pages are divided up into subpages by the channel Subpages a...

Page 20: ...EO broadcast signal is received NICAM M1 Illuminates for approx 4 seconds when a NICAM MONO A broadcast signal is received NICAM M1 M2 Illuminates for approx 4 seconds when a NICAM MONO A and MONO B broadcast signal is received NICAM OFF This will be displayed for approx 4 seconds if a NICAM signal is received when the NICAM Off option is selected Stereo reception in Germany STEREO illuminates for...

Page 21: ...e size settings is available only for 16 9 or Real HDMI mode only format Auto picture size Press PIC SIZE repeatedly until Auto appears on screen Picture format setting Press PIC SIZE repeatedly to scroll through the following options 4 3 This mode shows a picture in the standard 4 3 size with black side bars Real HDMI mode only This picture is displayed with original size 16 9 This mode is used w...

Page 22: ...s set to PC mode Hor Position Adjust the image position horizontally Ver Position Adjust the image position vertically Clock Minimize any vertical bars or stripes visible on the screen background Phase This must be adjusted if the PC mode frequency has been set to 60 Hz This will optimize picture quality Auto Adjust Adjust all the PC settings automatically DNR 2 2 In PC mode the DNR option cannot ...

Page 23: ...to 4 3 Default 3 3 Auto 4 3 Default is available only for Auto picture size setting In Component mode Auto 4 3 Default is available only for 480i 576i mode 4 3 16 9 This option selects the default way that a 4 3 signal is shown either as normal 4 3 or expanded in the 16 9 mode according to your preferences Display Setup 2 See page 24 Auto Shut Off On Off This option automatically shuts the TV off ...

Page 24: ...it can be corrected 1 Press DIGITAL MENU or MENU SETUP to display the Main Menu screen 2 Press to select the Setup menu then press ENTER CH LIST 3 Press to select Timer Setting then press ENTER CH LIST 4 If the time displayed on the Channel banner differs from the actual time adjust the time offset with the button until the correct time is shown Note Normally this would be done by selecting Auto 5...

Page 25: ...s 0 9 to key in 0000 This is the factory default password 4 Press to select Parental Lock then press ENTER CH LIST Press to select a desired parental rating then press ENTER CH LIST See Notes Press EXIT CANCEL to return to the normal screen 5 You can also change the password using the Change Password option Press to select Change Password then press ENTER CH LIST and enter a new password 0 to 9 Ma...

Page 26: ... version information 1 Press DIGITAL MENU or MENU SETUP to display the Main Menu screen 2 Press to select the Setup menu then press ENTER CH LIST 3 Press to select the Version menu then press ENTER CH LIST The software version is displayed 4 Press EXIT CANCEL to return to the normal screen ...

Page 27: ... the Main Menu screen 2 Press to select the Setup menu then press ENTER CH LIST 3 Press to select Software Upgrade then press ENTER CH LIST to select Start to check if the TV has the Over Air Download service A progress bar appears to indicate scanning progress 4 If a software upgrade is available from an Over Air Download OAD a message prompt with option to upgrade software from an OAD displays 5...

Page 28: ...ENU SETUP to display the Main Menu screen 2 Press to select the Setup menu then press ENTER CH LIST 3 Press to select Common Interface then press ENTER CH LIST 4 The conditional access module CAM name is displayed Press ENTER CH LIST to view more information 5 On the CI menu options relating to the CAM module is displayed on the screen Press to select an option then press ENTER CH LIST to view det...

Page 29: ...st 1 Press AUDIO SELECT to display the Multi audio menu The Audio mode and Language code will be displayed if available 2 Press to select Audio mode The Audio mode options include Stereo Left Right and L R 3 Press to select a Language Code in the Language code list 4 When different audio tracks are being broadcast from the left and right channels select Left or Right in the Audio mode option 5 Pre...

Page 30: ...o select your desired subtitle language from the available languages 3 To disable DVB Subtitle press repeatedly until Off appears in the Subtitle menu 4 Press EXIT CANCEL to save the subtitle language Using the Digital Service Some services bring you programmes with the Digital Service letting you experience DTV interactively When provided the Digital Service will start when you press Notes When t...

Page 31: ...information for the currently highlighted programme To scroll through the service list from page to page press the Red SLOW or Green PAUSE button Events list Displays events in a grid of rows and columns Each row shows the list of events that are available for the corresponding service in the service list Within each row you can press to navigate through the rest of the events You can easily move ...

Page 32: ...en display the Power indicator on the unit will be lit in orange This is to indicate that an EPG Timer event has begun in standby mode However if it begins during the standby mode with a screen display the Power indicator on the unit will light up green 1 Press GUIDE to display the EPG menu 2 Press to highlight the programme you want to set as a timer event then press ENTER CH LIST Notes If you se...

Page 33: ...e tape on the disc Do not drop or bend the disc Storing disc Store the disc in the case to avoid risk of scratches dirt or damage Do not leave disc exposed to direct sunlight or in hot or humid places Cleaning disc Wipe the disc with a clean dry cloth from centre to edge Do not wipe in circular direction Do not use liquid or aerosol cleaners On Video CDs This unit supports Video CDs equipped with ...

Page 34: ...DVD on the remote control to select the DVD mode The DVD startup screen appears on screen 3 Load the disc in the disc slot with the label side facing forward If the disc has a label Note Do not place a disc which is unplayable in this unit 4 On the TV screen changes to Reading and then playback commences A menu screen will appear on the TV screen if the disc has a menu feature Press to select titl...

Page 35: ...ut it will be replaced by Incorrect Disc Eject the disc and load again making sure the playback side is now facing backward Some discs may not work the resuming facility Some playback operations of DVDs may be intentionally fixed by software producers Since this unit plays DVDs according to the disc contents the software producers designed some playback features may not be available Also refer to ...

Page 36: ...e you press PAUSE the picture advances one frame 2 To resume normal playback press PLAY Notes You can use frame by frame playback for DivX CD The sound is muted during frame by frame playback Playing in slow motion DVD VCD 1 Press SLOW during playback SLOW Slow reverse playback SLOW Slow forward playback 2 Each time you press SLOW SLOW the slow motion speed changes 3 To resume normal playback pres...

Page 37: ...e DVD disc to locate the desired point to playback In the case of VCD Audio CD discs time and track are used to locate the desired point to playback To check the title chapter track and time press 1 Press JUMP during playback or resume stop mode 2 Press to select the Title Track Chapter or Time option 3 Use the Number buttons 0 9 to input the number If you input a wrong number press EXIT CANCEL Re...

Page 38: ...cess You can create up to three markers per disc 1 Press MARKER at the scene where you would like to place the bookmark 2 Press to select a blank marker then press ENTER CH LIST to bookmark the selected scene 3 Press MARKER to close the Bookmark window 4 To save two more bookmarks repeat steps 1 to 3 Returning to the scenes DVD VCD Audio CD 1 Press MARKER during playback or stop mode 2 Press to se...

Page 39: ...hen the SKIP SKIP buttons are pressed A B Repeat playback DVD VCD Audio CD The A B repeat function lets you repeat a specific section between two set points 1 Press REPEAT A B at the point where you would like the playback loop to begin This sets your A point 2 When the playback reaches the point where you would like the playback loop to stop press REPEAT A B again This sets your B point This sect...

Page 40: ...o start playback Notes Depending on the DVD you may not be able to select the title Depending on the DVD a title menu may simply be called a menu or title in the instructions supplied with the disc DVD menu DVD Some DVDs have an encoded menu that allows you to select a specific disc content enable a particular DVD feature e g subtitle or soundtrack language or choose a particular title for multi t...

Page 41: ...peatedly until the desired language is selected The on screen display will disappear after a few seconds In case of Video CD playback Audio type changes are as follows each time you press AUDIO SELECT Subtitles DVD When playing back a disc recorded with subtitles you can select the subtitle language or turn the subtitle off 1 Press SUBTITLE repeatedly during playback until the desired language is ...

Page 42: ... depending on its structure Music recorded by Joliet Recording Specification can be played back The music files recorded by Hierarchical File System HFS cannot be played back Limitations on displaying of the file name The maximum number for display is 15 characters Long file names will be condensed To playback MP3 JPEG DivX CD in the recorded order 1 Use MP3 JPEG DivX software that records data al...

Page 43: ...rowser screen press to select the desired file 2 Press ENTER CH LIST to start playback 3 To stop playback press STOP The unit records the stopped point appears on the screen Press PLAY to resume playback If you press STOP again or unload the disc the unit will clear the stopped point Select Files You can choose the type of file listed in the file browser 1 Press to move the selection highlight to ...

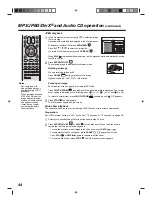
Page 44: ...be used in viewing JPEG files Press CH RTN ZOOM repeatedly until the preferred scale is displayed The current zoom setting is indicated by the following icons 1 x 1 3 2 x 1 5 and 3 x 2 0 To return to normal view press CH RTN ZOOM repeatedly until Off appears 3 Press STOP to end playback The file browser appears on the screen Slide show playback The slide show enables you to view multiple JPEG file...

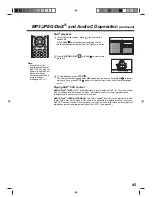
Page 45: ...s STOP again or unload the disc the unit will clear the stopped point Playing DivX VOD content ABOUT DivX VIDEO DivX is a digital video format created by DivX Inc This is an official DivX certified device that plays DivX video Visit www divx com for more information and software tools to convert your files into DivX video ABOUT DivX VIDEO ON DEMAND This DivX Certified device must be registered in ...

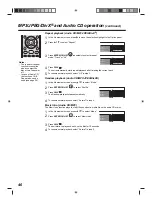
Page 46: ...io CD MP3 JPEG DivX 1 In the file browser screen press to select Mode 2 Press ENTER CH LIST to select Shuffle 3 Press PLAY The Random playback starts automatically 4 To resume normal playback select Normal in step 2 Music Intro Audio CD MP3 The Music Intro function plays the first 10 seconds of a media file on the audio CD or disc 1 In the file browser screen press to select Mode 2 Press ENTER CH ...

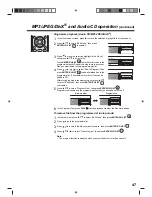
Page 47: ... 5 Press to select Program View then press ENTER CH LIST Program View shows only the programmed files that you have added in Step 4 6 In the Program View press PLAY to start playback via order the files were added To remove file from the programme list in stop mode 1 In Program View press to select Edit Mode then press ENTER CH LIST 2 Press to go to the programme list 3 Press to select the file yo...

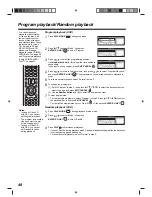
Page 48: ...layback and press ENTER CH LIST The programmes you selected will start to playback in order 5 To resume normal playback select Normal in step 2 6 To change the programme 1 Select Program in step 2 then press to select the track number you want to change and press EXIT CANCEL 2 Use the Number buttons 0 9 to enter the new track number 7 To clear programmes To clear a single programme select Program ...

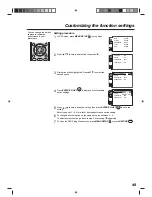
Page 49: ...To close the DVD Setup Menu screen press MENU SETUP or press RETURN Parental Off Set Password Output Interlace DivX R VOD DRC Off QSound On E B L Off TV Screen 4 3 Display On Picture Mode Auto JPEG Interval 5 Seconds Screen Saver On Menu English Subtitle English DivX Subtitle ASCII Audio English OSD English Parental Off Set Password Output Interlace DivX R VOD DRC Off QSound On Menu English Subtit...

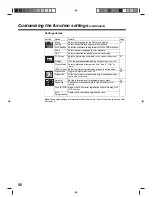
Page 50: ... Select a picture size according to the aspect ratio of your TV 51 Display Turn the operation status display on the screen on or off Picture Mode Select a preferred picture mode from Video Film or Auto JPEG Interval Select the interval time between images in a slide show 52 Night Mode Toggle the night mode on or off 52 Digital Out Select the format for digital audio output corresponding to your au...

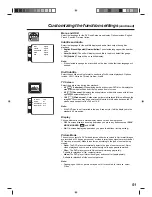
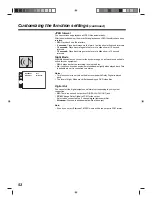
Page 51: ...scan style it will be displayed in the standard 4 3 proportion Display Choose whether to show a status display whenever a button is pressed Off On screen displays do not appear when you press any buttons except PLAY MODE MARKER and JUMP On On screen displays appear when you press the buttons factory setting Picture Mode The source content of a DVD video disc can either be recorded in film format i...

Page 52: ... explosion is toned down slightly when played back This is suitable when it is connected to a stereo Notes This function works only when the disc recorded with Dolby Digital is played back The level of Night Mode may differ depending on DVD video disc Digital Out You can select the digital output sound format corresponding to your system connection Off There is no sound output from DIGITAL AUDIO O...

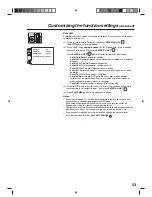
Page 53: ...k Should be viewed only by adults due to graphic sexual material violence or language Level Off Parental Control is inactive all discs can play 3 Press to select from the level 1 to level 8 The limitation will be more severe as the level number is lower Then press ENTER CH LIST 4 Press EJECT to activate Parental control setting Notes If each setup pages 51 54 has been completed the unit can always...

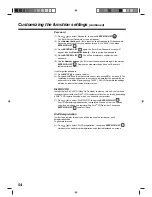
Page 54: ... press VOL on the unit The Initializing message appears on the screen to indicate that the password has been reset to its default factory setting 0000 All DVD Setup related settings will also be reset to their default factory values DivX R VOD In order to play DivX VOD Video On Demand content on this unit you first need to register the unit with your DivX VOD content provider You do this by genera...

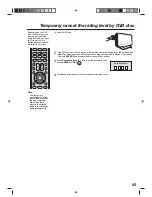
Page 55: ...s ejected When the disc is ejected the original rating level will be set again automatically 1 Load a DVD disc 2 If the DVD disc has been designed to temporarily cancel the Rating level the screen which follows the Reading screen will change depending on which disc is played If you select Yes and ENTER the password input screen will then appear 3 Press Number buttons 0 9 to input the password then...

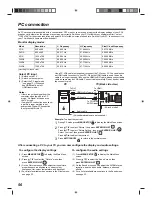
Page 56: ...Use a PC VGA cable not supplied to connect the TV to your PC You can also use an HDMI cable to connect to your PC When the HDMI cable is used the audio cable is no longer required If you use the HDMI to DVI cable please connect audio cable as same way as VGA cable Connect cables carefully Do not bend or break the connector pins Example To adjust the contrast 1 During PC mode press MENU SETUP to di...

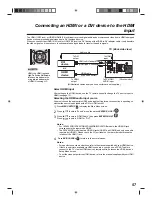
Page 57: ...creen 2 Press to select Sound menu then press ENTER CH LIST 3 Press to select HDMI Audio then press ENTER CH LIST Press to select HDMI or DVI Notes For 19DV665DB 19DV667DB 22DV665DB 22DV667DB models the HDMI IN jack corresponds to the input mode HDMI The 26DV665DG model has two HDMI IN jacks HDMI1 and HDMI2 and only one audio input mode HDMI1 Please check the I O port label on the rear side to det...

Page 58: ...stments only function with the sound from the TV speakers it does not affect the audio output sockets After connecting a Dolby Digital decoder please select in the DVD menu the Dolby Digital DD sound track option Several DVDs may be pre recorded on both sides however only one side contains the Dolby Digital sound track Please insert the correct DVD side When a DTS sound track is played the integra...

Page 59: ...outputs If your DVD player or other device has Component Video output jacks use a suitable set of leads RCA Phono to connect these to the Component Video inputs on this TV as shown it can greatly enhance the picture quality and performance Please remember that you will also need to connect separate leads RCA Phono for the audio signals Select the Component input mode see page 13 Note The Component...

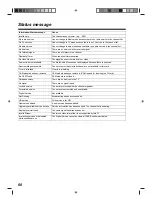
Page 60: ...he selected channel are not available for this card CI card initialized CI card is initializing CAM module has been removed CAM module has been removed CAM is used for inserting the CI card No CAM Found CAM module is not found Database empty There are no services in the TV No signal There are no signal inputs Locked service The service is locked with the channel organizer Scrambled service The ser...

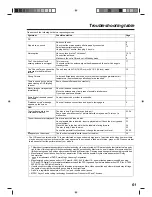
Page 61: ...ections and try auto tuning again 9 DVD The playback picture has occasional distortion The disc is dirty Eject the disc and clean it Some times a small amount of picture distortion may appear This is not a malfunction 33 34 The unit does not start playback No disc is inserted Insert a disc An unplayable disc is inserted Insert a playable disc Check the disc type and colour system Place the disc in...

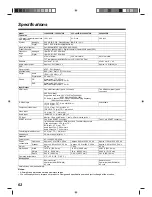
Page 62: ...nector HDCP compliant Suggested scan rates PAL 576i 576p 720p 1080i NTSC 480i 480p 720p 1080i PC Audio 2 channel PCM 32 44 1 48 kHz sampling frequency 16 20 24 bits per sample S Video input Y 1 0 V p p 75 4 pin mini DIN x 1 C 1 0 V p p 75 Unavailable Component video input Y 1 0 V p p 75 pin jack x 1 PB PR 0 7 V p p 75 pin jack x 2 Video input 1 0 V p p 75 pin jack x 1 Audio input 8dBm 50 k pin jac...

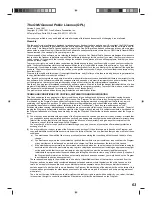
Page 63: ...ative work under copyright law that is to say a work containing the Program or a portion of it either verbatim or with modifications and or translated into another language Hereinafter translation is included without limitation in the term modification Each licensee is addressed as you Activities other than copying distribution and modification are not covered by this License they are outside its ...

Page 64: ...and conditions You may not impose any further restrictions on the recipients exercise of the rights granted herein You are not responsible for enforcing compliance by third parties to this License 7 If as a consequence of a court judgment or allegation of patent infringement or for any other reason not limited to patent issues conditions are imposed on you whether by court order agreement or other...

Page 65: ...ame of author This program is free software you can redistribute it and or modify it under the terms of the GNU General Public License as published by the Free Software Foundation either version 2 of the License or at your option any later version This program is distributed in the hope that it will be useful but WITHOUT ANY WARRANTY without even the implied warranty of MERCHANTABILITY or FITNESS ...

Page 66: ...n the specified values of lead Pb mercury Hg and or cadmium Cd defined in the Battery Directive 2006 66 EC then the chemical symbols for lead Pb mercury Hg and or cadmium Cd will appear below the crossed out wheeled dust bin symbol By participating in separate collection of batteries you will help to assure the proper disposal of products and batteries and thus help to prevent potential negative c...

Page 67: ...J52G0101A SH 09 01 N 52G0101A P69 Back indd 76 1 5 09 3 08 45 PM Printed in China ...

Reviews: